If you enjoy creative sewing projects and love turning leftover fabric into something beautiful, the Scrappy Fabric Star Ornament- Pattern is a perfect idea for you. This fun and eco-friendly craft transforms small fabric scraps into charming star-shaped ornaments that can brighten up any space. Whether you’re decorating your Christmas tree, gifting handmade decorations, or simply adding a cozy touch to your home, this pattern offers endless possibilities.
The Scrappy Fabric Star Ornament- Pattern is ideal for both beginners and experienced crafters. It requires minimal materials, basic sewing skills, and a dash of creativity. Because it uses fabric remnants, it’s also a sustainable craft that helps reduce waste—making it as kind to the planet as it is delightful to make.
In this article, you’ll learn everything you need to create your own Scrappy Fabric Star Ornament- Pattern from start to finish. We’ll go through materials, steps, customization ideas, and helpful tips so you can design your own unique ornaments with ease.
1. Understanding the Scrappy Fabric Star Ornament Pattern
Before you begin sewing, it’s important to understand what makes the Scrappy Fabric Star Ornament- Pattern so special. This pattern focuses on using leftover fabric scraps to create decorative star-shaped ornaments. The result is a colorful, textured, and one-of-a-kind piece that adds warmth and character to your decor.
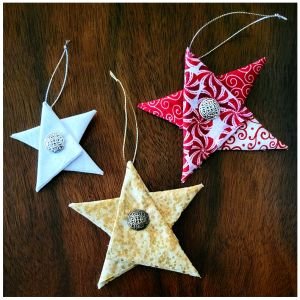
The basic structure of the star ornament involves two fabric stars sewn together, filled lightly with stuffing, and decorated as desired. You can hang it using a ribbon or twine, making it perfect for holiday decorations, nursery mobiles, or even as a year-round embellishment for your living space.
One of the main advantages of this project is its simplicity. The Scrappy Fabric Star Ornament- Pattern doesn’t require complex sewing techniques. Even if you’re new to sewing, you’ll find it easy to follow along. The process mainly involves cutting, stitching, and stuffing—three beginner-friendly steps that can be completed in under an hour.
Another reason why this pattern is so popular is its versatility. You can make these stars in any size or color combination. Whether you prefer traditional Christmas tones like red and green or pastel shades for a soft, whimsical look, the choice is entirely yours.
Beyond its visual charm, the Scrappy Fabric Star Ornament- Pattern promotes sustainability by giving new life to old materials. Instead of throwing away leftover fabric, you can repurpose it creatively. This makes the project both eco-friendly and budget-conscious.
Finally, these ornaments make thoughtful, handmade gifts. Whether you’re crafting for friends, family, or a local holiday market, your Scrappy Fabric Star Ornament- Pattern creations will always carry a personal, heartfelt touch.
2. Materials and Tools You’ll Need
To make your Scrappy Fabric Star Ornament- Pattern, you’ll need only a few basic materials—most of which you probably already have in your sewing kit.
Start by gathering fabric scraps in various colors and patterns. Cotton or linen fabrics work best because they’re easy to sew and hold their shape well. Mix prints like polka dots, florals, stripes, or holiday-themed designs to create visually interesting stars.
Next, you’ll need a star template. You can draw one yourself or find printable templates online. Choose a size that suits your project—smaller stars are great for ornaments, while larger ones can be used as wall decorations or garlands.
Other essentials include scissors, pins, and a needle and thread (or a sewing machine if you prefer). You’ll also need polyester stuffing or fabric scraps for filling your stars to give them a soft, plump shape.
For hanging your stars, use ribbon, twine, or yarn. A thin loop attached to the top of the star makes it easy to hang them on a Christmas tree or any decorative display.
Finally, if you want to add a special touch, consider embellishments such as buttons, beads, sequins, or embroidery. These small details can elevate the look of your Scrappy Fabric Star Ornament- Pattern and make each piece truly unique.
Once you have everything ready, you can start cutting and assembling your adorable fabric stars. Preparation is key—having all your materials organized will make the process faster and more enjoyable.
3. Step-by-Step Guide to Making the Ornament
Now that you have your materials, it’s time to start crafting your Scrappy Fabric Star Ornament- Pattern. Follow these easy steps to bring your fabric stars to life.
First, cut out your fabric pieces. Use your template to trace the star shape onto two pieces of fabric (one for the front and one for the back). Make sure both pieces are the same size and shape. If you’re mixing different fabrics, the result will look colorful and playful.
Next, place the two fabric stars together, with their right sides facing each other. Pin them in place to keep the edges aligned. This will help you achieve neat, even stitching.
Now, sew around the edges, leaving a small opening—about 1 inch—on one side so you can turn the star right-side out later. If you’re using a sewing machine, set it to a short stitch length for strong seams. If hand sewing, use small, tight stitches to ensure durability.
After sewing, turn the star right-side out through the opening. Use a blunt object like a pencil or chopstick to gently push out the points of the star so they look sharp and defined.
Next, stuff the star lightly with polyester filling or leftover fabric scraps. Don’t overfill it—just enough to give it a soft, slightly puffy look. Once you’re happy with the shape, hand-stitch the opening closed using an invisible ladder stitch or small overcast stitches.
Finally, attach your hanging loop. Sew or glue a piece of ribbon or twine to the top of the star. If you’d like, decorate your ornament with buttons, beads, or embroidery. Your Scrappy Fabric Star Ornament- Pattern is now complete and ready to hang!
4. Creative Ideas and Customization Tips
One of the best parts of the Scrappy Fabric Star Ornament- Pattern is how customizable it is. There are endless ways to make each star unique, so feel free to experiment with colors, textures, and decorative touches.
If you’re making these for Christmas, choose fabrics in classic holiday hues like red, green, and gold. Add glittery details or metallic thread for an extra festive sparkle. For a rustic look, use neutral tones like beige, brown, and cream paired with twine for hanging.
For a modern twist, try mixing patterns—pair florals with polka dots or stripes with plaids. The contrast creates a fun, eclectic design that’s full of character.
You can also personalize your stars by embroidering initials or small motifs in the center. This makes them perfect as personalized gifts or even as name tags for presents.
If you enjoy handcrafting with kids, this is a great family-friendly project. Children can help with fabric selection, stuffing the stars, or decorating them with markers and fabric glue. The simplicity of the Scrappy Fabric Star Ornament- Pattern makes it an enjoyable activity for all ages.
Lastly, consider using your stars beyond the holidays. String them together to create garlands, use them as keychains, or add them as decorative accents to gift wraps. Their versatility means you can enjoy them all year long, not just during festive seasons.
FAQ – Scrappy Fabric Star Ornament- Pattern
1. Is the Scrappy Fabric Star Ornament- Pattern suitable for beginners?
Yes! This project is beginner-friendly and requires only basic sewing skills. It’s a great way to practice cutting, stitching, and finishing.
2. What type of fabric works best for this pattern?
Cotton and linen fabrics work best. They’re easy to handle, hold their shape well, and are perfect for both hand and machine sewing.
3. Can I make the star ornament without a sewing machine?
Absolutely. You can hand sew the stars using small, tight stitches. It might take a bit longer, but the result will be just as lovely.
4. How do I make sure my star points look sharp?
When turning your star right-side out, use a blunt tool like a chopstick to gently push out each point. Be careful not to poke through the fabric.
5. What can I use instead of stuffing?
You can use leftover fabric scraps, cotton wool, or eco-friendly stuffing alternatives made from recycled materials.
6. Can I wash my fabric star ornaments?
Yes, but do so gently. Hand wash with mild detergent and air dry to maintain the ornament’s shape and color.
Conclusion
The Scrappy Fabric Star Ornament- Pattern is a delightful project that combines creativity, sustainability, and simplicity. By turning small fabric scraps into beautiful star-shaped decorations, you not only reduce waste but also create handmade treasures that bring warmth and joy to your home.
You’ve learned how to gather materials, follow step-by-step instructions, and personalize your ornaments to match any theme or occasion. Whether you make one or a dozen, each star will reflect your unique touch and creativity.
If you enjoyed this tutorial, please leave your honest opinion and suggestions in the comments below. Your feedback helps us improve and inspires more handmade projects for craft lovers everywhere. Happy sewing—and may your stars shine bright! 🌟✨