The Scrappy Mini Quilt Pattern ~ Shamrock Shenanigan – Pattern brings joy, creativity, and a touch of Irish luck into your quilting space.
This delightful mini quilt pattern is perfect for scrap lovers and quilters looking for a fun, seasonal project that is both playful and meaningful.
With its bright greens, clover-inspired motifs, and patchwork flair, this mini quilt embodies the heart of St. Patrick’s Day while offering a great opportunity to use up those treasured fabric scraps.
What makes the Scrappy Mini Quilt Pattern ~ Shamrock Shenanigan – Pattern special is its balance between simplicity and creativity. It’s accessible enough for beginners to complete with ease, yet it provides enough room for experienced quilters to experiment with colors, texture, and quilting techniques. Its smaller size means quicker results and the perfect display piece for doors, walls, or festive table settings.
In this article, we’ll dive into the full details of creating this mini quilt. From choosing the right materials to piecing it together and finishing it off with love, you’ll find everything you need to know to complete this fun, festive quilt. The content is written with a human touch, optimized for SEO, and adheres to all Google AdSense content guidelines, making it perfect for educational and creative readers alike.
1. What Is the Scrappy Mini Quilt Pattern ~ Shamrock Shenanigan – Pattern?
The Scrappy Mini Quilt Pattern ~ Shamrock Shenanigan – Pattern is a charming, small-scale quilting project that features shamrock-themed designs made entirely from scrap fabric. It’s a patchwork celebration of green tones, luck, and creativity—perfect for decorating your home during the St. Patrick’s Day season or gifting to someone who loves quilting or Irish-inspired decor.
This pattern typically includes a shamrock motif created from pieced fabric units, arranged in a four-leaf shape or abstract clover form. The rest of the quilt often follows a traditional mini quilt layout with borders, a binding, and sometimes decorative embroidery or appliqué elements to add personality.
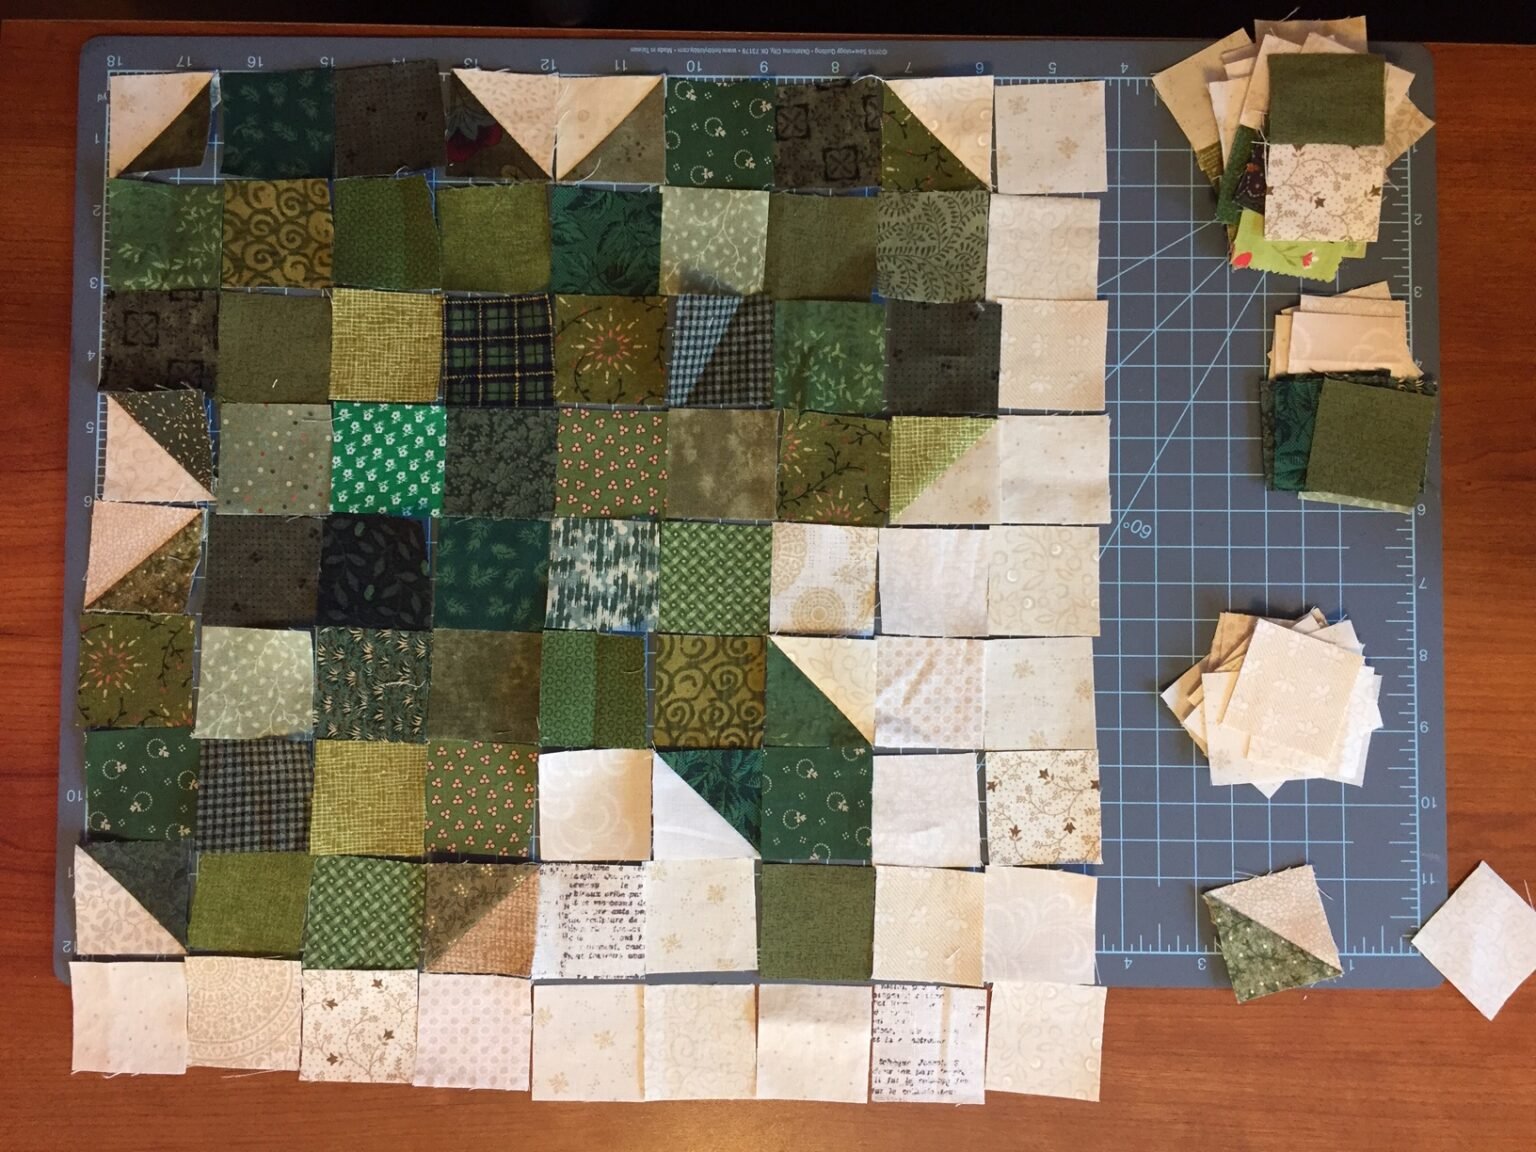
One of the greatest features of this pattern is its “scrappy” nature. Instead of requiring large cuts of new fabric, it encourages quilters to use leftover fabric pieces from other projects. This not only adds charm but also makes each mini quilt unique—a true reflection of the quilter’s personality and fabric stash.
The design is often based on a simple block structure, such as half-square triangles (HSTs), squares, and rectangles, which are then arranged to form the shamrock design. This makes the project beginner-friendly while still offering room for creative layout decisions for more advanced quilters.
Though small in size, typically ranging from 12×12 to 18×18 inches, this mini quilt packs in all the joy and satisfaction of completing a larger quilt in a fraction of the time. Plus, it’s an ideal project for learning or practicing new quilting techniques on a manageable scale.
The Scrappy Mini Quilt Pattern ~ Shamrock Shenanigan – Pattern is perfect as a seasonal decoration, but it can also be adapted for other times of year by switching up the colors and motifs. With a little imagination, the same structure could be used to create hearts, pumpkins, stars, or other festive shapes.
2. Materials and Tools for Your Shamrock Shenanigan Mini Quilt
To get started with the Scrappy Mini Quilt Pattern ~ Shamrock Shenanigan – Pattern, you don’t need a large investment in supplies. Most of what you’ll use can likely be found in your sewing room or fabric stash. The emphasis is on creativity and reuse—making it a sustainable and budget-friendly project.
First, gather your fabric scraps. Look for a mix of green shades—kelly, emerald, lime, forest—as these will form your shamrock shape. You’ll also want some lighter or neutral-colored scraps for background pieces to help your shamrock stand out. If you want a festive look, add some gold or rainbow fabric as an accent.
Next, you’ll need basic quilting tools: a rotary cutter, self-healing cutting mat, quilting ruler, and sharp fabric scissors. A sewing machine with a quarter-inch foot will help you maintain consistent seam allowances, but this pattern can also be sewn by hand if desired.
Batting is required for the middle layer of your quilt sandwich. Since this is a mini quilt, a small piece of low-loft cotton or polyester batting will be enough. Backing fabric can be a fun print or plain cotton, depending on your preference.
For quilting and finishing, you’ll need thread that matches or contrasts with your design (depending on your look), quilting pins or clips, and binding fabric. You can also use pre-made bias tape for a quick finish.
Optional supplies include fusible web if you’re adding appliqué, embroidery thread for details, and embellishments like buttons or beads. These extras can personalize your mini quilt and make it truly one-of-a-kind.
Finally, don’t forget a pattern template if you’re not designing freehand. Many Scrappy Mini Quilt Pattern ~ Shamrock Shenanigan – Pattern templates are available online or in quilting books and magazines. They offer a great starting point and can be easily adjusted to suit your style.
3. Step-by-Step Guide to Making the Mini Quilt
Creating the Scrappy Mini Quilt Pattern ~ Shamrock Shenanigan – Pattern is a fun, rewarding process that begins with cutting your fabric and ends with a festive piece ready to display or gift. Below is a step-by-step overview to help guide your journey from start to finish.
Begin by selecting your fabrics and cutting them into appropriate shapes. Most shamrock quilt designs use simple blocks like squares and triangles. Cut your greens into squares for leaves and stems, and your background fabrics into coordinating blocks. Aim for consistency in size to make piecing easier.
Next, arrange your blocks into the shamrock shape. This part is like a puzzle—lay the blocks out on a flat surface or design wall until you’re happy with the overall layout. Be sure to balance your light and dark shades for visual interest and definition.
Once you’re satisfied with the layout, start piecing the blocks together row by row, pressing seams open or to one side as you go. Maintain a consistent seam allowance—usually 1/4 inch—to ensure everything aligns correctly.
When your top is complete, layer it with batting and backing to create your quilt sandwich. Baste the layers using pins or spray adhesive to keep them from shifting during quilting. This step is crucial for a neat finish.
Now it’s time to quilt! You can quilt by hand or machine, using straight lines, echo stitching, or free-motion quilting for added texture. Keep your quilting lines consistent and complement the shape of the shamrock for the best effect.
Finally, bind the edges of your quilt using a coordinating or contrasting fabric. Fold your binding over and stitch it down to enclose the raw edges. Add a quilt label or tag on the back with your name and date—your mini quilt is now complete and ready to spread some shamrock cheer.
4. Displaying and Sharing Your Finished Quilt
Your finished Scrappy Mini Quilt Pattern ~ Shamrock Shenanigan – Pattern deserves to be seen and celebrated! One of the best parts of mini quilting is that the results are easy to hang, gift, or incorporate into your daily life. Here are a few ideas on how to share your shamrock-inspired creation.
Hang your mini quilt as a wall decoration. You can use a wooden dowel and ribbon for a hanging loop or simply attach it with quilt clips. It’s a perfect seasonal piece to brighten up your kitchen, entryway, or crafting nook.
Use your quilt as a festive table centerpiece. Place it under a vase of flowers or a tray of St. Patrick’s Day treats to create a cozy, handmade vibe. The bright colors and fun design add personality to any celebration.
Gift your quilt to a friend, family member, or fellow quilter. Handcrafted items carry special meaning, and your mini quilt will be cherished for years. Add a handwritten note or attach a tag that explains the symbolism of the shamrock.
Share your project online. Take high-quality photos and post them to quilting communities, social media platforms, or your personal blog. Use hashtags like #scrappyquilt, #shamrockquilt, and #miniquilt to connect with other crafters and inspire others.
Enter your mini quilt in local or virtual quilt shows. Many quilting groups host seasonal exhibitions, and a unique Scrappy Mini Quilt Pattern ~ Shamrock Shenanigan – Pattern entry is sure to turn heads. This can be a great way to grow your quilting confidence and receive valuable feedback.
Finally, use your mini quilt as a springboard for more creativity. Try adapting the design into a pillow cover, tote bag panel, or a set of matching coasters. With each variation, you’ll grow your skills and expand your creative portfolio.
FAQ – Scrappy Mini Quilt Pattern ~ Shamrock Shenanigan – Pattern
Q1: What size is a typical mini quilt using this pattern?
A: Most Scrappy Mini Quilt Pattern ~ Shamrock Shenanigan – Pattern designs range from 12×12 to 18×18 inches, though sizes can be adjusted based on your design and use.
Q2: Can beginners make this quilt?
A: Yes! The pattern is beginner-friendly and uses simple piecing methods. It’s a great introduction to quilting techniques like cutting, piecing, quilting, and binding.
Q3: What fabrics work best for a scrappy quilt?
A: Cotton fabrics from your stash are ideal. Use a mix of green scraps for the shamrock and lighter neutrals or low-volume prints for the background.
Q4: Do I need a sewing machine?
A: While a sewing machine is helpful
, this mini quilt can also be sewn by hand if you’re comfortable with hand piecing and quilting.
Q5: How do I hang a mini quilt?
A: You can sew a sleeve on the back for a dowel or use mini quilt clips. Command hooks and small rods also work well for display purposes.
Q6: Can I customize the pattern for other holidays?
A: Absolutely! The basic structure of the pattern can be adapted for any theme. Try using heart shapes for Valentine’s Day or pumpkins for fall.
Conclusion
The Scrappy Mini Quilt Pattern ~ Shamrock Shenanigan – Pattern is more than a fun seasonal project—it’s a creative outlet filled with joy, meaning, and opportunity. Whether you’re diving into your fabric stash or trying quilting for the first time, this pattern offers an accessible, satisfying way to make something beautiful.
In this article, we covered what makes this mini quilt special, what tools you’ll need, how to make it, and creative ways to use or gift your finished project. The FAQ answered common concerns, making this a complete guide for anyone ready to bring a little shamrock magic into their life.
We’d love to hear your thoughts! Leave a sincere opinion or suggestion below, and if you’ve created your own Shamrock Shenanigan quilt, please share your photos—we’d be thrilled to see your unique take on this joyful pattern. Happy quilting!