The Scrumptious Brick Layer Cake Quilt – Pattern is an exciting and visually captivating quilting project.
With its unique design that mimics the structure of a brick wall, this quilt is sure to impress anyone who lays eyes on it.
Whether you are an experienced quilter or a beginner looking to step into the world of quilting, this pattern offers an approachable yet stunning result.
The beauty of the Scrumptious Brick Layer Cake Quilt – Pattern lies in its simplicity, creating a cozy and striking addition to any home.
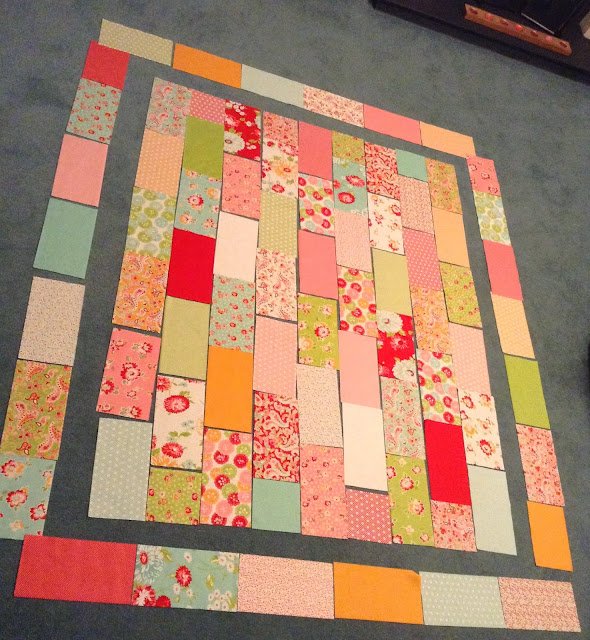
The name “brick layer” in the title is inspired by the way the quilt pieces are arranged, much like the layers of bricks in a wall. This pattern allows quilters to experiment with various colors and textures, resulting in an eye-catching design that combines boldness and subtlety. The combination of various fabric strips or “layer cakes” gives the quilt its layered effect, making it a fun project to work on.
If you’re interested in creating a quilt that showcases geometric simplicity and elegance, the Scrumptious Brick Layer Cake Quilt is the perfect choice. In this article, we will dive into the details of this quilt pattern, including the materials needed, step-by-step instructions for creating the quilt top, and tips for piecing and quilting the design. We’ll also explore the best ways to customize this pattern to make it truly your own.
1. Materials Required for the Scrumptious Brick Layer Cake Quilt
Before diving into the Scrumptious Brick Layer Cake Quilt – Pattern, it’s important to gather all the necessary materials. Having the right fabrics and tools on hand will make your quilting experience smoother and more enjoyable.
Fabric Layer Cakes: The foundation of this quilt pattern is fabric layer cakes, which are pre-cut bundles of fabric squares, typically 10″ x 10″. These squares make the cutting process easier and more efficient. You can choose layer cakes that feature coordinated colors or patterns, or mix and match to create a more eclectic look. The choice of fabrics is entirely up to you, but many quilters choose solid colors, florals, or prints that complement each other.
Background Fabric: For the background of the quilt, you’ll need a fabric that contrasts or complements the colors of the layer cakes. Typically, a neutral fabric like white, cream, or light gray is used for the background, but you can choose any color that suits your design preferences.
Quilt Batting: The batting is the middle layer of the quilt that provides warmth and softness. There are many types of batting available, including cotton, polyester, or a blend of both. Select the batting that feels the best to you and works with your chosen fabrics.
Quilt Backing Fabric: This fabric will be used to create the back of the quilt. You can choose a fabric that matches or contrasts with the quilt top. It’s important to have enough backing fabric to cover the entire quilt once it is finished.
Thread: A good quality quilting thread is essential for stitching the quilt together. Choose a thread color that matches or complements your fabrics. For quilting, cotton threads are often preferred because they provide durability and a smooth finish.
Quilting Tools: You will also need the following tools: quilting ruler, rotary cutter, cutting mat, quilting pins, and fabric scissors. These tools are necessary for accurately cutting your fabric and piecing your quilt together.
With all these materials in hand, you’re ready to begin your quilting journey and start crafting your Scrumptious Brick Layer Cake Quilt – Pattern!
2. Step-by-Step Instructions for Creating the Quilt Top
Once you’ve gathered your materials, it’s time to begin constructing your Scrumptious Brick Layer Cake Quilt – Pattern. Below are the steps for piecing the quilt top, starting with the cutting process.
Step 1: Cutting the Fabric
Start by cutting the fabric layer cakes into strips. For this pattern, you’ll need to cut the layer cakes into 2.5-inch strips. You can arrange these strips according to your desired design or use a pre-arranged pattern. Once your strips are cut, set them aside for the next step.
Step 2: Arrange the Strips
Lay out the strips in rows, arranging them in a brick-like pattern. The strips should be placed in a staggered fashion, similar to how bricks are arranged in a wall. Make sure to mix and match the colors and patterns to create a balanced look. This is the step where you can get creative with your design!
Step 3: Sew the Strips Together
Once you are satisfied with the arrangement of the strips, it’s time to sew them together. Using a quarter-inch seam allowance, sew the strips together to form long rows. Be careful to maintain a consistent seam allowance throughout to ensure the rows fit together evenly.
Step 4: Press the Seams
After sewing the strips together, press the seams flat. This step is important for ensuring that the quilt top lies flat and that your seams are well-pressed for the best possible finish.
Step 5: Join the Rows
Now, sew the rows together. Align the seams of the rows carefully, and sew them using a quarter-inch seam allowance. This will complete the quilt top, and you should have a large brick-layer pattern by now.
Step 6: Trim the Quilt Top
Once your rows are sewn together, it’s important to trim any excess fabric to make sure the quilt top is square and even. Use a quilting ruler and rotary cutter to trim any uneven edges. The result will be a neat, symmetrical quilt top ready for quilting.
3. Quilting the Scrumptious Brick Layer Cake Quilt
After piecing together the quilt top, the next step is quilting the layers together. Quilting adds texture and security to your quilt, ensuring that the layers are held together.
Step 1: Prepare the Quilt Sandwich
Place your quilt backing fabric on a flat surface, and then lay the batting on top of the backing fabric. Finally, place the quilt top on top of the batting. Make sure everything is smooth and free of wrinkles. Pin the layers together to hold them in place as you begin quilting.
Step 2: Select a Quilting Pattern
There are several quilting patterns you can choose from to finish your quilt. Some quilters prefer simple straight-line quilting, while others enjoy more complex patterns like stippling or free-motion quilting. For a Scrumptious Brick Layer Cake Quilt, a grid or diagonal pattern can work well to complement the geometric design of the quilt.
Step 3: Begin Quilting
Using a sewing machine or by hand, begin quilting the layers together. Start from the center of the quilt and work your way outwards. Be sure to keep the quilting lines straight and evenly spaced.
Step 4: Trim the Edges
Once the quilting is complete, trim any excess batting and backing fabric around the edges of the quilt. This will give your quilt a clean, finished look.
Step 5: Add the Binding
To finish the quilt, attach the quilt binding around the edges. The binding is usually made from fabric strips that are sewn together and then folded over the edges of the quilt. Sew the binding in place, making sure the corners are neatly mitered.
Step 6: Final Touches
After the binding is attached, your Scrumptious Brick Layer Cake Quilt is complete! Give it a final press with an iron to smooth out any wrinkles and admire your handiwork.
4. Tips for Customizing the Scrumptious Brick Layer Cake Quilt
The Scrumptious Brick Layer Cake Quilt – Pattern offers plenty of opportunities for customization, allowing you to create a quilt that is uniquely yours. Here are a few tips to make the quilt even more personal:
1. Experiment with Color Combinations
Don’t be afraid to play with different color schemes. You can create a quilt that is bold and vibrant or one that has a more subtle, monochromatic look. The possibilities are endless!
2. Use Prints and Solids Together
Combining solid fabrics with printed fabrics can add depth and interest to your quilt. The contrast between the prints and solids will make the Scrumptious Brick Layer Cake Quilt even more visually striking.
3. Add Embellishments
You can also add embellishments like embroidery, applique, or fabric paint to make the quilt even more unique. Embellishments can bring personality to the quilt, turning it into a true work of art.
4. Adjust the Size
If you want to make a smaller or larger version of the quilt, adjust the number of strips or rows. You can also experiment with the size of the layer cakes if you want a more compact or more expansive design.
5. Play with Layouts
Try arranging the strips in different ways to create a variety of patterns. You could create a zig-zag pattern, a diamond design, or even a more random arrangement for a completely unique quilt.
6. Add a Personal Touch
To make the quilt even more special, consider adding a label or inscription to the back of the quilt. This could include the date, the recipient’s name, or a meaningful message.
FAQ About the Scrumptious Brick Layer Cake Quilt Pattern
1. What is a layer cake in quilting?
A layer cake is a pre-cut bundle of fabric squares, usually 10” x 10”. These squares make it easy to quickly get started on a quilt without having to cut the fabric yourself.
2. Can I use a different size fabric instead of a layer cake?
Yes, you can cut your own fabric into squares of any size you prefer, but using a pre-cut layer cake saves time and ensures consistency in the size of your squares.
3. What is the best quilting technique for this pattern?
Straight-line quilting works well for the Scrumptious Brick Layer Cake Quilt – Pattern, as it complements the grid-like structure of the brick design. You could also try free-motion quilting for a more intricate effect.
4. How do I make the quilt larger or smaller?
To make the quilt larger, simply add more rows or columns of hexagons. To make it smaller, reduce the number of hexagons used.
5. What is the recommended batting for this quilt?
For a cozy quilt, cotton batting is a good option. However, polyester batting can also work for a quilt that holds its shape well and provides extra warmth.
Conclusion
The Scrumptious Brick Layer Cake Quilt – Pattern is a beautiful and customizable quilting project that results in a stunning finished product. Whether you’re a beginner or an experienced quilter, this pattern offers plenty of opportunities for creativity. From selecting your fabrics to quilting and finishing the edges, this project will provide hours of enjoyment and a gorgeous quilt that you can be proud of. Share your thoughts and experiences with us in the comments below!