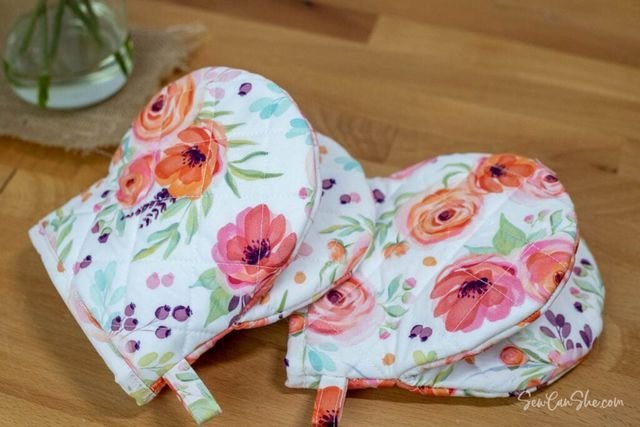
Looking for a fun, fast, and practical sewing project? This Sew Mini Oven Mitts – Pattern is perfect for both beginners and experienced sewists who enjoy crafting useful items with a personal touch. Mini oven mitts are not only adorable, but they also serve a functional purpose in the kitchen. Whether you’re using them to handle hot pots or gifting them as part of a handmade kitchen set, these mitts are a delightful project to add to your sewing list.
The beauty of the Sew Mini Oven Mitts – Pattern is that it uses minimal fabric, which makes it an excellent scrap-busting project. You can mix and match colors, textures, or even holiday-themed fabrics to create seasonal or custom mini mitts. They’re also great for kids to use in play kitchens or for lightweight cooking tasks under supervision.
In this guide, we’ll walk you through how to make your own Sew Mini Oven Mitts – Pattern step by step. From gathering materials to sewing, padding, and finishing touches, you’ll learn the process from start to finish. Plus, we’ll explore creative ideas to personalize your project, answer common questions, and help you sew with confidence.
1. Getting Started: Materials and Preparation
Before you begin sewing your Sew Mini Oven Mitts – Pattern, it’s important to gather all the supplies you’ll need. Preparation is key to a smooth and successful project.
First, choose your fabric. Quilting cotton is a popular choice because it’s easy to work with and comes in countless prints and colors. You’ll need two types of fabric: one for the outer layer and one for the lining. Cotton is breathable and heat-resistant, making it ideal for mitts.
You’ll also need heat-resistant batting, such as Insul-Bright or a similar thermal lining, to protect your hands from heat. If you don’t have that, you can layer multiple pieces of cotton batting for extra thickness, but it’s best to use specialized batting for real heat protection.
Other tools you’ll need include fabric scissors, pins or clips, a sewing machine, coordinating thread, and an iron. A quilting ruler and rotary cutter can make your cuts more precise, but they’re not strictly necessary.
Download or draw your Sew Mini Oven Mitts – Pattern template. The pattern should include both front and back mitt shapes, typically slightly rounded to fit the hand comfortably. Make sure the size suits your intended use—small enough for control but large enough to provide coverage.
Pre-wash and press your fabric before cutting. This ensures that any shrinkage occurs before the pieces are sewn, preventing warping later on. It also helps remove any chemicals or residue from the manufacturing process.
Once you have your fabric, batting, and pattern pieces ready, you’re all set to move on to cutting and assembling your mini oven mitts.
2. Cutting, Layering, and Sewing the Mitts
Now that everything is prepared, it’s time to dive into the construction of your Sew Mini Oven Mitts – Pattern. This part of the process is where your project starts to come to life.
Begin by cutting out your fabric using the pattern. For each mitt, you’ll need two pieces for the outer fabric, two for the lining, and two of the thermal batting. Make sure each layer matches in size and shape to ensure a snug fit when sewing.
Layer your mitts in a sandwich-style setup. Place one piece of lining fabric face down, followed by a piece of thermal batting, and then one outer fabric piece face up. Pin or clip the layers together to prevent shifting while sewing.
Quilt the layers together by sewing straight lines or decorative stitching across the mitt shape. This step is important because it holds the batting in place and prevents it from bunching during use or washing. You can follow the curve of the mitt or create a simple grid pattern for a clean look.
Repeat the layering and quilting process for the second half of the mitt. Once both sides are quilted, place them right sides together, aligning the edges carefully. Pin all around the edges, leaving the wrist opening unsewn.
Using a 1/4″ or 3/8″ seam allowance, sew around the curve of the mitt. Be sure to backstitch at the start and end for durability. Clip the curves without cutting into the seam to help the fabric lie flat once turned right side out.
Turn the mitt right side out, pushing out the curves gently with a blunt tool like a chopstick or the back of a pen. Press the seams flat with an iron to smooth everything out. You’ll already see the mini mitt taking shape.
3. Finishing the Edges and Adding Details
With the main structure of your Sew Mini Oven Mitts – Pattern complete, it’s time to add those final details that make your project look polished and professional.
Begin by finishing the wrist opening. You can do this by folding the raw edge inside about 1/4″ to 1/2″, pressing it flat, and topstitching around the edge. This helps prevent fraying and gives the mitt a clean edge.
If you want a more decorative finish, consider adding bias tape or a fabric binding around the opening. Bias tape adds color contrast and also strengthens the wrist edge for durability.
Want to hang your mini mitts? Add a small fabric loop on the inside seam of the opening before sewing it closed. This is a great way to display them in the kitchen or keep them handy next to your oven or microwave.
Another customization option is embroidery. You can stitch initials, kitchen icons like utensils or fruits, or fun sayings like “Hot Stuff” or “Bite Me.” Hand embroidery adds a personal touch and makes the mitts more unique.
If you’re making a set, consider mixing and matching fabrics for each mitt, or sewing themed sets—floral for spring, checkered for summer, holiday prints for winter. Sets make great gifts for housewarmings, holidays, or bridal showers.
Don’t forget to test your mini oven mitts after completion. While they are decorative and adorable, make sure the insulation is adequate for handling hot cookware, especially if they’ll be used regularly.
4. Creative Uses and Gift Ideas
The Sew Mini Oven Mitts – Pattern isn’t just for the kitchen. These little mitts can be used and gifted in many creative ways that make them both practical and fun.
Mini oven mitts make wonderful housewarming gifts, especially when paired with a matching apron or handmade potholder. Add in a few cookie cutters or a wooden spoon for a themed kitchen bundle.
These mitts are also ideal for kids who love to help in the kitchen. Make a smaller version of the Sew Mini Oven Mitts – Pattern using playful, child-safe fabrics for supervised play or real use when baking with adults.
Create seasonal versions to decorate your kitchen year-round. Use Halloween prints in October, snowflakes in December, or citrus patterns for summer. These small details bring seasonal joy without taking up much space.
Mini mitts can be turned into lavender sachets by replacing the thermal batting with a mix of batting and dried lavender. Hang them in closets or place in drawers for a pleasant scent and a cute look.
For crafters who sell handmade items, Sew Mini Oven Mitts – Pattern creations are quick to make and cost-effective. Their small size makes them ideal for craft fairs, especially when bundled in themed kitchen sets.
Lastly, you can use them as decorative accents on your table for special meals. Place them under hot dishes or even use them as fun napkin holders for a cozy, handmade touch to your dining presentation.
FAQ: Sew Mini Oven Mitts – Pattern
Q1: Are mini oven mitts safe for high heat?
Mini oven mitts made with heat-resistant batting like Insul-Bright are generally safe for moderate heat. However, they are best used for lightweight kitchen tasks, not for handling heavy or extremely hot items directly from the oven.
Q2: What size should a mini oven mitt be?
A typical mini oven mitt measures around 5″ x 7″. You can adjust the pattern depending on the size of your hand or purpose—smaller for decoration, slightly larger for functionality.
Q3: Can I wash my mini oven mitts?
Yes, they are washable if you use cotton fabric and batting. Hand washing is preferred, but they can be machine washed on a gentle cycle. Avoid using high heat in the dryer.
Q4: What’s the best batting to use for heat resistance?
Insul-Bright is a popular choice because it’s specifically designed for heat resistance. If not available, double-layered cotton batting can work for decorative or light-use mitts.
Q5: Can I hand-sew the entire mini oven mitt?
Yes, but it may take longer. Use strong, even stitches and double-thread your needle for extra durability, especially when sewing through multiple layers.
Q6: Are mini oven mitts good for beginners?
Absolutely! The Sew Mini Oven Mitts – Pattern is perfect for beginners. It’s small, manageable, and teaches essential sewing skills like layering, quilting, and binding.
Conclusion
Creating your own Sew Mini Oven Mitts – Pattern is a joyful way to blend creativity with practicality. These tiny mitts pack a lot of personality and function into a compact, beginner-friendly project. Whether you make them as gifts, for your own kitchen, or as partof a larger crafting hobby, they’re a delightful addition to any handmade collection.
We hope this guide has inspired you to pick up your fabric and thread and start stitching your own mini oven mitts. If you’ve tried the pattern or have ideas to share, please leave your sincere opinion and suggestions below. Your feedback helps this creative community continue to grow and improve.