Taking your machine on the go? Then you’ll definitely want to consider a sewing machine travel bag – pattern that keeps your equipment safe, organized, and stylish. Whether you’re headed to a quilting class, a sewing retreat, or just need to store your machine with care, a well-designed travel bag makes all the difference.
Unlike regular bags or cases, a sewing machine travel bag – pattern is crafted specifically to accommodate the size, weight, and accessories of a sewing machine.
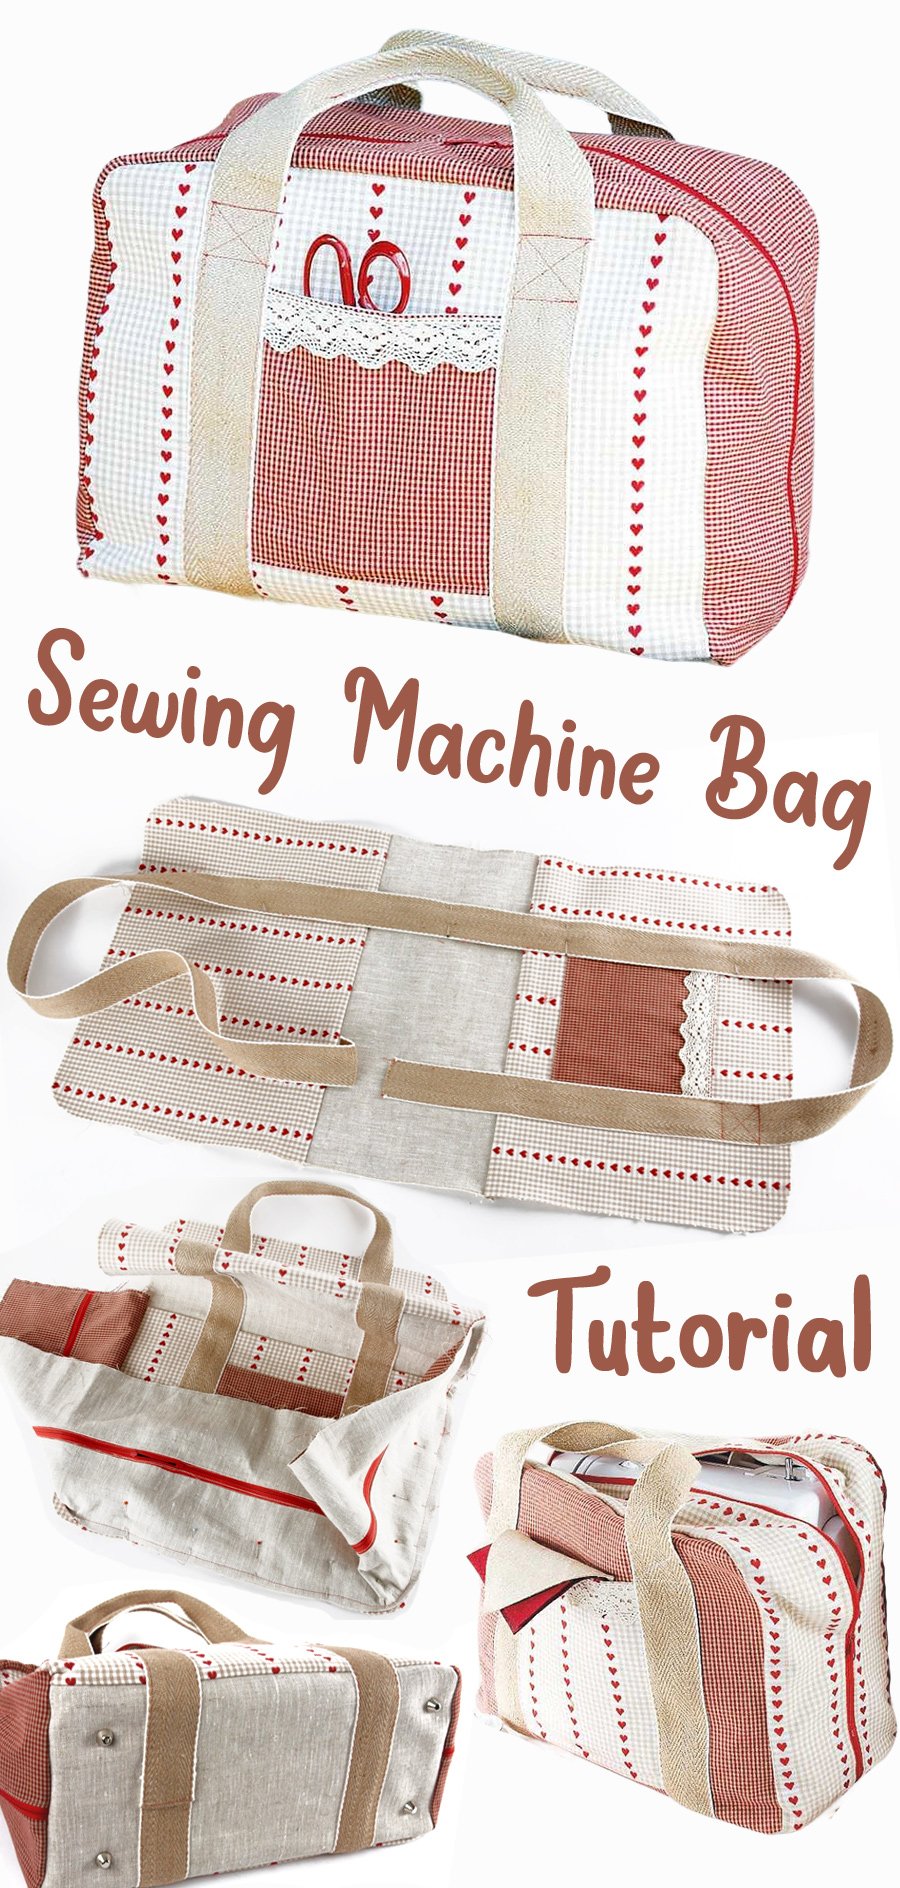
It typically includes padded sides, sturdy handles, compartments for foot pedals, thread, and notions, and a structure that supports transport without damage.
In this guide, we’ll walk you through everything you need to know—from choosing materials and sewing the structure, to customizing compartments and ensuring proper padding. You’ll find practical advice whether you’re a beginner or a seasoned crafter looking to add a personal touch to your machine bag.
1. Choosing the Right Materials and Notions
The success of your sewing machine travel bag – pattern begins with material selection. Durability is key here, since the bag must withstand the weight of a machine and the wear of travel. You’ll want strong fabric, quality zippers, sturdy thread, and high-density padding.
Start with your outer fabric. Popular choices include canvas, duck cloth, denim, or waxed cotton. These fabrics are thick enough to provide structure and long-term wear. If you prefer a quilted look, you can use cotton fabric with a foam interfacing to create that effect.
Next, think about the lining. You’ll need a material that is easy to clean and doesn’t fray easily. Nylon or polyester lining works great, especially for compartments that will hold thread or small items that might snag the fabric.
Interfacing and padding are essential components of your sewing machine travel bag – pattern. Use a thick fusible foam (like Pellon Flex-Foam or ByAnnie’s Soft and Stable) for body support and shock absorption. Adding extra padding around corners and the machine base will increase protection.
Strong zippers, Velcro strips, and heavy-duty thread should also be on your list. These help keep compartments secure and ensure your bag holds up over time. Choose metal or plastic zippers at least 1” wide for added strength.
Don’t forget hardware like D-rings, swivel hooks, or adjustable strap sliders. These make the bag more functional and easier to carry, especially if you plan on making it into a crossbody or backpack-style carrier.
Lastly, always pre-wash your fabric if it’s cotton-based. Shrinkage after sewing can distort your finished bag. Use color-safe detergent and iron before cutting your pieces for accurate measurements.
2. Step-by-Step Construction of the Travel Bag
Now let’s dive into constructing the sewing machine travel bag – pattern. This stage involves measuring your sewing machine, cutting out fabric panels, and assembling the base, body, and pockets.
Begin by measuring your sewing machine: width, height, and depth. Add 2-3 inches to each measurement for seam allowances, padding, and wiggle room. Use these numbers to draft your cutting plan for the outer fabric, lining, and interfacing.
Cut out your base panel first—this is the most important foundation of your sewing machine travel bag – pattern. Attach your interfacing and padding layers to it using a hot iron or spray adhesive. Reinforce this panel by sewing an X-pattern or diamond grid to hold the layers firmly.
Next, work on the front and back panels. These should be padded as well and may include outer pockets for your foot pedal or user manual. Add zippers or Velcro closures to pockets now, before attaching them to the main panels.
Sew the side panels and assemble all body pieces into a box-like shape. Make sure to use a strong seam (like double stitching or a zigzag reinforcement) to handle the weight of the machine. Attach the base last, ensuring all seams are clean and sturdy.
Add the lining by creating a similar “bag within a bag” structure. Slip the lining into place, wrong sides facing, and sew around the top opening to connect it to the outer shell. This gives a clean edge and fully enclosed construction.
Finally, attach handles and straps. Sew handles on with box or X-reinforced stitching to avoid tearing. For a detachable shoulder strap, sew D-rings on both ends and attach a strap with swivel clips. Your travel bag is now almost complete—just add finishing touches!
3. Customizing for Functionality and Style
A huge advantage of making your own sewing machine travel bag – pattern is the ability to customize it. From fabric color to pocket layout, you can make the bag reflect your personal style and suit your specific needs.
Start with your fabric theme. Floral prints, modern geometrics, or even novelty sewing-themed fabric can give your bag personality. Matching the fabric to your machine’s color or your sewing room theme can make it even more special.
Next, think about storage. Customize interior and exterior pockets to suit your gear. Add small pouches for scissors, tape measures, bobbins, or spare needles. A zippered mesh pocket inside the flap is perfect for keeping everything visible and secure.
Consider adding a name label or embroidered tag. This is especially useful if you attend group sewing events where bags might get mixed up. Personalization not only looks professional but adds a thoughtful touch if you’re gifting the bag.
For those who travel frequently, adding wheels and a retractable handle can turn your sewing machine travel bag – pattern into a rolling tote. You can purchase pre-made wheeled bases or sew a custom casing that accommodates a detachable roller.
Reinforce stress points using double layers of fabric and topstitching. The areas where straps connect, corners of the base, and zipper seams should all be reinforced to prevent wear and tear.
Finally, don’t forget about closure options. Besides standard zippers, you might add magnetic snaps or drawstring covers inside the top flap for added security. These extras enhance usability and give your bag a polished finish.
4. Maintenance, Safety Tips, and Portability
Once you’ve created your sewing machine travel bag – pattern, maintaining it well ensures it lasts for years. Proper cleaning, safe storage, and smart usage all help protect both your bag and your machine.
To clean your bag, always check the materials. Most canvas and cotton bags can be spot-cleaned with a damp cloth and mild detergent. Avoid submerging padded bags unless they are fully machine washable, which depends on your fabric choices.
When storing your machine inside the bag long-term, remove accessories that may scratch it, like metal bobbins or scissors. Place those items in a separate compartment or pouch. Keeping your machine covered with a dust cloth or fabric sleeve adds another layer of protection.
Use silica gel packets or a moisture absorber inside your bag if you’re storing it in a humid area. This prevents mold, rust, and fabric mildew—especially important if you live in a coastal or tropical environment.
Always lift your bag from the base or handles—not from the zipper or strap clips—to avoid stress on attachments. A loaded sewing machine travel bag – pattern can be heavy, so be mindful of the weight when lifting or placing it in a vehicle.
When flying with your sewing machine, always check airline carry-on and weight restrictions. Most domestic machines fit within size limits, but padding and protection are critical to prevent damage in overhead bins.
If you often commute with your sewing gear, you may want to make a second, smaller bag for accessories only. Keeping sharp or loose items separate reduces clutter and ensures your machine stays clean and safe during travel.
FAQ – Sewing Machine Travel Bag – Pattern
Q1: What size should I make my sewing machine travel bag?
Measure your sewing machine’s width, height, and depth, and add at least 2–3 inches to each measurement for padding and ease.
Q2: Can I use regular cotton fabric for the whole bag?
You can, but it’s recommended to reinforce it with fusible interfacing or foam padding to make the bag durable and structured.
Q3: Is this bag suitable for air travel?
Yes, many homemade sewing machine travel bag – pattern designs are carry-on friendly. Just ensure the padding is thick enough to protect your machine.
Q4: How do I clean my travel bag?
Spot-clean with mild soap and water. If machine washable, use gentle cycles and air dry. Always avoid bleach and high heat.
Q5: What kind of straps work best?
Padded shoulder straps, sturdy hand straps, or detachable crossbody straps work well. Reinforce all attachment points for safety.
Q6: Do I need to line my travel bag?
Yes, lining adds polish, protects your machine, and allows you to include inner pockets. It’s worth the effort for a professional finish.
Conclusion
A well-made sewing machine travel bag – pattern isn’t just a functional item—it’s an expression of creativity, care, and craftsmanship. Whether you’re a hobbyist or a professional sewist, this bag will protect your machine while reflecting your personal style.
In this guide, we covered how to choose durable materials, construct the bag step by step, personalize it with functional features, and care for it properly. With thoughtful planning, your handmade travel bag will serve you well for years.
Have you created your own **sewing machine travel bag –
pattern**? We’d love to hear about your experience! Please leave a sincere opinion or helpful suggestions in the comments. Your input inspires others and helps grow our creative community. Happy sewing!