The Sewing Tool Organizer – Pattern is the ultimate solution for crafters who find themselves constantly searching for lost needles, stray bobbins, or that one specific pair of fabric shears. There is a unique kind of magic in creating your own workspace essentials, and crafting a custom organizer allows you to tailor every pocket and loop to your specific workflow. Whether you are a seasoned quilter or a beginner just learning the ropes, having a dedicated place for your gear makes the creative process smoother, faster, and significantly more enjoyable.
When you decide to work with a Sewing Tool Organizer – Pattern, you aren’t just making a bag; you are building a command center for your hobby. Most commercial organizers are “one size fits all,” which often means they don’t fit your extra-long acrylic rulers or your favorite rotary cutter quite right. By using a specialized pattern, you gain the flexibility to choose durable fabrics, reinforced interfacing, and aesthetic designs that match your sewing room’s personality.
Starting this project requires a bit of planning and the right set of instructions. A well-designed Sewing Tool Organizer – Pattern typically includes detailed diagrams, seam allowances, and a list of necessary notions like zippers, elastic, and bias tape. In the following guide, we will dive deep into why this specific project is a game-changer for your craft room and how to master the technical aspects of the Sewing Tool Organizer – Pattern to achieve a professional, high-quality result.
1. Understanding the Essentials of a Sewing Tool Organizer – Pattern
The foundation of any successful project lies in the clarity of the Sewing Tool Organizer – Pattern you choose to follow. A high-quality pattern acts as a roadmap, providing precise measurements that ensure all your pockets align perfectly once the final stitch is in place.
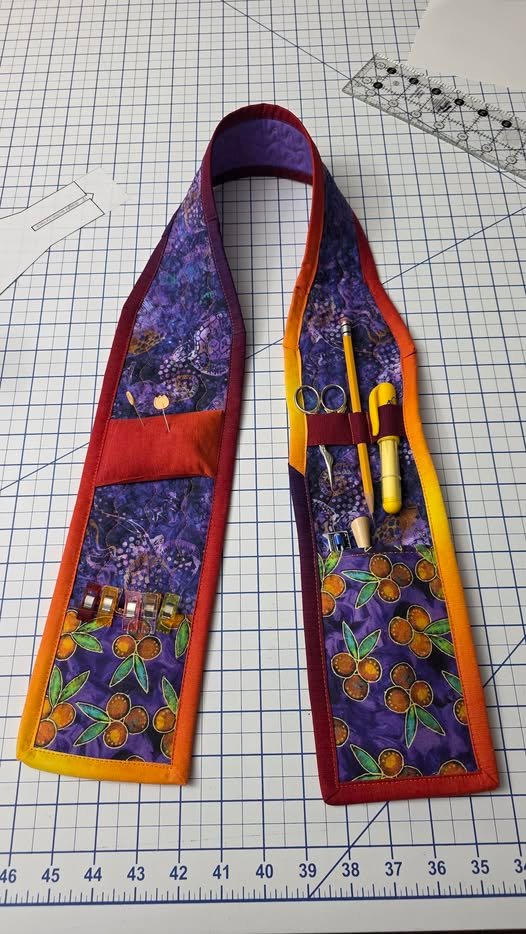
Organization is more than just storage; it is about accessibility and protection for your expensive equipment. When you use a Sewing Tool Organizer – Pattern, you are creating a shielded environment for your fabric scissors, marking pens, and seam rippers, preventing them from getting dull or damaged in a cluttered drawer.
One of the most important aspects of the Sewing Tool Organizer – Pattern is the layout of the internal compartments. Designers often include specific sections for thread spools and thimbles, ensuring that even the smallest items have a “home” where they won’t disappear during a busy project.
Choosing the right fabric for your Sewing Tool Organizer – Pattern is equally vital for longevity. Most experts recommend using heavy-duty cotton, canvas, or even denim to ensure the organizer can hold the weight of metal tools without sagging or tearing over time.
Optimization for SEO and functionality goes hand-in-hand when we talk about digital patterns. Many modern makers prefer a PDF Sewing Tool Organizer – Pattern because it can be printed at home and offers instant access to the instructions, allowing you to start your project immediately.
Finally, the Sewing Tool Organizer – Pattern serves as a fantastic skill-builder. It introduces techniques like topstitching, binding edges, and installing hardware, which are essential skills for any intermediate sewist looking to level up their craft.
2. Choosing the Right Materials for Your Sewing Project
Before you cut into your favorite fabric, you must consult the requirements listed in your Sewing Tool Organizer – Pattern. The material list is the “ingredient list” for your success, and skipping out on quality stabilizers can lead to a flimsy finished product.
Interfacing is the secret hero of the Sewing Tool Organizer – Pattern. To give the organizer its structure, you will likely need fusible fleece or heavyweight stabilizer, which allows the organizer to stand upright or fold neatly without losing its shape.
The Sewing Tool Organizer – Pattern often calls for a variety of closures. Depending on the design, you might need magnetic snaps, heavy-duty zippers, or even hook-and-loop fasteners to keep your tools secure when you are on the move.
Don’t forget the importance of thread quality. When assembling a Sewing Tool Organizer – Pattern, using a strong polyester thread is usually better than 100% cotton, as it offers the elasticity and strength needed to handle the tension of bulging pockets.
Visual appeal is a huge part of the Sewing Tool Organizer – Pattern experience. Many crafters use fussy cutting techniques to feature specific motifs from their fabric on the pocket fronts, making the organizer a piece of art in itself.
Lastly, consider the lining fabric. A light-colored lining in your Sewing Tool Organizer – Pattern makes it much easier to find dark tools, like a black-handled rotary cutter, compared to a dark or busy interior fabric that hides your supplies.
3. Step-by-Step Execution of the Sewing Tool Organizer – Pattern
Preparation is the first active step once you have your Sewing Tool Organizer – Pattern ready. Always start by washing and pressing your fabric to prevent any future shrinkage that could warp the dimensions of your carefully measured pockets.
Cutting the fabric pieces according to the Sewing Tool Organizer – Pattern requires a steady hand and sharp tools. Using a rotary cutter and a self-healing mat will provide the cleanest edges, which is crucial for the precise alignment required in this project.
The assembly process of a Sewing Tool Organizer – Pattern usually begins with the internal pockets. It is much easier to sew the small compartments onto the flat interior panels before you join the front and back pieces together.
Pay close attention to the seam allowance specified in the Sewing Tool Organizer – Pattern. Even a slight deviation of a few millimeters can add up across multiple pockets, resulting in a finished product that feels too tight or doesn’t close properly.
As you follow the Sewing Tool Organizer – Pattern, remember to backstitch at the beginning and end of every pocket opening. These areas experience the most stress as you slide tools in and out, and reinforced stitching prevents the seams from popping.
The final “birthing” or turning of the Sewing Tool Organizer – Pattern project is often the most satisfying part. After sewing the main body, you will turn it right side out through a small opening, revealing the functional and beautiful tool kit you have created.
4. Customizing and Troubleshooting Your Organizer
One of the best things about a Sewing Tool Organizer – Pattern is the ability to customize. If you use a specific brand of fabric markers, you can easily adjust the width of the pen loops in the pattern to ensure a perfect, snug fit.
If you find that your sewing machine is struggling with the thick layers of the Sewing Tool Organizer – Pattern, try using a denim needle or a walking foot. These tools help the machine feed through multiple layers of fabric and interfacing without skipping stitches.
Adding a personalized label or embroidery to your Sewing Tool Organizer – Pattern project can give it a professional finish. It also makes the organizer a thoughtful and high-value gift for fellow enthusiasts in the sewing community.
Sometimes, the Sewing Tool Organizer – Pattern might seem complex due to the number of pieces. Organization during the process is key; use wonder clips or pins to label each cut piece so you don’t confuse the “inside pocket A” with “outside flap B.”
Maintaining your finished Sewing Tool Organizer – Pattern is simple if you chose the right materials. Most handmade organizers can be spot-cleaned with a damp cloth, or if you used pre-shrunk cotton, they can be gently hand-washed to keep them looking new.
The versatility of the Sewing Tool Organizer – Pattern means it can evolve with you. As you acquire new tools, you might find yourself making a second, larger version, or perhaps a mini “travel” version of the same pattern to take to workshops and retreats.
Frequently Asked Questions (FAQ)
Is the Sewing Tool Organizer – Pattern suitable for beginners?
Yes, many versions of this pattern are designed specifically for those with basic sewing knowledge. It teaches essential skills like straight stitching, pocket construction, and working with interfacing.
What is the best fabric to use for a Sewing Tool Organizer – Pattern?
Medium to heavyweight woven fabrics are best. Quilt-weight cotton is popular for the aesthetics, but it should be paired with a strong interfacing to provide the necessary structure.
How long does it take to complete a Sewing Tool Organizer – Pattern project?
On average, an intermediate sewist can complete the project in 3 to 6 hours. This includes the time for cutting, prepping the interfacing, and the actual construction.
Can I sell items made from this Sewing Tool Organizer – Pattern?
This depends on the designer’s licensing. Most independent pattern designers allow you to sell finished items on a small scale (like at craft fairs), but always check the copyright notice on your specific Sewing Tool Organizer – Pattern.
Do I need a special sewing machine for this project?
A standard home sewing machine is usually sufficient. However, because a Sewing Tool Organizer – Pattern often involves multiple layers, using a heavy-duty needle (size 90/14 or 100/16) is highly recommended.
Can I modify the Sewing Tool Organizer – Pattern to fit my tablet?
Absolutely. Many crafters adjust the main compartment of the pattern to hold an iPad or tablet, allowing them to follow digital tutorials while they sew.
Conclusion
Creating your own Sewing Tool Organizer – Pattern is a rewarding journey that blends functionality with personal creativity. Throughout this article, we have explored the importance of choosing the right pattern, selecting durable materials like canvas and stabilizers, and following a structured assembly process to ensure a professional result.
By organizing your needles, threads, and cutting tools, you not only protect your investment but also clear the mental clutter that comes with a messy workspace. This project is a testament to the “made-to-measure” philosophy that makes sewing such a powerful skill.