If you’re looking to elevate your quilting skills and dive into a visually striking design, the Sewing Tumbling Blocks Patchwork – Pattern is a fantastic place to start. Known for its mesmerizing 3D effect, this timeless quilt pattern is both challenging and deeply rewarding. Whether you’re an experienced quilter or a curious beginner ready to explore beyond basic squares, this pattern offers the perfect opportunity to grow your skills and create a masterpiece.
The beauty of the Sewing Tumbling Blocks Patchwork – Pattern lies in its clever use of geometry and contrast. The illusion of stacked blocks is achieved through careful fabric placement and precise piecing. When done correctly, the result is a quilt that seems to leap off the surface, catching the eye with every angle. It’s a pattern rich in history, yet still relevant in modern quilting design.
In this article, we’ll explore everything you need to know about this intriguing pattern—from choosing fabrics and tools to sewing techniques and customization tips. If you’ve ever been captivated by the dimensional beauty of tumbling blocks, this guide is your go-to resource for bringing the Sewing Tumbling Blocks Patchwork – Pattern to life.
1. What Is the Tumbling Blocks Patchwork Pattern?
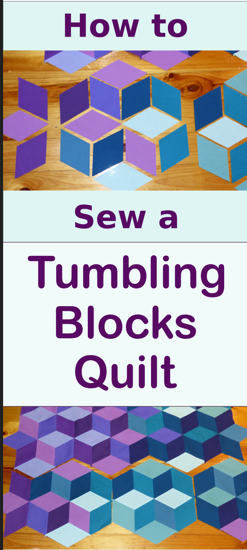
The Sewing Tumbling Blocks Patchwork – Pattern is a traditional quilting design made up of three rhombus-shaped pieces arranged to form a cube. When placed side-by-side, these cubes create a 3D illusion of blocks tumbling or stacking across the quilt top. It’s a visually dynamic effect that draws attention and creates depth, all with just three fabrics per block.
One of the most fascinating aspects of this pattern is its reliance on color contrast. Each “block” typically includes a light, medium, and dark fabric to highlight the different sides of the cube. This tonal variation is key to achieving the visual illusion that defines the tumbling blocks effect.
Though it looks complex, the actual construction is based on simple shapes and repeated units. Once you understand how the pieces fit together, sewing the tumbling blocks becomes a rhythmic and enjoyable process. It’s a great way to learn about value, contrast, and fabric positioning.
Historically, this pattern dates back centuries and was a staple in early American quilting. Its continued popularity speaks to its timeless aesthetic and the satisfaction quilters get from mastering its form. It bridges tradition and modern style effortlessly.
Another benefit is the versatility of its application. The Sewing Tumbling Blocks Patchwork – Pattern can be used for full quilts, baby blankets, table runners, or even framed textile art. You can adapt the scale and color palette to match your home or personal style.
Despite its intricate look, it doesn’t require special sewing machines or complex equipment. With some patience and precision, even beginner quilters can succeed with this project. Understanding the basics will make it feel less intimidating and much more achievable.
2. Tools and Materials for Tumbling Blocks Patchwork
Before you begin working on the Sewing Tumbling Blocks Patchwork – Pattern, it’s important to gather the right tools and materials. Having the proper setup will make your sewing experience smoother and more enjoyable.
First, you’ll need high-quality cotton fabric in at least three contrasting tones—light, medium, and dark. These colors will form the three visible sides of each tumbling block. Choose fabrics with minimal print so the geometric effect stands out clearly.
You’ll also need a rhombus template or acrylic ruler that allows you to cut consistent diamond shapes. Many quilters use a 60-degree diamond shape for this pattern, but templates in various sizes are widely available. Accuracy in cutting is critical to ensure the pieces fit together properly.
Next, a rotary cutter and self-healing cutting mat will help you make sharp, clean cuts through multiple layers of fabric. This not only saves time but also increases the precision needed for geometric patchwork like tumbling blocks.
For assembly, use fine quilting thread and a ¼-inch quilting foot on your sewing machine. This helps maintain consistent seam allowances and improves the alignment of each piece. A neutral thread color often works best to avoid visible seams.
You may also want to use fabric glue or pins to hold pieces together before stitching. Because of the angles involved, stabilizing each block before sewing can help avoid shifting and keep your points crisp and clean.
Lastly, keep an iron and pressing board nearby. Pressing each seam as you go is crucial in patchwork projects like this. It helps keep the quilt top flat and enhances the sharpness of your 3D design.
3. How to Sew Tumbling Blocks Step by Step
Let’s break down how to create the Sewing Tumbling Blocks Patchwork – Pattern step by step. While it requires attention to detail, the process is very rewarding once you understand the method.
Start by cutting out your rhombus-shaped pieces using your template or ruler. For each block, you’ll need three diamonds—one each from your light, medium, and dark fabric selections. Arrange the pieces before sewing to get a sense of how they’ll look together.
Begin by sewing the light and medium pieces together along one edge using a ¼-inch seam. Press the seam toward the darker fabric. Next, attach the dark piece to complete the block. Take care to match your points precisely for a clean finish.
Now that you have completed blocks, lay them out in rows, rotating each unit so the illusion of stacked cubes appears. The orientation of each block matters a lot in achieving the 3D effect, so take your time here.
Sew the blocks together in diagonal rows. This approach helps maintain the integrity of the angles. Pin where necessary to ensure points and seams align correctly, as slight misalignment can affect the overall visual impact.
After assembling all rows, join them together to complete the quilt top. Be sure to press each seam open or to one side consistently to reduce bulk and maintain a smooth finish.
Finally, sandwich your quilt top with batting and backing, then quilt using straight lines or echo quilting to complement the geometric design. Bind the edges, and your Sewing Tumbling Blocks Patchwork – Pattern is complete!
4. Design Tips and Customization Ideas
The Sewing Tumbling Blocks Patchwork – Pattern opens up a world of design possibilities. With a few tweaks in color or layout, you can completely change the feel of your quilt.
One of the best customization techniques is experimenting with color schemes. You could use bright, bold colors for a modern look or stick with muted, vintage tones for a more traditional appearance.
You might also consider using gradients within the blocks—choosing different shades of the same color for the light, medium, and dark fabrics. This creates a subtle, artistic effect that enhances the dimensional look.
Want something even more eye-catching? Try using scrappy fabrics. Instead of uniform colors, mix and match different prints and textures within the same tonal range. This adds visual interest and is a great way to use leftover fabric.
Another advanced idea is altering the block size. Large blocks make for faster construction and bold statements, while smaller ones offer intricate detail and complexity. Choose what suits your time frame and aesthetic goals.
Don’t be afraid to incorporate negative space into your layout. Leaving sections of the quilt top blank or filled with solid fabric can frame the tumbling blocks and give the design breathing room.
Lastly, consider blending tumbling blocks with other patchwork patterns. Adding borders, sashing, or even alternating blocks with other geometric designs can create a unique quilt that reflects your personality and style.
FAQ – Sewing Tumbling Blocks Patchwork – Pattern
Q1: Is the Sewing Tumbling Blocks Patchwork – Pattern suitable for beginners?
A1: Yes, with patience. While it involves precision, beginners can absolutely succeed with practice and by starting with larger block sizes.
Q2: What size diamond should I use?
A2: A 60-degree diamond is most common. You can adjust the size depending on how detailed or large you want the final quilt to be.
Q3: How do I choose the right fabric colors?
A3: Pick one light, one medium, and one dark shade per block. High contrast is essential to create the 3D cube illusion.
Q4: Can I sew the tumbling blocks by hand?
A4: Absolutely. Hand-piecing works well with this pattern, especially if you enjoy a slower, more meditative quilting process.
Q5: Why don’t my points match up?
A5: It’s often due to inconsistent seam allowances. Make sure you’re sewing a true ¼-inch seam and press carefully after each seam.
Q6: Can I use pre-cut fabric like charm packs or jelly rolls?
A6: Yes, but you’ll need to ensure they are large enough to cut your diamond shapes accurately. Jelly rolls work well for strip piecing diamonds.
Conclusion
The Sewing Tumbling Blocks Patchwork – Pattern is a stunning and timeless design that brings both challenge and satisfaction to any quilting project. From mastering color contrast to stitching precise angles, every step contributes to a final piece that is as beautiful as it is impressive.
We’ve covered what the pattern is, the tools you’ll need, how to assemble it, and creative ways to make it your own. Whether you’re a traditional quilter or a modern maker, the tumbling blocks pattern is a versatile and rewarding addition to your skill set.