Creating a Shooting Star Block Pattern is one of the most rewarding projects for any quilter, offering a perfect blend of celestial beauty and geometric precision. This specific pattern has captured the imaginations of textile artists for generations, serving as a versatile foundation for everything from cozy baby blankets to sophisticated wall hangings. When you begin working on a Shooting Star Block, you are essentially learning how to manipulate angles and contrast to create a sense of motion across the fabric.
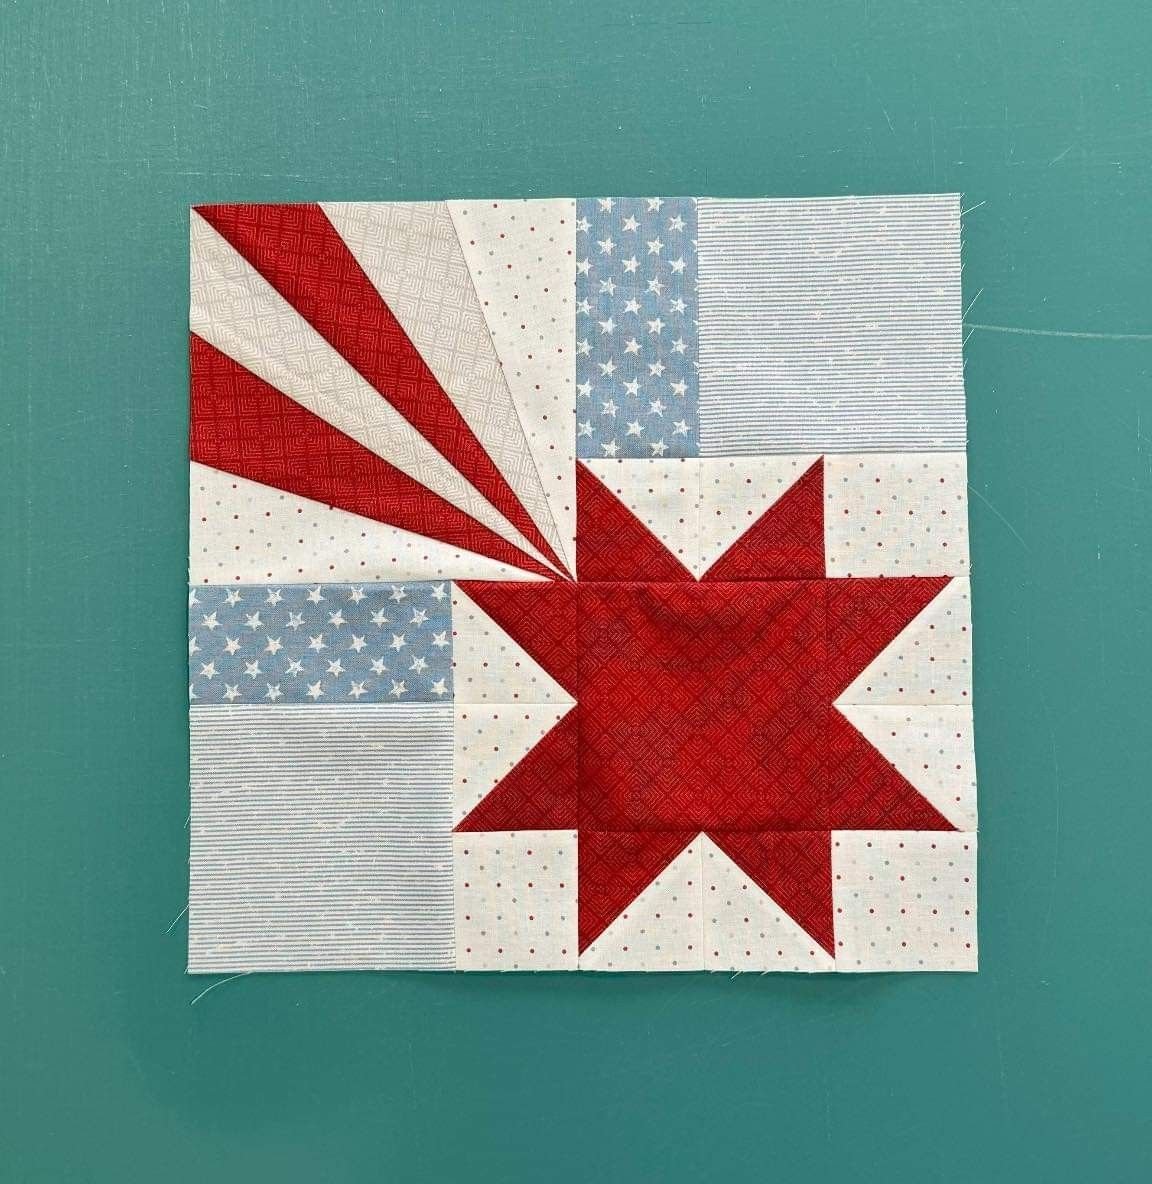
The allure of the Shooting Star Block Pattern lies in its visual impact, which mimics the fleeting brilliance of a meteor streaking across the night sky. Unlike static star designs, this pattern utilizes “tails” or trailing points that give the block a dynamic, directional energy. Mastering this design requires a bit of patience with your seam allowance, but the result is a stunning quilt block that looks far more complex than it actually is to assemble.
For those looking to enhance their quilting repertoire, the Shooting Star Block Pattern offers an excellent opportunity to practice fussy cutting or experimenting with color theory. By choosing the right fabric prints and high-contrast solids, you can make your stars pop against a dark background, effectively bringing a bit of the cosmos into your home. In this guide, we will break down every aspect of this quilt pattern to ensure your next project is a stellar success.
1 Understanding the Foundations of the Shooting Star Block Pattern
The first step in mastering the Shooting Star Block Pattern is understanding the geometry behind the design. Most variations of this block are based on a grid system, often a 3×3 or 4×4 layout, which helps in keeping the star points aligned. By visualizing the grid, you can better manage your fabric scraps and ensure that the “movement” of the star is consistent across multiple blocks.
Choosing the right quilting fabric is crucial for this specific pattern. To achieve the “glowing” effect of a star, many quilters opt for batiks or high-quality cotton solids that offer a wide range of values. The contrast between the star center and the background fabric is what defines the clarity of the Shooting Star Block, making your color selection a top priority during the planning phase.
Precision cutting is the backbone of any successful Shooting Star Block Pattern. Because this design often involves half-sqaure triangles (HSTs) or flying geese units, even a slight deviation in your cutting can lead to blunt points. Using a rotary cutter and an acrylic ruler is highly recommended to maintain the integrity of the star’s silhouette throughout the assembly process.
The “shooting” element of the Shooting Star Block Pattern is typically created using elongated triangles or a series of smaller squares that form a trail. This adds a layer of complexity compared to a standard Sawtooth Star or Ohio Star. Understanding how these trailing units connect to the main star body is essential for creating a cohesive look that flows naturally across the quilt top.
Modern quilters often use foundation paper piecing (FPP) to achieve the sharp points required for a professional-looking Shooting Star Block Pattern. FPP allows for extreme accuracy, especially when dealing with the thin, sharp angles that represent the star’s tail. If you are a beginner, looking for a paper-pieced pattern might be the best way to avoid the frustration of mismatched corners.
Finally, always remember to press your seams carefully as you construct the Shooting Star Block Pattern. Proper seam nesting and pressing towards the darker fabric will prevent bulk at the intersections. A flat, well-pressed quilt block not only looks better but is also much easier to quilt once you reach the final stages of your project.
2 Selecting Materials and Tools for Your Star Pattern
Before diving into the Shooting Star Block Pattern, gathering the right tools will save you significant time and effort. You will need a reliable sewing machine with a consistent quarter-inch foot. Since this pattern relies heavily on exact measurements, having a machine that handles multiple layers of quilting cotton without shifting is a major advantage for any maker.
When it comes to the Shooting Star Block Pattern, the thread you choose matters more than you might think. A high-quality 50wt cotton thread in a neutral color like gray or tan works best for most piecing tasks. This weight is thin enough to avoid adding bulk to your seams but strong enough to hold the star units together securely over years of use and washing.
Your choice of interfacing or stabilizer can also play a role if you are working with delicate fabrics for your Shooting Star Block. If you decide to use silk or satin to give your star an extra shimmer, a lightweight fusible stabilizer can prevent the fabric from fraying or stretching out of shape. This ensures the geometric pattern remains crisp and professional.
Marking tools are indispensable when drafting a Shooting Star Block Pattern. Whether you prefer a water-soluble pen, a tailor’s chalk, or a heat-erase marker, you need a way to indicate sewing lines for HSTs. Accurate marking ensures that your diagonal seams are perfectly centered, which is the secret to those coveted sharp star points.
For the background fabric of your Shooting Star Block Pattern, consider using “low volume” prints or deep “midnight” blues. The background acts as the canvas for your celestial design, so it should complement rather than compete with the star. Many designers suggest using a solid coordinate to keep the focus entirely on the intricate lines of the shooting star.
Don’t forget the importance of a fresh microtex needle in your machine before starting the Shooting Star Block Pattern. Sharp needles pierce the fabric cleanly, preventing skipped stitches or puckering. When you are dealing with the multiple intersections of a star block, a sharp needle ensures that the machine glides through the “bulk” of the center effortlessly.
3 Step-by-Step Assembly of the Shooting Star Block
The assembly of a Shooting Star Block Pattern usually begins with the central star unit. Most quilters start by creating the star points using the four-at-a-time flying geese method or by sewing half-square triangles. This initial phase sets the scale for the rest of the block, so double-checking your unfinished block size at this stage is a smart move.
Once the central star is formed, you move on to the “tail” sections of the Shooting Star Block Pattern. These are often mirror-imaged units that attach to one or two sides of the star. It is helpful to lay out all your pieces on a design board before sewing to ensure the “tail” is moving in the desired direction across your quilt layout.
Joining the units of the Shooting Star Block Pattern requires careful pinning. Align the “star” sections with the “tail” sections, paying close attention to the intersection points. To avoid “chopping off” your points, try to sew just a hair’s breadth outside the intersection of the previous seams. This “scant” seam technique is a favorite among pro quilters.
As the Shooting Star Block grows, you will notice the importance of directional pressing. By pressing seams in opposite directions, you create “nested” seams that lock together. This technique is vital for the Shooting Star Block Pattern because it reduces the thickness of the fabric at the corners, allowing your needle to pass through smoothly without shifting the design.
After the main rows of the Shooting Star Block Pattern are joined, it is time for the final squaring up. Use a large square ruler to trim the block to its final size, ensuring the edges are perfectly straight. This step is non-negotiable if you plan on joining multiple star blocks into a larger quilt top, as it prevents the final piece from waving or buckling.
The final look of your Shooting Star Block Pattern can be customized during the quilting process. You might choose to quilt in the ditch to highlight the geometry, or use free-motion quilting to create “wind” swirls around the star. The way you stitch the final layers together can emphasize the “shooting” motion of the pattern, adding a professional finishing touch.
4 Creative Variations and Layout Ideas for Quilters
One of the best things about the Shooting Star Block Pattern is its adaptability to different styles. For a modern quilt, you might use a monochromatic color scheme with different shades of a single color. For a scrappy quilt, you can use a different fabric for every “trail” piece, making the Shooting Star Block look like a vibrant explosion of color and texture.
You can also play with the scale of the Shooting Star Block Pattern. Making an oversized “mother star” as a center medallion surrounded by smaller stars creates a stunning focal point for a bed-sized quilt. Conversely, tiny 4-inch versions of this pattern can be used to create intricate borders or decorative throw pillows that sparkle with detail.
The orientation of the Shooting Star Block Pattern within your quilt can change the entire vibe of the project. If you point all the stars in the same direction, you create a sense of organized movement. If you rotate the blocks randomly, the quilt takes on a more chaotic, “meteor shower” effect that is visually stimulating and perfect for contemporary decor.
Incorporating negative space is another way to make your Shooting Star Block Pattern stand out. By placing the stars sporadically against a large expanse of solid fabric, you give the eye a place to rest. This minimalist approach is very popular in the current modern quilting movement and highlights the technical skill involved in the block construction.
For those who enjoy embroidery, adding hand-stitched details to the Shooting Star Block Pattern can elevate the design. You could add “sparkle” lines or even stitch the names of constellations in the background. These personal touches transform a standard quilt pattern into a cherished heirloom that tells a unique story.
Finally, don’t be afraid to mix the Shooting Star Block Pattern with other blocks. Combining it with Moon blocks or simple Square-in-a-Square units can create a celestial-themed quilt that feels cohesive and themed. The versatility of this pattern ensures that no two quilts ever look exactly the same, allowing your personal creativity to shine.
FAQ: Frequently Asked Questions about the Shooting Star Block Pattern
What is the best fabric for a Shooting Star Block Pattern?
High-quality quilting cotton is the gold standard. It has a stable weave that prevents stretching, which is essential for the sharp angles found in this pattern.
Is the Shooting Star Block Pattern suitable for beginners?
It is considered an intermediate pattern. However, an ambitious beginner can succeed by using foundation paper piecing techniques or by following a detailed step-by-step tutorial.
How do I keep my star points sharp?
The secret to sharp points in a Shooting Star Block Pattern is the scant quarter-inch seam and careful pinning. Never sew directly through the “V” of a point; always sew slightly above it.
Can I make this block using 5-inch charms or 10-inch layers?
Yes! Many Shooting Star Block Patterns are designed to be “pre-cut friendly.” You can use charm packs for the stars and layer cakes for the larger background sections to speed up the process.
Why does my block look wavy after sewing?
Waviness usually occurs due to inconsistent seam allowances or over-pressing with a dragging motion. Always press the iron down and lift it up (pressing), rather than sliding it across the fabric (ironing).
How do I choose colors that “pop”?
Use a color wheel to find complementary colors. For a Shooting Star Block, a bright yellow or white star against a deep purple or navy background provides the maximum visual contrast.
Conclusion
In this article, we have explored the intricate and beautiful world of the Shooting Star Block Pattern. From understanding the basic grid-based geometry to selecting the perfect high-contrast fabrics, we’ve covered the essential steps to creating a successful quilt block.
We discussed the importance of precision cutting, the benefits of foundation paper piecing, and how to use nesting seams to ensure your star points remain sharp and professional. Whether you are aiming for a modern minimalist look or a vibrant scrappy design, this pattern offers endless possibilities for customization and artistic expression.