A Simple Fabric Organizer – Pattern is the perfect project for anyone who loves sewing and wants to bring a bit of order and charm to their creative space. Handmade organizers are not only functional but also give you a chance to express your creativity through colors, textures, and fabrics. This easy and enjoyable sewing project can be completed in a single afternoon, even if you are a beginner.
Whether you want to store sewing notions, craft supplies, or small household items, this Simple Fabric Organizer – Pattern offers an excellent way to keep everything tidy while adding a decorative touch. Using leftover fabric scraps or coordinating prints, you can create a unique and stylish piece that fits perfectly into your workspace or home.
In this article, you’ll learn how to make your own fabric organizer, how to personalize it with design details, and how to use simple quilting and sewing techniques to make it sturdy and long-lasting. Let’s explore the steps and creative possibilities behind this Simple Fabric Organizer – Pattern, a must-have for anyone who enjoys crafting and organization.
1. Understanding the Simple Fabric Organizer – Pattern
The Simple Fabric Organizer – Pattern is designed to be both practical and beautiful. It typically includes compartments or pockets where you can store small objects, keeping your workspace uncluttered and efficient. This makes it a great project for crafters, students, or anyone looking for an easy DIY home organization solution.
One of the best features of this pattern is its flexibility. You can adjust the size, number of pockets, and fabric type to match your personal needs. Cotton fabric is a popular choice because it’s easy to work with, washable, and durable. However, you can also experiment with linen, canvas, or even quilted fabric for added structure.
Another appealing aspect of this project is its eco-friendly nature. By using fabric scraps from previous sewing or quilting projects, you’re reducing waste while creating something functional. This sustainability aspect adds even more value to your handmade organizer.
The Simple Fabric Organizer – Pattern usually involves basic sewing techniques, making it ideal for beginners. If you can sew straight lines and handle basic cutting and pressing, you’ll find this project enjoyable and rewarding. For experienced sewers, it’s a quick and relaxing project that still allows for creative customization.
Decorative elements like contrasting stitching, appliqué, or even small fabric buttons can be added to enhance the visual appeal of your organizer. These small details can transform a simple item into a stunning, personalized piece.
Overall, the pattern’s adaptability makes it perfect for anyone — whether you’re organizing craft supplies, makeup, stationery, or small kitchen items. The Simple Fabric Organizer – Pattern is truly a project that combines practicality with creativity.
2. Materials and Tools You’ll Need
Before starting your Simple Fabric Organizer – Pattern, it’s important to gather all the materials and tools needed for the project. Having everything ready makes the sewing process smoother and more enjoyable.
The main material you’ll need is fabric — preferably medium-weight cotton or canvas. Choose a main fabric for the exterior and a coordinating one for the lining. If you prefer a padded look, add interfacing or batting between the layers to provide extra stability.
You’ll also need matching thread, scissors or a rotary cutter, a ruler, pins, and a sewing machine. These are the basic essentials for nearly any sewing project. For finishing touches, you can include bias tape or decorative trim to give your organizer a polished appearance.
Zippers, Velcro, or buttons can be added if you want to secure your compartments. These closures not only make the design more functional but also add charm and personality. For a rustic or handmade aesthetic, wooden buttons or leather ties can be great additions.
Measuring your intended items before cutting your fabric is a crucial step. This ensures your organizer will fit everything comfortably. Take a few minutes to sketch your design and determine where you want each pocket or section to go.
Once all materials are prepared, you’re ready to move on to the sewing process. The Simple Fabric Organizer – Pattern is simple enough that you can complete it in just a few hours, making it an ideal weekend or evening project.
3. Sewing the Fabric Organizer
Now that your materials are ready, it’s time to start sewing your Simple Fabric Organizer – Pattern. Begin by cutting your fabric according to the measurements you’ve decided. Remember to include seam allowances, typically ¼ inch or ½ inch, depending on your preference.
Start with the outer fabric and lining. If you’re using interfacing or batting, fuse or quilt it onto the back of the outer fabric for extra stability. This step is optional but highly recommended if you want your organizer to hold its shape.
Next, create the pockets. Fold the pocket fabric pieces, press them neatly, and topstitch the edges for a clean finish. Arrange them on the lining according to your design plan and stitch them in place, ensuring each pocket is reinforced at the top for durability.
Assemble the front and back pieces by sewing around the edges, leaving an opening to turn your organizer right-side out. Press the edges flat and topstitch all around to give it a crisp and professional finish.
If you’re adding straps or loops for hanging, sew them into the seams before closing. This transforms your Simple Fabric Organizer – Pattern into a wall-hanging or portable version, depending on your needs.
Once everything is assembled, inspect your stitches and trim any excess threads. Your simple yet elegant fabric organizer is now complete and ready to use.
4. Customization and Creative Ideas
One of the joys of making a Simple Fabric Organizer – Pattern is how customizable it can be. You can modify its design, colors, and textures to perfectly suit your style or home decor.
For example, if you want to create a modern look, choose monochrome fabrics or geometric prints. For a cozy, country-style aesthetic, try floral or patchwork fabrics. Adding lace, ribbons, or embroidery can also elevate the design and make it uniquely yours.
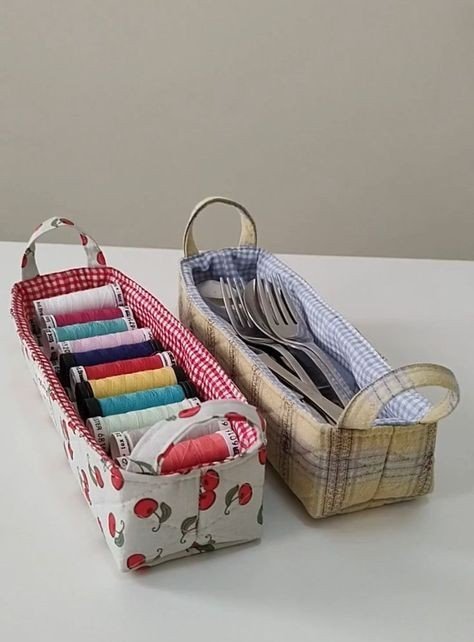
Another great idea is to personalize your organizer for different uses. A small version can hold sewing supplies like scissors and threads, while a larger version can serve as a mail sorter or bathroom organizer. The versatility of this pattern is truly remarkable.
You can also make these organizers as thoughtful handmade gifts. They’re perfect for birthdays, holidays, or housewarming presents — practical, beautiful, and made with love. Add a custom tag or label to make it extra special.
For families with children, creating themed organizers for toys or school supplies is a fun and creative activity. Choose fabrics with your kids’ favorite colors or characters to encourage them to keep their belongings tidy.
With just a bit of imagination, your Simple Fabric Organizer – Pattern can become a statement piece that reflects your creativity while serving a useful purpose in everyday life.
FAQ
1. Is the Simple Fabric Organizer – Pattern suitable for beginners?
Yes! This project is beginner-friendly and requires only basic sewing skills.
2. What type of fabric works best for this pattern?
Medium-weight cotton or canvas is ideal, but you can experiment with different materials.
3. Can I make it without a sewing machine?
It’s possible to hand sew, but using a machine will make the process faster and neater.
4. How can I make my organizer more durable?
Use interfacing or batting to add structure and reinforce the seams with extra stitching.
5. Is it washable?
Yes, if made with washable fabric and thread. Be sure to prewash your fabric to prevent shrinking.
6. Can I sell organizers made from this pattern?
Yes, handmade items like these are perfect for selling at craft fairs or online.
Conclusion
The Simple Fabric Organizer – Pattern is an easy, enjoyable, and rewarding sewing project that helps bring beauty and function into your daily life. From choosing fabrics to adding finishing touches, every step allows for creativity and personalization.
Whether you’re sewing for yourself or creating thoughtful gifts for others, this pattern offers endless possibilities for expression and practicality.
If you enjoyed this tutorial, don’t forget to leave your honest opinion and suggestions below. Your feedback helps inspire even more creative sewing ideas for the future!