If you’re looking for a charming and approachable quilting project, the Simple Pansy Quilt – Pattern is an ideal choice.
This floral-inspired design combines the timeless beauty of pansies with a beginner-friendly structure, making it perfect for both novice and seasoned quilters.
Whether you’re creating a keepsake, a gift, or a decorative home accent, this quilt pattern offers the versatility and appeal to suit any purpose.
The Simple Pansy Quilt – Pattern not only introduces you to essential quilting techniques but also gives you the freedom to explore your creativity with fabric choices, color schemes, and layout variations. With its soft floral motifs and traditional patchwork appeal, this quilt is a wonderful way to bring warmth and artistry into your sewing practice.
In this guide, we’ll explore everything you need to know about this delightful pattern. You’ll learn how to prepare your materials, cut and piece your fabrics, sew your blocks, and assemble the quilt top. We’ll also provide tips for finishing touches and quilting methods, so your pansy quilt is as polished as it is cozy.
1. Understanding the Simple Pansy Quilt – Pattern
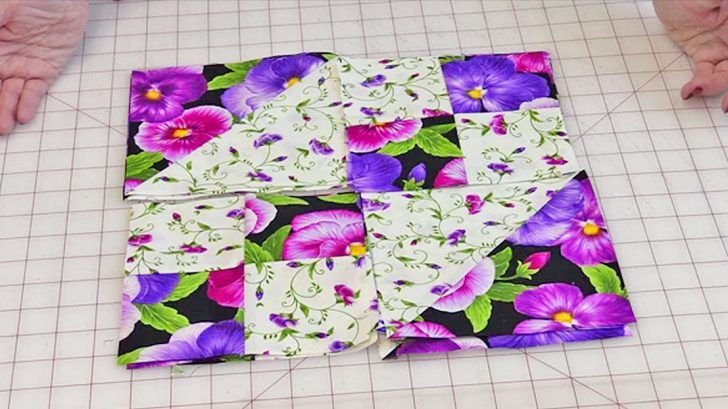
The first step in creating a Simple Pansy Quilt – Pattern is to understand the basic components and design layout. This pattern typically features pansy-shaped blocks, which are constructed from simple geometric shapes, making it manageable even for beginners.
The pansy motif is often created using squares and half-square triangles, which gives the illusion of petals. These blocks are then arranged in a grid, with optional sashing or borders to enhance the final design.
One of the most appealing aspects of this quilt is its adaptability. You can adjust the size of your blocks or even vary your pansy colors to reflect different seasons or personal style preferences.
Color selection is important in this pattern. While traditional pansy quilts use purples, yellows, and whites, modern interpretations might incorporate bold prints or pastel palettes. The choice of fabric can drastically change the look and feel of your final piece.
It’s also a good idea to pre-wash your fabrics before cutting to prevent shrinking or color bleeding after the quilt is finished. This is especially true when working with high-contrast colors.
Before beginning, make sure to print out or draw your Simple Pansy Quilt – Pattern so you have a clear guide to follow as you piece each section. A visual layout can help you avoid mistakes and stay organized throughout the project.
2. Materials and Tools You’ll Need
Every great quilt starts with the right materials and tools. For the Simple Pansy Quilt – Pattern, you’ll need a selection of quilting cottons, thread, and a few essential notions.
First, gather your fabrics. You’ll want a combination of pansy-themed prints or solid fabrics in coordinating colors. Typically, you’ll need background fabric, petal colors, leaf/green accents, and binding fabric.
Cutting tools are crucial. Use a rotary cutter with a sharp blade, a self-healing cutting mat, and a quilting ruler. Accuracy in cutting will make assembling your blocks much easier.
You’ll also need basic sewing supplies such as pins, fabric scissors, a seam ripper (just in case), and a good quality thread that matches your chosen color scheme.
A sewing machine with a ¼-inch foot is highly recommended for piecing your quilt blocks together. This consistent seam allowance ensures that everything fits neatly when the blocks are joined.
For pressing, use an iron and ironing board. Pressing your seams flat after each step gives your quilt a crisp, professional finish. Some quilters also prefer a pressing spray or starch for added stability.
Lastly, gather batting and backing fabric. The batting will give your quilt its warmth and loft, while the backing can be a coordinating print or solid that complements the pansy theme.
3. Piecing and Assembling the Quilt Blocks
Now comes the exciting part—piecing your Simple Pansy Quilt – Pattern. Start by cutting all your fabric pieces according to the measurements in your pattern. Label each piece to keep your work organized.
Begin with the center of the pansy block. This typically involves creating a simple square or four-patch, which acts as the flower’s heart. Choose a color that contrasts with the petals for a striking visual.
Next, make the petals using half-square triangles (HSTs). This is a common quilting technique that involves sewing two squares together on the diagonal, then cutting and pressing them open. Arrange the HSTs around the center to form the pansy shape.
Add the leaf or background sections to each pansy block. These often involve rectangles or corner squares that frame the flower and add dimension to your quilt design.
Sew the blocks together row by row, using consistent seam allowances. Press each row before joining it to the next, taking care to match points and seams for a tidy finish.
Once your quilt blocks are sewn into a full top, consider adding a border. This can be a single strip around the edge or a pieced border that echoes the pansy design.
Lay out the completed quilt top to check alignment and symmetry. It’s much easier to make adjustments now than after quilting and binding.
4. Quilting and Finishing Touches
With your quilt top complete, it’s time to layer and quilt. Create a quilt sandwich by layering the backing fabric (right side down), batting, and the quilt top (right side up). Smooth out wrinkles and secure with pins or basting spray.
Choose a quilting method that suits your style. Straight-line quilting is great for beginners and complements the geometric shapes of the pansy blocks. You can quilt diagonally across the blocks or stitch in the ditch along the seams.
For a more decorative touch, consider free-motion quilting. Swirls, loops, or floral motifs can add texture and elegance to the Simple Pansy Quilt – Pattern. Practice on scraps first to build confidence.
Once quilted, trim the edges to square up your quilt. Then prepare your binding strips and sew them around the perimeter using your preferred binding method—machine or hand-sewn.
Add a label to your quilt if desired, noting the date and any personal message. This is especially meaningful if the quilt is a gift or heirloom piece.
Give your finished quilt a gentle wash and dry. This helps set the quilting and gives the fabric a soft, crinkled look that’s both cozy and classic.
FAQ – Frequently Asked Questions
Q1: Is the Simple Pansy Quilt – Pattern suitable for beginners?
Yes! This pattern is ideal for beginners due to its use of basic shapes like squares and triangles. It offers a great opportunity to practice fundamental quilting techniques.
Q2: How long does it take to complete a pansy quilt?
The time varies depending on your skill level and how much time you dedicate each day. On average, expect to spend 10–20 hours from cutting to finishing.
Q3: What size should I make my quilt blocks?
Typical pansy quilt blocks are 8 to 12 inches. However, you can scale them up or down depending on the overall quilt size you want.
Q4: Can I use scraps for this quilt?
Absolutely. The Simple Pansy Quilt – Pattern is perfect for using up fabric scraps, especially for the petals and leaves. Just ensure they are 100% cotton for consistency.
Q5: Do I need a quilting machine to make this quilt?
No. While a sewing machine helps speed up the process, you can also sew this quilt by hand using traditional hand-stitching techniques.
Q6: What’s the best way to care for a finished pansy quilt?
Use gentle wash cycles and cold water to preserve colors. Dry on low or air dry. Store in a cool, dry place away from direct sunlight to prevent fading.
Conclusion
The Simple Pansy Quilt – Pattern is more than just a sewing project—it’s a creative journey that brings joy and satisfaction from start to finish. From selecting your fabrics to putting in the final stitch, this quilt is a rewarding experience for crafters of all skill levels.
We hope this guide has inspired you to start your own pansy quilt. If you’ve followed along, you now know how to plan, piece, quilt, and finish a beautiful floral quilt that will brighten any room.
If you found this article helpful, please leave a sincere review below and share your suggestions or experiences. We’d love to hear how your Simple Pansy Quilt – Pattern turned out!