If you’re looking to add a charming and creative touch to your quilting or sewing projects, the Simple Patchwork Border – Pattern is a fantastic way to enhance any piece.
Whether you’re working on a quilt, a cushion, or a wall hanging, a well-crafted patchwork border can frame your work beautifully and make the entire design stand out.
This article explores everything you need to know about using and creating a simple patchwork border – pattern to elevate your crafting game.
A simple patchwork border pattern offers a perfect blend of functionality and decoration. It allows you to use fabric scraps creatively while also defining the edges of your project with style. Beginners and seasoned crafters alike can enjoy this technique, as it is adaptable, straightforward, and endlessly customizable to match any design theme.
Throughout this guide, we will delve into how to choose the best simple patchwork border – pattern, what materials to use, tips to perfect your stitching, and how to integrate it into your broader sewing or quilting projects. We’ll also answer some frequently asked questions and conclude with a helpful summary to support your creative journey.
1. Understanding the Simple Patchwork Border Concept
A Simple Patchwork Border – Pattern typically consists of small fabric squares or rectangles sewn together to form a decorative edge around your project. This not only enhances visual interest but also adds texture and color variation, bringing your creation to life.
This border can be made using leftover fabric pieces from your main quilt or contrasting prints to create a bold frame effect. It’s an ideal way to reduce fabric waste while maintaining design consistency or adding a pop of unexpected color.
Patchwork borders work well with most types of quilting styles—traditional, modern, or eclectic. The simplicity of the method makes it easy to adapt and modify according to the dimensions and design of your project.
One of the biggest advantages of this approach is that it doesn’t require advanced sewing skills. Even beginners can achieve beautiful results by following a few basic principles of patchwork piecing and alignment.
In many patterns, the patchwork border is sewn onto the main quilt top before adding batting and backing, which ensures that it is integrated smoothly into the final design without disrupting the overall structure.
When planned properly, a simple patchwork border – pattern can become the highlight of the project. It frames your work like a picture, drawing attention to the centerpiece while contributing to the overall harmony of the piece.
2. Materials and Tools Needed
Before you begin creating a Simple Patchwork Border – Pattern, make sure you have all the essential materials and tools on hand. Proper preparation will make the process smoother and more enjoyable.
Start with fabric. Use scraps or pre-cut squares (like charm packs) for an easy start. Choose colors and patterns that either match or complement the main project for a cohesive look.
A rotary cutter, quilting ruler, and cutting mat will help you cut fabric pieces with precision. Uniform shapes are crucial to ensure your patchwork border fits together neatly and lays flat.
You’ll need basic sewing tools: a reliable sewing machine, matching thread, and straight pins or clips to hold pieces in place. Make sure your machine is set to a consistent stitch length.
If you’re new to quilting, a quarter-inch foot attachment for your sewing machine can be incredibly helpful. It ensures you maintain accurate seam allowances for better alignment.
Don’t forget your iron and ironing board. Pressing your seams as you go helps the patchwork border remain crisp and flat, contributing to a more professional-looking finish.
Optional but useful additions include fabric markers for labeling rows, interfacing for extra support, and spray starch to help keep your fabric in shape while sewing.
3. Step-by-Step Tips to Perfect Your Patchwork Border
Creating a flawless Simple Patchwork Border – Pattern involves both planning and precision. Here are some practical tips to help you get the best results.
Begin by calculating the total length of the border sides. Measure each edge of your main project and determine how many fabric squares or rectangles you need to fill each side evenly.
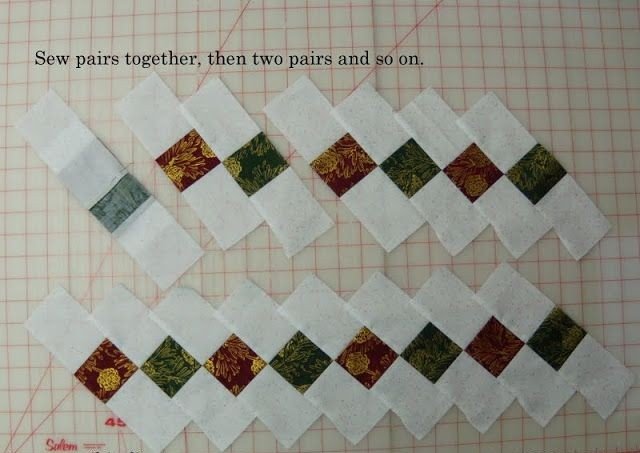
Lay out your fabric pieces in the order you want to sew them. This helps you visualize the final design and avoid repeating patterns or colors too closely together.
Sew the pieces together in rows using a consistent seam allowance—typically ¼ inch. Press the seams to one side or open, depending on your preference and how bulky the fabric is.
Pin the border strips to each side of your project before sewing. This prevents misalignment and ensures that the patchwork matches up cleanly at the corners.
Take your time while sewing the border to your quilt or fabric project. If needed, trim any excess fabric before attaching to avoid puckering or uneven stitching.
Once the borders are attached, give the whole piece a final press with the iron. This step smooths out any slight irregularities and ensures a crisp, clean edge around your design.
4. Creative Ways to Use Simple Patchwork Borders
The Simple Patchwork Border – Pattern isn’t just for quilts. There are many ways to incorporate this technique into a variety of sewing and décor projects.
Use patchwork borders on throw pillows to give them a handmade, cozy feel. Choose fabrics that match the room’s theme or use seasonal prints for a festive touch.
Add a patchwork border to kitchen linens like table runners or placemats. This not only enhances the look but also ties together other elements in your kitchen decor.
For wall hangings or fabric art pieces, a patchwork frame helps define the work and makes it stand out more, especially when hung against a plain wall.
You can even add patchwork borders to clothing items like skirts or denim jackets. This creates a one-of-a-kind fashion statement that reflects your personal style.
Book covers, bags, and pouches can also benefit from a decorative border. It adds both structure and visual interest, especially when used as a feature detail.
And finally, patchwork borders can be used in children’s room décor—on blankets, crib bumpers, or decorative bunting. Bright colors and fun prints make these borders both playful and practical.
FAQ – Simple Patchwork Border – Pattern
Q1: What is the best fabric to use for a patchwork border?
A: 100% cotton fabric is ideal due to its stability, ease of use, and wide range of available patterns and colors.
Q2: Can I use a patchwork border on a project that isn’t a quilt?
A: Absolutely. Simple patchwork border – pattern techniques can be applied to pillows, bags, clothing, and more.
Q3: Do I need a quilting machine to sew patchwork borders?
A: No. A standard sewing machine with a straight stitch function works perfectly for most patchwork borders.
Q4: How wide should the border be?
A: The width can vary based on your design. Common sizes range from 2 to 4 inches, but it’s totally up to your aesthetic goals.
Q5: How do I avoid the border from becoming wavy or uneven?
A: Accurate cutting, consistent seam allowances, and pressing your seams properly all help maintain even, straight borders.
Q6: Is there a way to speed up the sewing process?
A: Yes. Chain piecing—sewing multiple squares in one continuous line—can save time and keep pieces in the correct order.
Conclusion
In this article, we explored the beauty and practicality of using a Simple Patchwork Border – Pattern in your sewing and quilting projects. From understanding the concept and gathering materials, to applying expert tips and exploring creative applications, you now have a complete guide to get started.
We hope this information helps you confidently add patchwork borders to your next project. Whether you’re making a cozy quilt or a stylish pillow, these decorative edges add personality and flair. If you’ve tried using patchwork borders or have questions, please leave your honest opinion and suggestions below—we’d love to hear from you and continue improving this guide for fellow crafters!