Patchwork SNOWMAN BLOCK – Pattern designs are a delightful way to bring winter charm into your quilting projects. By beginning this article with the term Patchwork SNOWMAN BLOCK – Pattern, we establish a strong SEO foundation while immediately introducing the project’s theme. Snowman quilt blocks have become a beloved motif for winter quilts, holiday décor, and homemade gifts. Their cheerful expressions and customizable accessories make them perfect for creative sewists looking to add personality to their patchwork projects.
Snowman blocks often combine simple geometric shapes with playful appliqué or piecing details. Following a structured Patchwork SNOWMAN BLOCK – Pattern ensures consistency while still allowing for endless variations in color, face details, and embellishments. Whether you prefer a classic winter look of whites and blues or want a fun, colorful snowman design, working with a snowman block pattern offers limitless creative potential.
This article will guide you through the key aspects of designing, sewing, and embellishing a snowman block. You’ll learn how to understand the pattern layout, choose the right fabrics, build your snowman step-by-step, and personalize the block for your quilt or craft project. At the end, a FAQ section answers common questions, followed by a conclusion inviting your feedback and suggestions.
1. Understanding the Patchwork SNOWMAN BLOCK – Pattern
A Patchwork SNOWMAN BLOCK – Pattern typically includes clear instructions for assembling the body, head, and features of the snowman. Most patterns use squares, rectangles, and triangles for the base construction, making them beginner-friendly yet visually striking.
Many patterns start with the snowman’s body as the central focus. Traditionally, the body is made from white or off-white fabric. Some patterns use curved piecing, but most rely on straight-line piecing for simplicity. You can expect to cut rectangles and squares that will later form the rounded snowman shape through patchwork illusion.
The head is usually a smaller block that attaches directly to the body. The pattern provides measurements to ensure the proportions look natural. Consistency between the head block and body block is essential for achieving a balanced and charming snowman figure.
A Patchwork SNOWMAN BLOCK – Pattern also includes elements like the hat, scarf, eyes, nose, and buttons. These features can be pieced, appliquéd, or embroidered depending on the style. Patterns often give optional templates for appliqué details such as carrot noses or top hats.
Background fabric plays a major role in framing the snowman. Patterns often recommend cool tones such as blue or gray to resemble winter skies. The contrast between the snowman’s white body and the background enhances the visual appeal of the block.
Finally, the pattern may offer instructions for multiple snowman poses or variations. Some snowmen wave, some wear earmuffs, others hold brooms or gifts. Understanding the pattern will help you plan your layout and choose which version best suits your quilting project.
2. Choosing Fabrics and Materials for the Snowman Block
Selecting the right materials ensures your Patchwork SNOWMAN BLOCK – Pattern turns out vibrant, durable, and visually appealing. Since snowman blocks rely heavily on contrast, fabric choice is particularly important.
Start with the snowman body fabric. Solid white or off-white works best, but you can also choose subtle prints like tone-on-tone snowflakes or dots. This adds texture without distracting from the design. Avoid overly busy prints that might blur the shape of the snowman.
For the background, choose fabrics that complement the winter theme. Blues, teals, grays, and dark neutrals create a cold-weather atmosphere. Ombre fabrics add depth, while small winter-themed prints can enhance the festive feel.
Accessories such as scarves and hats are excellent opportunities to use scrap fabrics. Bright reds, greens, plaids, or polka dots bring life to your Patchwork SNOWMAN BLOCK – Pattern. Mixing colors and textures gives your snowman charm and personality.
You’ll also need thread that blends well with your fabrics. White thread blends into the snowman body, while matching thread for accessories helps maintain clean lines. If you’re doing appliqué, consider using a zig-zag or blanket stitch with matching or contrasting thread.
Basic quilting tools such as a rotary cutter, rulers, cutting mat, and iron are essential. Using sharp tools ensures your shapes are accurate, which is crucial for assembling clean, symmetrical blocks.
Optional materials include fusible web for appliqué pieces, buttons for eyes or embellishments, and embroidery floss for facial details. Adding these elements can make your snowman look more animated and unique.
3. Assembling the Patchwork Snowman Step-by-Step
When constructing a Patchwork SNOWMAN BLOCK – Pattern, begin by cutting all required fabric shapes. Organize them by section—head, body, hat, scarf, and background—to make sewing easier and more efficient.
Start with the snowman body. Follow the pattern to piece together the rectangles and squares that form the rounded body. Even though patchwork uses straight seams, clever placement creates the illusion of curves. Press seams as you go to maintain accuracy.
Next, assemble the snowman head. Make sure your seam allowances match the pattern recommendations—usually ¼ inch. Accurate sewing ensures that the head and body align perfectly when joined. Press the block to keep everything smooth.
Then move on to the accessories. If your pattern uses pieced hats or scarves, sew these components next. If using appliqué, prepare your shapes by tracing them onto fusible web, cutting them out, and ironing them onto the fabric. Stitch the appliqué securely before adding it to the snowman block.
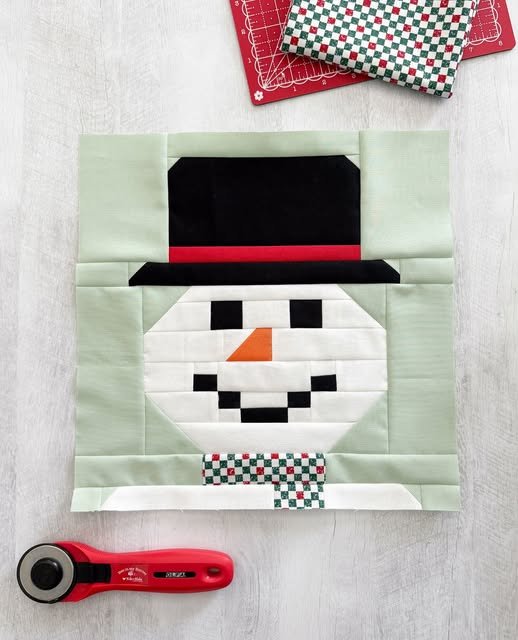
A Patchwork SNOWMAN BLOCK – Pattern often includes optional facial details. Eyes and buttons can be appliquéd, embroidered, or added as tiny fabric circles. The nose is typically a bright orange triangle representing a carrot. Position these features carefully to give your snowman a friendly expression.
Next, assemble the background pieces around the snowman. This step frames the block and maintains its shape. The pattern will guide you through adding top, bottom, and side strips. Make sure edges line up neatly to keep your block square.
Once all pieces are assembled, press the entire block. Your snowman is now ready to be added to a quilt top, wall hanging, table runner, or any winter-themed project. The final result is a charming snowman block with personality and warmth.
4. Creative Ways to Personalize Your Snowman Block
The fun part of working with a Patchwork SNOWMAN BLOCK – Pattern is personalizing your snowman. There are countless ways to add creative touches and make your block stand out.
Start by experimenting with accessories. Scarves can be striped, plaid, polka-dotted, or floral. Hats can be classic black top hats, beanies, or festive Santa hats. Using bold prints gives your snowman a cheerful and whimsical touch.
Consider changing the facial expression. Embroidering a smile, adding rosy cheeks with fabric paint, or using small buttons for eyes can transform your snowman’s personality. Each detail gives your block character and makes it more engaging.
Another idea is to add background scenery. You can appliqué snowflakes, stars, pine trees, or even a moon behind the snowman. These extra elements bring storytelling and dimension to your Patchwork SNOWMAN BLOCK – Pattern.
Try playing with scale. Make a large snowman block as the centerpiece of a quilt, or create multiple smaller versions to use in borders or table décor. Scaling lets you adapt the pattern to different project types.
If you enjoy texture, consider using chenille fabric for the scarf or embellished stitching for the hat. Texture adds depth and makes the block visually rich.
Lastly, mix fabrics creatively. Using metallic fabrics for buttons or glittery cotton for snow adds festive sparkle. These unique touches make your snowman block one-of-a-kind and perfect for holiday gifts or winter displays.
FAQ About the Patchwork SNOWMAN BLOCK – Pattern
1. Is the Patchwork SNOWMAN BLOCK – Pattern beginner-friendly?
Yes, most designs use simple shapes, making them suitable for beginners.
2. What size are typical snowman blocks?
They usually range from 10 to 14 inches, depending on the pattern.
3. Can I use scraps for the accessories?
Absolutely—small scraps are perfect for hats, scarves, and details.
4. Do I need appliqué skills?
Not necessarily. Many patterns offer pieced options instead of appliqué.
5. What background colors work best?
Blues, grays, and winter-themed prints help the snowman stand out.
6. Can I make multiple snowman blocks for a quilt?
Yes! They look beautiful arranged together on a winter quilt.
7. Should I prewash fabrics?
Prewashing is recommended to avoid shrinking and color bleeding.
8. Can I add buttons or embellishments?
Yes, but avoid pieces that may detach if the quilt is for a child.
9. How can I keep my block square?
Accurate cutting, consistent seam allowances, and pressing help maintain shape.
10. Can I sell items made with this pattern?
Yes, unless the designer specifies restrictions. Always check pattern licenses.
Conclusion
Creating a Patchwork SNOWMAN BLOCK – Pattern project is a joyful and artistic way to celebrate winter and express creativity.
This article has guided you through understanding the pattern, choosing fabrics, assembling the snowman, and customizing your block with fun embellishments. Snowman blocks add warmth and personality to any handmade project and are perfect for quilts, wall hangings, and seasonal décor. I hope this guide inspires you to create your own unique snowman block.