If you’re looking to bring some festive Halloween spirit into your home, a “Spooky” quilt – pattern is a perfect DIY project to try this fall. This seasonal craft combines creativity, comfort, and a touch of eerie charm. Whether you’re a beginner or a seasoned quilter, working on a spooky quilt is a fantastic way to celebrate autumn and decorate your space with something handmade and personal.
The term “Spooky” quilt – pattern refers to quilting designs that incorporate Halloween-inspired motifs like ghosts, pumpkins, bats, haunted houses, black cats, spiderwebs, and more. These quilts can be subtle or bold depending on your style, and they’re perfect for cozying up on chilly October nights or draping over furniture for a spooky vibe.
In this article, we’ll walk you through everything you need to know to create your own “Spooky” quilt – pattern from scratch. From choosing the best fabrics to assembling your quilt and adding finishing touches, you’ll get tips, techniques, and inspiration to make your spooky masterpiece stand out. Let’s dive into the world of Halloween quilting!
1. Choosing Fabrics and Materials for a “Spooky” Quilt
When creating your “Spooky” quilt – pattern, the materials you choose will define the overall mood and quality of the finished product. Halloween offers a wide range of thematic options, so selecting the right fabrics is both fun and important.
Start by picking Halloween-themed fabrics. Look for prints that feature classic spooky elements like skulls, skeletons, witches, jack-o’-lanterns, or eerie text. Many fabric stores release special Halloween collections, making it easier to find matching or complementary designs.
Color choice also plays a big role. Traditional spooky colors include black, orange, purple, and green. However, don’t be afraid to mix in neutrals like gray, cream, or even metallics for a more modern or mysterious look. These shades help balance the busy prints and add sophistication to your quilt.
Choose high-quality 100% cotton quilting fabric, as it’s easy to sew, durable, and machine-washable. Cotton also holds its shape well and is comfortable for use in a lap quilt, bedspread, or wall hanging.
You’ll also need batting to give your quilt warmth and thickness. Cotton, polyester, or a cotton-poly blend are all great options. For a warmer quilt, go with a thicker batting; for a lighter throw, choose a low-loft style.
Don’t forget about backing fabric. You can go with a solid color that complements your top design or continue the spooky theme with a matching Halloween print. This helps complete the overall aesthetic of your “Spooky” quilt – pattern.
Finally, gather your essential quilting tools: rotary cutter, quilting ruler, cutting mat, sewing machine, thread, pins, and a quilting needle. Having the right tools on hand will make the entire process smoother and more enjoyable.
2. Designing and Planning Your “Spooky” Quilt – Pattern
Before you start cutting fabric and stitching pieces together, it’s important to plan your “Spooky” quilt – pattern thoroughly. This step ensures your quilt turns out as envisioned and saves you time and frustration.
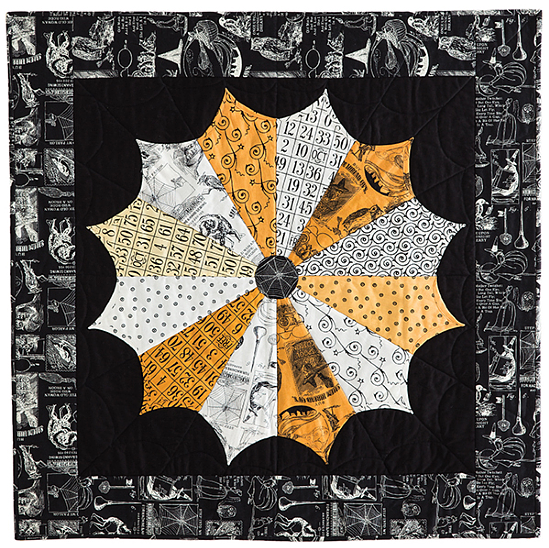
Begin with a quilt layout or sketch. Decide whether you want a traditional block-style quilt or something more modern like a medallion or strip quilt. You can even create a scene with appliqué—like a haunted house surrounded by bats—or spell out spooky words like “BOO” or “TRICK OR TREAT.”
Keep scale in mind. If your quilt will be used as a wall hanging, smaller blocks with more detail can look amazing. For bedspreads or lap quilts, go with larger pieces for a faster finish and bold impact.
Next, create a cutting plan. Measure and calculate how many pieces you’ll need for each part of the quilt. Using graph paper or quilting software can help you visualize the final product and adjust dimensions as needed.
If you’re adding text or images, consider appliqué or embroidery techniques. Appliqué allows you to sew cut-out shapes like ghosts, pumpkins, or cats onto your quilt top. Embroidery adds finer details such as spiderwebs or stitched lettering.
Don’t overlook your border and binding choices. A patterned border can frame your quilt beautifully, while a solid black binding adds a polished edge and enhances the spooky effect.
Lastly, gather your blocks and arrange them before sewing. Lay out all pieces on a flat surface or design wall to check the balance of colors and patterns. Rearranging now is easier than unpicking later.
3. Assembling and Quilting the Spooky Masterpiece
Now that your “Spooky” quilt – pattern is planned, it’s time to assemble the pieces and bring your Halloween vision to life. This part of the process is where your quilt truly begins to take shape.
Start by sewing your quilt blocks together. Use a quarter-inch seam allowance and press the seams open or to one side as you go. Consistent seam allowances ensure your quilt lays flat and all the pieces align properly.
Once the top is complete, it’s time to create your quilt sandwich. This involves layering the quilt top, batting, and backing fabric. Smooth out any wrinkles and secure the layers with safety pins or basting spray to keep everything in place.
Choose a quilting design that complements your theme. Straight-line quilting is simple and works well for geometric patterns. Free-motion quilting can add a whimsical or eerie touch—think swirls that resemble mist or cobweb-like loops.
Test your design on a scrap quilt sandwich before stitching the real thing. This helps ensure your tension is correct and your stitches look clean. Once ready, quilt across the layers using your machine or by hand, working from the center out to avoid puckering.
Trim the excess batting and backing, then attach the binding around the edges. You can make your own binding from coordinating fabric or use pre-made binding tape. A hand-sewn binding gives a professional finish, while machine stitching is quicker and still looks great.
After binding, give your quilt a final press and inspect your work. Remove any loose threads, check for missed stitches, and admire your spooky creation. You now have a handmade Halloween treasure to enjoy year after year!
4. Ideas to Personalize Your “Spooky” Quilt – Pattern
What makes a “Spooky” quilt – pattern truly special is the ability to personalize it. Adding your own twist not only makes the quilt more meaningful but also ensures it stands out as a one-of-a-kind creation.
Try incorporating family traditions into your design. Add a panel with each family member’s name or a small appliqué that represents them. This is especially fun for kids and makes the quilt a beloved holiday heirloom.
Use glow-in-the-dark thread or fabric for a surprising and fun effect. These materials are available at most craft stores and can add an extra spooky vibe when the lights go out.
Mix textures by combining cotton, flannel, and even velvet. These fabrics add depth to the quilt, and the different feels make it interesting to the touch. Just make sure to account for different fabric weights during cutting and sewing.
Incorporate photographs printed on fabric to personalize your quilt even further. Maybe you have old Halloween costume photos or snapshots from past trick-or-treat nights that would make cute additions to the quilt blocks.
Don’t forget about the back of the quilt! Use a contrasting fabric or a surprise print for a fun twist. This can make your quilt reversible and give you options for display or use throughout the season.
Finally, consider adding a label to your quilt. Include your name, the date it was made, and a short message like “Made with love for Halloween 2025.” This detail adds a professional touch and preserves the story behind your creation.
FAQ: Frequently Asked Questions About “Spooky” Quilt – Pattern
Q1: What is a “Spooky” quilt – pattern?
A: It’s a Halloween-themed quilt design that uses festive motifs like ghosts, bats, pumpkins, and spooky colors. These quilts are perfect for seasonal decor or gifts.
Q2: Can beginners make a spooky quilt?
A: Absolutely! Many “Spooky” quilt – pattern options are simple enough for beginners, especially those using basic blocks or pre-cut fabric packs.
Q3: Where can I find free spooky quilt patterns?
A: Many quilting blogs and fabric company websites offer free Halloween-themed patterns. You can also find inspiration on Pinterest and quilting forums.
Q4: What size should a spooky quilt be?
A: That depends on its use. Wall hangings may be around 30”x30”, lap quilts about 50”x60”, and bed quilts can vary based on mattress size.
Q5: Do I need special tools to make a spooky quilt?
A: Basic quilting tools like a rotary cutter, mat, ruler, sewing machine, and thread are enough. Optional tools include appliqué scissors or embroidery hoops.
Q6: Can I use a spooky quilt as decor?
A: Yes! Drape it over a couch, hang it on a wall, or use it as a table topper for Halloween parties and seasonal displays.
Conclusion
Creating a “Spooky” quilt – pattern is a fun and rewarding way to celebrate the Halloween season while expressing your creativity. From selecting eerie fabrics and planning your layout to sewing the quilt top and adding personalized touches, each step helps bring your spooky vision to life.
Whether you’re making a cozy throw for yourself or a Halloween gift for a friend, this project is sure to become
a seasonal favorite. Don’t forget to leave a sincere opinion about this guide and share your finished quilt ideas or suggestions in the comments. We’d love to see how you’ve made the “Spooky” quilt – pattern your own!