Squares From Strips Quilt- Pattern is a timeless and creative quilting method that transforms simple fabric strips into beautifully arranged squares. Right from the first stitch, the Squares From Strips Quilt- Pattern encourages both beginners and experienced quilters to experiment with colors, textures, and layouts. This technique results in an eye-catching quilt that is both practical and artistic, making it one of the most popular choices among quilting enthusiasts. Throughout this article, you will find SEO-optimized guidance that follows Google AdSense policies, ensuring high-quality, user-friendly content.
Working with strips to form squares is not only efficient but also incredibly fun. The Squares From Strips Quilt- Pattern allows quilters to use leftover fabrics, precut strips, or freshly cut textile pieces to craft unique blocks that fit perfectly together. Because the technique focuses on repetitive units, it becomes simpler to maintain precision while still leaving room for creative variation. Whether you prefer soft pastels, bold contrasts, or modern minimalist palettes, this pattern adapts beautifully to your personal style.
Before diving into detailed steps, it’s essential to understand why this method is so loved. The Squares From Strips Quilt- Pattern is ideal for anyone looking to build a quilt quickly while still achieving a professional and cohesive look. Its versatility makes it perfect for bed quilts, baby quilts, wall hangings, or decorative throws. With the right arrangement of colors and values, even simple strips can transform into an intricate-looking final piece. Now, let’s explore how to bring this quilt pattern to life.
1. Understanding the Basics of the Squares From Strips Quilt- Pattern
The first step to mastering the Squares From Strips Quilt- Pattern is understanding how fabric strips come together to form structured, uniform blocks. The magic of this pattern lies in sewing multiple strips together and then cutting them into squares, allowing for quick assembly and consistent sizing across your quilt.
Most quilters begin by selecting fabrics that provide visual contrast. Light and dark colors, warm and cool tones, or patterned and solid fabrics all work well in this technique. A balanced combination ensures your squares stand out, reinforcing the geometric beauty of the pattern.
Once your fabrics are chosen, accuracy becomes essential. Even minor inconsistencies in strip width can affect the symmetry of your final squares. For this reason, using a rotary cutter, quilting ruler, and self-healing mat is highly recommended when preparing your strips.
Stitching your strips together with an accurate seam is equally important. The standard quarter-inch seam keeps all pieces uniform and helps your blocks align neatly during assembly. Consistency creates the polished look that makes the Squares From Strips Quilt- Pattern so appealing.
After sewing the strips into panels, the next step is pressing. Pressing, not ironing, keeps seams crisp and prevents distortion. Proper pressing ensures your squares remain sharp and clean when cut from the strip sets.
Finally, once your pressed panels are cooled and flat, you begin cutting your squares. This satisfying step reveals the final building blocks of your quilt, showcasing the beautiful patterns created by your strip combinations.
2. Materials and Tools Needed for the Squares From Strips Quilt- Pattern
To create a polished Squares From Strips Quilt- Pattern, gathering the right materials prevents unnecessary challenges and ensures long-lasting results. Start with high-quality cotton quilting fabric, as it cuts, sews, and presses more cleanly than other textile types.
You’ll also need a sharp rotary cutter, essential for cutting accurate strips and squares. A clean, precise cut contributes to the professional appearance of your finished quilt. Pair it with a sturdy quilting ruler and cutting mat to maintain correct measurements for each piece.
Thread selection matters just as much as fabric choice. A strong, low-lint cotton or polyester thread is ideal for piecing strips together. Choose a neutral color that blends seamlessly into your fabrics to prevent visible thread lines across your quilt.
A sewing machine capable of consistent straight stitches is highly recommended. While hand-sewing is possible, machine stitching accelerates the process and provides more uniform results, which is vital for the Squares From Strips Quilt- Pattern layout.
Pressing tools, such as an iron and ironing board or wool pressing mat, are necessary for setting seams. Proper pressing enhances the sharpness of your squares and keeps your quilt top flat and aligned.
Finally, backing fabric, batting, and binding material will be needed once your quilt top is complete. These finishing components bring your project together, adding softness, stability, and a polished border.
3. Step-by-Step Process for the Squares From Strips Quilt- Pattern
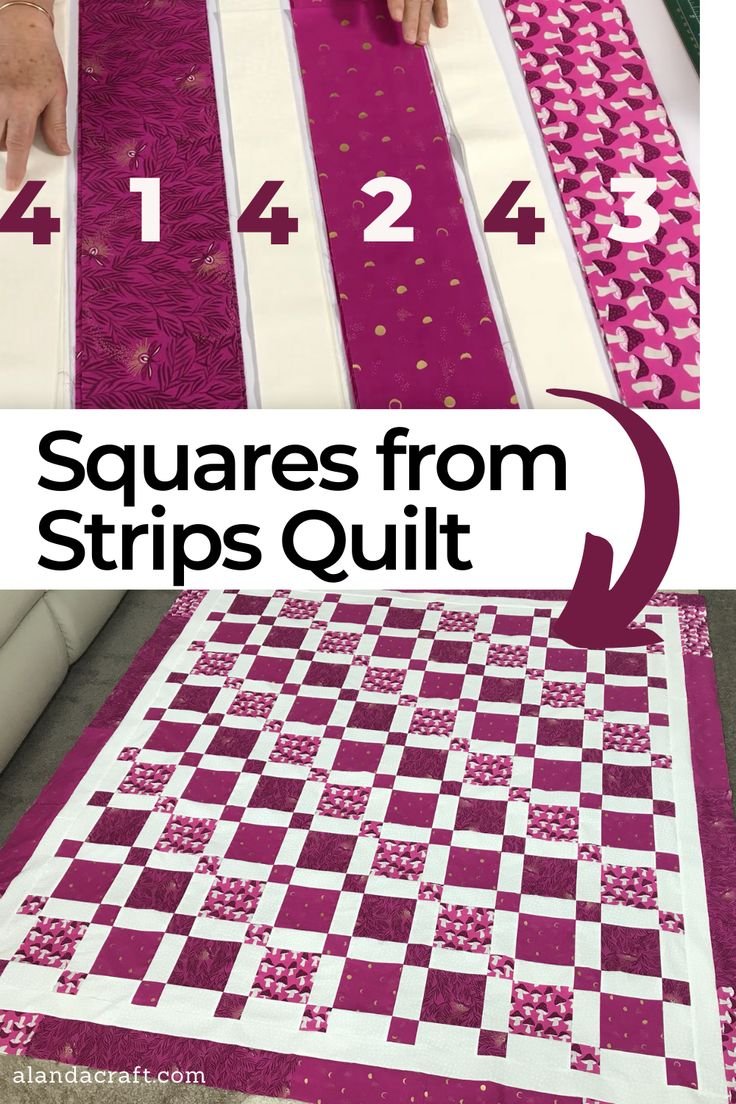
To start the Squares From Strips Quilt- Pattern, begin by cutting your fabric into uniform strips. Most quilters use 2½-inch or 3-inch strips, depending on the desired final block size. Keep your cuts clean and straight for best results.
Next, arrange your strips in the order you want them displayed in your quilt. Playing with color arrangement helps determine the energy and movement of the final design. Once you’re satisfied, sew the strips together using a consistent seam allowance.
After sewing the strip set, press the seams in one direction. This step is crucial because it reduces bulk and keeps the fabric smooth. A well-pressed strip set makes cutting squares easier and more precise.
Now, use your quilting ruler to cut the strip set into even squares. Each cut reveals a balanced combination of your chosen fabrics. Place each square aside carefully, keeping them in order if you want to preserve a specific layout.
Once your squares are ready, begin arranging them into rows. You can alternate direction, rotate squares, or create unique patterns depending on your creative vision. This flexibility is what makes the Squares From Strips Quilt- Pattern so enjoyable.
After your layout is finalized, sew the squares into rows and then sew the rows together. Press the quilt top thoroughly before adding the backing, batting, and final quilting stitches.
4. Customization Ideas for the Squares From Strips Quilt- Pattern
One of the most appealing features of the Squares From Strips Quilt- Pattern is its adaptability. With small changes, you can create countless unique versions of the same technique. Color plays a major role in customization, as bold tones bring energy, while neutrals create a calm, modern look.
You can also experiment with strip width. Thicker strips create larger, more dramatic square designs, while thinner strips result in a more intricate layout. Mixing widths adds texture and visual interest to the quilt.
Another creative approach is incorporating novelty prints or themed fabrics. Children’s quilts, holiday designs, or memory quilts become special keepsakes when unique fabrics are used within the strip sets.
You may also choose to add sashing between your squares. Sashing helps separate the blocks, adding structure and reducing visual busyness if your fabrics are particularly bold or patterned.
For even more customization, consider rotating every other square or arranging them into diagonal or checkerboard layouts. This small alteration transforms the overall design without changing the core technique.
Finally, decorative quilting stitches add the finishing touch. Free-motion swirls, straight-line quilting, or geometric patterns all enhance the texture and beauty of your completed quilt.
FAQ – Frequently Asked Questions About the Squares From Strips Quilt- Pattern
1. Is the Squares From Strips Quilt- Pattern suitable for beginners?
Yes. This pattern is simple, repetitive, and easy to follow, making it a wonderful choice for anyone new to quilting.
2. What strip size works best for this quilt?
Most quilters use 2½-inch strips, but any width works as long as you stay consistent throughout the project.
3. Can I use leftover fabric scraps to create the strip sets?
Absolutely. Scrap strips create charming, colorful quilts with lots of personality.
4. How do I achieve perfectly aligned squares?
Use consistent seam allowances, accurate cutting tools, and press your strip sets before cutting.
5. Do I need a sewing machine for this quilt?
While you can sew by hand, a sewing machine makes the process quicker and ensures more uniform seams.
6. Can I change the layout after cutting the squares?
Yes, the layout is fully customizable. Rotate, rearrange, or add sashing to achieve your desired design.
Conclusion
Creating a Squares From Strips Quilt- Pattern project is an enjoyable and rewarding experience for quilters of all levels. Throughout this article, you learned the basics, the materials needed, the step-by-step construction process, and creative customization ideas.
With these techniques, you can confidently begin crafting your own quilt filled with texture, color, and personal meaning.