The Squares From Strips Quilt- Pattern is a versatile and visually appealing quilting technique that is perfect for quilters of all skill levels. If you’re looking for a relatively straightforward yet stunning quilt project, this is a fantastic option. It involves sewing fabric strips together, cutting the strip sets into smaller pieces, and then assembling those pieces into unique squares. This approach allows you to experiment with colors, patterns, and strip widths, creating a truly custom quilt.
This quilt pattern is not only beginner-friendly but also offers countless possibilities for creativity. You can use a variety of fabric collections, precut fabric squares like 2.5-inch squares (often referred to as jelly rolls), or even fabric scraps to create a one-of-a-kind quilt top. The resulting squares can be arranged in various layouts, giving you the freedom to design a quilt that perfectly reflects your style and personality.
Whether you’re new to quilting or a seasoned pro, the Squares From Strips Quilt- Pattern is a delightful project that will yield beautiful and functional results. This quilt technique allows you to make a stunning quilt without having to master complex piecing or intricate quilting designs. The steps are clear, the process is efficient, and the finished product is sure to be cherished for years to come.
-
Understanding the Squares From Strips Quilt- Pattern
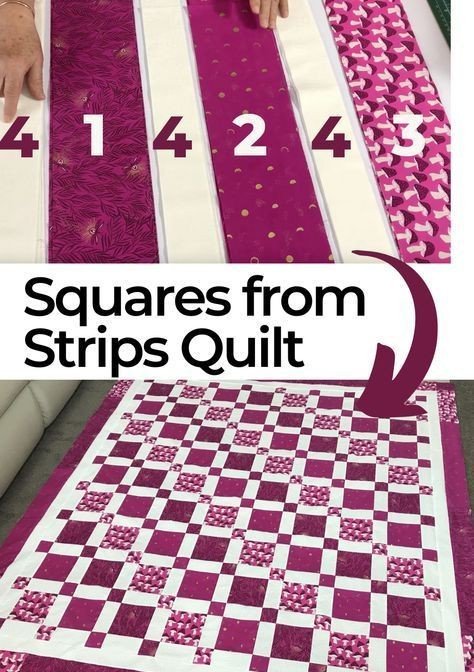
The Squares From Strips Quilt- Pattern is essentially a methodical way to create squares from fabric strips. Instead of cutting individual small squares of fabric, you sew long strips of different fabrics together along their long edges to form strip sets. These strip sets are then pressed to one side to ensure neatness and accuracy.
Once the strip sets are pressed, you cut them horizontally into smaller segments, which are the fundamental building blocks of your quilt pattern. The width of these segments determines the size of the smaller squares within each block. It’s crucial to measure carefully and use a sharp quilting ruler to ensure consistent and accurate cuts.
After cutting the strip sets, you arrange the cut segments in pairs or groups, matching up the seams to ensure they nest. Nesting seams is important because it prevents bulky seams and results in a flatter and more polished quilt top. This technique ensures that the points of the squares align precisely.
The next step in the Squares From Strips Quilt- Pattern is to sew these segments together to form the individual squares. This is often done using a quarter-inch seam allowance, which is a standard seam allowance in quilting. Consistency in seam allowance is key to achieving consistent block sizes.
Once you have sewn the individual squares, you can arrange them in a grid or other layout to create the overall design of your quilt top. You can rotate the squares or rearrange them to experiment with different visual effects until you find a layout that you like. This step is where you can truly make the quilt your own.
After finalizing the layout, you sew the squares together in rows, making sure to align the seams between adjacent squares. This process involves nesting seams once again to ensure a neat and tidy finish. Finally, you sew the rows together to complete the quilt top, ready for quilting and binding.
-
Benefits of Using the Squares From Strips Quilt- Pattern
One of the significant advantages of the Squares From Strips Quilt- Pattern is its beginner-friendly nature. The process is straightforward and less daunting for someone who is new to quilting. It provides an excellent introduction to basic piecing and quilting concepts while still producing a impressive-looking quilt.
The quilt pattern is also incredibly efficient, especially when working with longer strips of fabric. Sewing long seams and then cutting the strip sets is much faster than cutting and sewing countless individual small squares. This efficiency makes it a great option for quilters who want to make a quilt in a shorter amount of time.
Furthermore, the Squares From Strips Quilt- Pattern is extremely versatile, allowing for endless customization. You can vary the width of the strips, the colors and patterns of the fabrics, and the arrangement of the finished squares to create a wide array of looks. From modern and minimalistic to cozy and scrappy, this pattern can adapt to any style.
The quilt pattern is also fabric-efficient, meaning that you can use a wide range of fabric leftovers to create a cohesive and beautiful quilt. This makes it an ideal choice for quilters who want to use up their fabric scraps and minimize waste. It’s a fantastic way to create something useful and beautiful out of leftover material.
Additionally, the Squares From Strips Quilt- Pattern results in a stable and reliable quilt. The long vertical seams in the strip sets provide strength and prevent the fabric from stretching out of shape during the quilting process. This ensures that the finished quilt is durable and will hold up well over time.
Finally, the completed quilt top has a wonderful geometric and repetitive look that is visually appealing. This type of pattern is often very relaxing to make and can be quite meditative to work on. The final quilt can be a meaningful gift or a cherished addition to your own home decor.
-
Fabric and Tool Requirements for Squares From Strips Quilt- Pattern
When selecting fabrics for the Squares From Strips Quilt- Pattern, you’ll need to decide on a color palette. Using coordinated fabric collections can ensure that the final quilt looks cohesive and balanced. Alternatively, you can embrace a more eclectic and scrappy look by using fabrics from different sources.
The amount of fabric you will need depends on the size of the quilt you want to make and the width of your strips. You’ll need enough fabric for the main body of the quilt, as well as for the borders and binding. It’s always a good idea to purchase a little extra fabric to account for mistakes or additions.
In addition to fabric, you will need some essential quilting tools to complete the Squares From Strips Quilt- Pattern. A sharp pair of scissors, a rotary cutter, a self-healing cutting mat, and a clear acrylic quilting ruler are absolute must-haves for accurate cutting and measuring. A sewing machine with a good quarter-inch seam allowance foot is also crucial.
You will also need thread that matches your fabrics and a seam ripper in case you need to correct any mistakes. Iron and ironing board are essential for pressing seams, ensuring that your fabric lies flat and neat. These basic tools are essential for any quilting project and will serve you well for years to come.
When choosing a sewing machine needle, make sure it’s the correct size and type for your fabric. A universal or microtex needle in a size 80/12 or 90/14 is usually suitable for cotton quilting fabrics. Change your needle regularly to ensure that you get a clean stitch and minimize fabric damage.
It’s also essential to have adequate work space, ensuring that you have enough room to spread out your fabric and cut accurately. Good lighting will also make the cutting and sewing process easier and less straining on your eyes. Investing in good tools will make your quilting experience more enjoyable and successful.
-
Step-by-Step Guide to Making the Squares From Strips Quilt
The first step in making the Squares From Strips Quilt- Pattern is to cut your fabric into strips. The width of the strips will determine the size of the squares within your quilt block. Be precise with your measurements, and use a sharp rotary cutter to ensure clean and accurate cuts. It’s better to make fewer cuts, using longer fabric if possible.
Once the strips are cut, you’ll sew them together lengthwise, alternating colors or patterns to create your desired design. When sewing the strips, use a consistent quarter-inch seam allowance and be careful not to stretch the fabric. After sewing, press the seams to one side, alternating the direction of pressing for each strip set to ensure nesting seams.
After pressing, use your quilting ruler and rotary cutter to cut the strip sets into smaller segments horizontally. The width of these segments should be the same as the unfinished width of your squares. Once again, measure carefully and ensure that your cuts are straight and consistent to avoid uneven squares.
Now it’s time to arrange the segments in groups, making sure the seams nest. This nesting technique helps to prevent bulk and creates crisp corners when the squares are assembled. Pin the segments in place if needed, and sew them together along the long edges using a consistent quarter-inch seam allowance.
After sewing the segments, press the seams open or to one side, depending on your preference. Be consistent with your pressing choice to maintain a flat and even quilt top. Once you have your assembled squares, you can arrange them on a large surface to decide on the final layout for your quilt.
When you’re happy with the layout, sew the squares together in rows, matching up the seams between adjacent squares. Be careful to sew straight and consistent seams to avoid puckering. After sewing the rows, press the seams open or to one side, alternating the direction for each row to ensure nesting. Finally, sew the rows together to complete your stunning quilt top!
FAQ
-
What are some popular fabric collections suitable for this pattern?
Many quilters prefer coordinating fabric collections, such as those from Tula Pink, Bonnie & Camille, or Moda Fabrics. These collections often feature a cohesive set of designs and colors that work well together.
-
How can I calculate the fabric requirements for my specific quilt size?
Fabric requirements vary depending on the finished size of the quilt and the strip width used. Many online quilt calculators or quilt patterns provide detailed formulas to help you determine the necessary fabric yardage.
-
Can I use fat quarters for this project?
Yes, fat quarters can be used, but you will need to cut them into strips first. This will give you more variety in your fabrics, contributing to a truly scrappy and unique quilt.
-
What is the easiest way to ensure accurate cuts?
Using a high-quality rotary cutter, self-healing cutting mat, and a clear acrylic ruler is the most effective way to achieve consistent and accurate cuts. Make sure to cut slowly and steadily.
-
How can I make the quilting process easier?
Consider using a walking foot on your sewing machine. A walking foot ensures that all layers of the quilt sandwich feed evenly, preventing shifting and puckering. You can also start with a simple straight-line quilting design before progressing to more intricate patterns.
-
Is it necessary to pre-wash my fabric?
Pre-washing fabric is a personal preference. Some quilters prefer to pre-wash to minimize shrinkage after the quilt is completed, while others prefer the crispness of unwashed fabric for cutting and piecing.
Conclusion
The Squares From Strips Quilt- Pattern offers an enjoyable and straightforward way to create a beautiful and customizable quilt. By utilizing fabric strips, quilters can efficiently assemble unique blocks that can be arranged into a variety of stunning layouts. This beginner-friendly approach is perfect for learning fundamental quilting techniques like accurate cutting, precise piecing, and effective seam management.
Whether you opt for a scrappy, eclectic look or use a curated fabric collection, the final result will be a cherished handmade quilt. We hope you found this comprehensive guide helpful and inspiring. Please share your thoughts and suggestions below, as we’d love to hear your feedback on this wonderful quilting pattern.