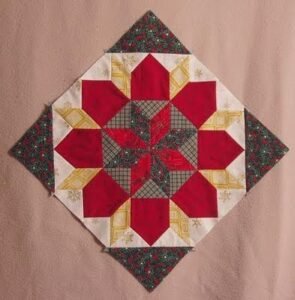
The Star of Bethlehem block is a stunning and intricate quilt pattern that has captivated quilters for centuries.
Its radiant starburst design makes it a standout piece in any quilt, bringing a touch of elegance and complexity.
In this tutorial, we will guide you through the steps to create your own Star of Bethlehem block, including fabric selection, cutting instructions, and assembly. Let’s dive into this beautiful project!
Selecting Your Fabric
Choosing the Right Fabrics
When choosing fabrics for the Star of Bethlehem block, it’s essential to select colors and patterns that will highlight the intricate design. Traditionally, this block is made with a combination of light, medium, and dark fabrics to create a dimensional effect.
Consider using solid colors or small-scale prints to maintain clarity in the star’s design. You can opt for a traditional color palette, such as red, green, and white for a festive look, or experiment with modern hues to suit your personal style.
Fabric Quantities
For each 12-inch finished Star of Bethlehem block, you will need:
- Light fabric: 1/4 yard
- Medium fabric: 1/4 yard
- Dark fabric: 1/4 yard
Preparing the Fabric
Before you begin cutting, wash and iron your fabrics to remove any sizing and ensure they are pre-shrunk. This step will help prevent any distortion or shrinking after the quilt is completed. Once your fabrics are washed and pressed, you are ready to start cutting your pieces.
Cutting Your Fabric
Cutting the Pieces
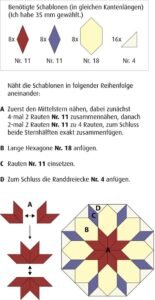
The Star of Bethlehem block is composed of several diamond shapes and triangles. Here are the cutting instructions for a 12-inch finished block:
- Light Fabric:
- Cut 4 squares, 4.5 x 4.5 inches (for the background)
- Cut 8 diamonds with a 45-degree angle, 2.5 inches wide
- Medium Fabric:
- Cut 8 diamonds with a 45-degree angle, 2.5 inches wide
- Dark Fabric:
- Cut 8 diamonds with a 45-degree angle, 2.5 inches wide
- Triangles:
- Cut 8 right-angled triangles from the light fabric to fit around the edges of the diamond shapes
Organizing Your Cuts
Lay out your cut pieces on a design board or large table to ensure you have all the required pieces. Organizing your pieces before you start sewing will help streamline the process and prevent any mistakes.
Assembling the Block
Creating the Diamond Units
The Star of Bethlehem block consists of diamond units that form the star. Follow these steps to create the diamond units:
- Sewing the Diamonds:
- Take one light fabric diamond and one medium fabric diamond. Place them right sides together and sew along one side with a 1/4-inch seam allowance.
- Press the seam open to reduce bulk.
- Repeat this process to sew a dark fabric diamond to the other side of the light fabric diamond. Continue until you have completed eight diamond units.
- Joining the Diamond Units:
- Lay out the diamond units to form the star shape. Make sure the colors are arranged to create the desired pattern.
- Sew the diamond units together in pairs, then join the pairs to form the star points. Ensure your seams align accurately to maintain the star’s symmetry.
- Press the seams open or to one side, depending on your preference.

Adding the Background Triangles
Once you have assembled the star points, it’s time to add the background triangles to complete the block:
- Attaching the Triangles:
- Take the right-angled triangles cut from the light fabric and sew them to the outer edges of the diamond units. These triangles will form the edges of the block and complete the square shape.
- Sew the triangles to each diamond unit with a 1/4-inch seam allowance, and press the seams open.
- Joining the Units:
- Arrange the diamond units with the attached triangles to form the complete block. Ensure the star points are correctly aligned and the triangles fill the gaps between the points.
- Sew the units together, matching seams and pressing them open as you go.
Completing the Block
After sewing all the pieces together, your Star of Bethlehem block should measure 12.5 x 12.5 inches, including seam allowances. This size will finish to 12 x 12 inches when sewn into a quilt.
Repeat the process to create as many Star of Bethlehem blocks as needed for your quilt. Maintaining consistent seam allowances and accurate cutting will ensure all blocks are uniform in size and fit together perfectly.
Assembling the Quilt Top
Planning the Layout
Decide on the layout for your quilt top. The Star of Bethlehem blocks can be arranged in various configurations, such as straight sets or on-point layouts. Use a design wall or large flat surface to arrange your blocks and experiment with different layouts until you find one you like.
Sewing the Blocks Together
Once you’ve decided on a layout, start sewing the blocks together into rows. Use a 1/4-inch seam allowance and press the seams between the blocks open or to one side. This step reduces bulk and helps the quilt lay flat.
After sewing the rows, join them together to complete the quilt top. Again, press the seams open or to one side, ensuring all seams align correctly.
Adding Borders (Optional)
If you’d like to add borders to your quilt, measure the length and width of the quilt top. Cut border strips to the desired width, adding a few inches to the length for a more oversized fit. Sew the side borders first, then add the top and bottom borders. Press the seams towards the borders.

Finishing the Quilt
Preparing the Quilt Sandwich
To complete your Star of Bethlehem quilt, you’ll need to create a quilt sandwich. Lay out the backing fabric, right side down, and smooth it out. Place the batting on top of the backing, followed by the quilt top, right side up. Smooth out any wrinkles and ensure all layers are aligned.
Basting the Quilt
Baste the quilt sandwich using your preferred method: safety pins, spray basting, or hand basting. Basting secures the layers together, preventing shifting during quilting.
Quilting
Quilt the layers together using a walking foot or free-motion quilting technique. You can quilt along the seam lines (stitch in the ditch) or create a custom quilting design that complements the Star of Bethlehem pattern. Take your time and ensure the quilting is even and consistent across the quilt.
Binding
Finish the quilt by adding binding to the edges. Cut binding strips 2.5 inches wide and the length of your quilt’s perimeter plus a few extra inches. Join the strips end-to-end to create a continuous binding strip. Sew the binding to the front of the quilt, then fold it over to the back and hand or machine stitch it in place.
Congratulations! You’ve completed your Star of Bethlehem quilt. This timeless pattern is sure to become a cherished piece in your collection, showcasing your quilting skills and creativity. Enjoy your beautiful creation!