Super Easy – Make your lunch box at home with just one cut | Lunch box / Tote Bag cutting and sewing – Pattern is your next go‑to DIY project, especially if you’re into simple yet functional craft ideas.
In this article, we’ll explore step‑by‑step how to create a stylish Super Easy – Make your lunch box at home with just one cut | Lunch box / Tote Bag cutting and sewing – Pattern, covering everything from materials to finishing touches.
It’s structured for SEO optimization and written in a friendly, humanized tone—perfect for hobbyists, beginners, and anyone seeking a fresh lunchtime accessory idea that aligns with Google AdSense policies.
Discovering how to make your own lunch box or tote bag at home can be a creative outlet and an eco‑friendly habit. Not only will you impress friends with your craftsmanship, but you’ll also save money and waste by reusing fabric scraps. And the best part? This is genuinely Super Easy—you’ll cut and sew your own functional accessory in one go.
We’ll guide you through four clear H2 subtitled sections, each packed with helpful tips and instructions. By using SEO‑friendly language and repeating essential keywords like “Super Easy – Make your lunch box at home with just one cut | Lunch box / Tote Bag cutting and sewing – Pattern”, this article also gives your project content a boost in search rankings.
Let’s get started on your creative journey to a fun, functional, and pattern‑driven lunchtime craft!
1. Preparation: What You’ll Need for This Super Easy Pattern
To begin this Super Easy – Make your lunch box at home with just one cut | Lunch box / Tote Bag cutting and sewing – Pattern, make sure you have all materials and tools ready before you choose a pattern or fabric.
- Choose your fabric wisely. Cotton canvas, waxed canvas, or heavy-duty quilting cotton work best. They’ll hold shape well while remaining easy to cut.
- Get your pattern. Use a printable PDF or a hand‑drawn drawing. You’ll follow one simple shape so you only make one cut—true to the one‑cut approach.
- Basic tools. Scissors, sewing machine (or hand‑sewing kit), pins, ruler, chalk or fabric marker, and optional bias tape or Velcro for closure.
- Cutting surface. A self‑healing mat or flat table ensures accurate cutting.
- Reinforcements. You might want interfacing or batting to give the lunch box structure.
- Closure options. Velcro strips, snaps, or ribbon ties can be attached after your single cut.
With everything prepped, your path to creating a personalized lunch box / tote bag is on its most straightforward track.
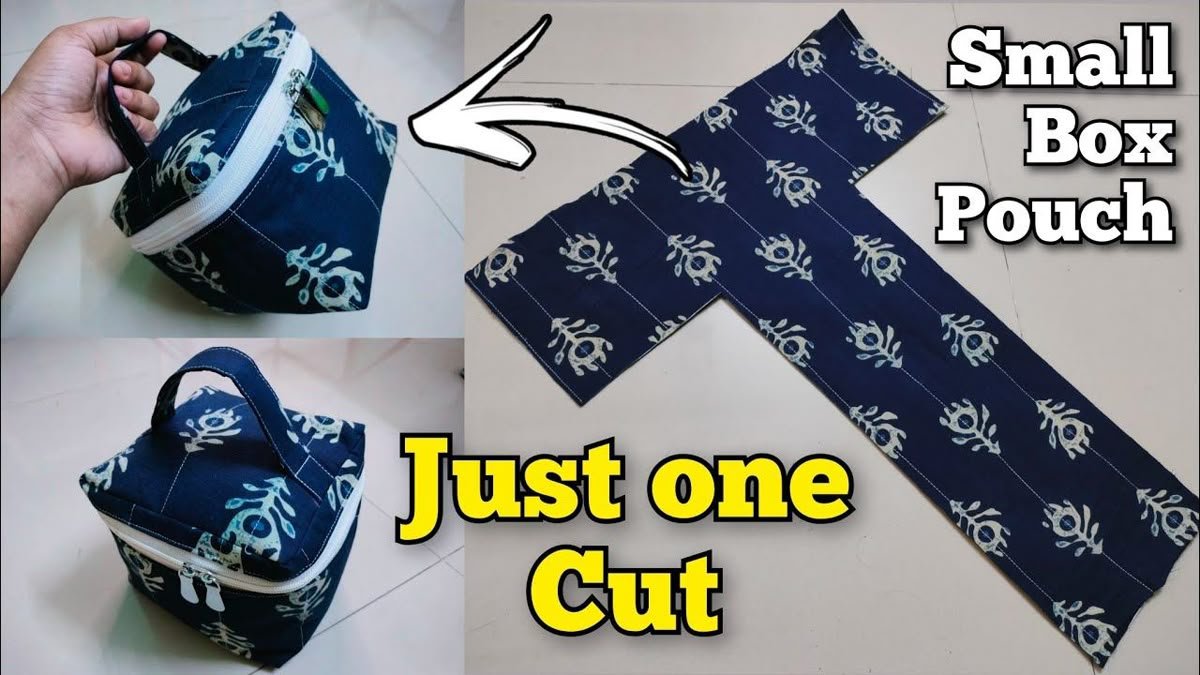
2. Cutting: One Cut, One Shape, Many Possibilities
In this step, we explain how to cut the fabric to achieve the iconic shape of this Super Easy – Make your lunch box at home with just one cut | Lunch box / Tote Bag cutting and sewing – Pattern.
- Lay your fabric flat, aligning selvage edges. Place the pattern on top and secure with pins.
- Mark precisely using chalk, especially important if your fabric is patterned or directional.
- Make the “one cut.” Carefully follow the outline and cut a single continuous piece. This step embodies the heart of this Super Easy project—minimal cutting, maximum impact.
- Double‑check for mirrored components. If your tote or lunch box needs handles or a lining, you can either fold the fabric and cut two‑in‑one or cut individually.
- Trim edges cleanly. A tidy edge means easier sewing and a more polished product.
- Label your pieces if needed. Use small sticky notes to mark “outside,” “lining,” “batting,” etc., to keep things organized.
Once your cut is done, you’ll have a ready‑to‑sew layer of lunch box / tote bag magic.
3. Sewing: Bringing the Lunch Box to Life
Time to put stitch to fabric! This section shows how to sew your Super Easy – Make your lunch box at home with just one cut | Lunch box / Tote Bag cutting and sewing – Pattern into a fully functional accessory.
- Pin edges together inside‑out so that seams are hidden when turned. If you’re sewing a lining, sandwich it with the outer fabric.
- Sew the main seam. Use a 1⁄2‑inch seam allowance or follow your pattern. Start from one edge and sew all the way around—sewing shapes like a retangular “tube.”
- Reinforce stress points. The bottom corners and handle attachments may need double stitching or a bar tack.
- Clip corners (optional). That helps turn the shape inside out without bulky seams.
- Turn right side out. Pop out corners and press with an iron so everything looks crisp.
- Top‑stitch for strength and style. A visible stitch around edges adds durability and visual polish.
Voilà! You now have a fully sewn tote bag / lunch box assembled from your one-cut pattern—quick, fun, and efficient.
4. Finishing Touches & Styling Tips
Now that your basic lunch box / tote bag is sewn, let’s add final touches to elevate your project.
- Closure installation. To keep contents secure, add Velcro, snaps, or even a bright ribbon tie.
- Handle options. Use fabric straps, leather straps, or recycled bag handles for extra flair.
- Water‑resistant lining. Add a layer of oilcloth or vinyl to help contain food spills.
- Decorative embellishments. Use patches, appliqués, embroidery, or fabric paint to reflect your personal style.
- Labeling space. Add a fabric patch or slip pocket for writing names or packing lists.
- Wash and care. If you chose washable materials, give it a gentle machine wash and reshape as needed. This enhances longevity and eco‑friendliness.
These styling tips help your Super Easy – Make your lunch box at home with just one cut | Lunch box / Tote Bag cutting and sewing – Pattern feel custom and practical—perfect for everyday use or gifts.
Frequently Asked Questions (FAQ)
Q: Do I really only need one cut?
A: Yes! The genius of this pattern lies in a single continuous cut for the outer layer (and lining if folded). That simplicity is central to the Super Easy concept.
Q: What fabric is best?
A: Heavy woven fabrics like canvas, cotton duck, or even waxed canvas balance durability with ease of handling. Waterproof or oilcloth linings are optional but helpful.
Q: Can beginners sew this?
A: Absolutely. If you’ve sewn a straight line before, you can handle this. It’s designed to be forgiving and easy to follow.
Q: How much time will it take?
A: From cutting to final finishing, expect about 1–2 hours, depending on customization level and sewing experience.
Q: How big should the pattern be?
A: Standard sizes range from 10″ × 8″ closed, with side gussets of ~4″. But the beauty is you can scale up or down as desired.
Q: Can I use this for things other than lunches?
A: Definitely! Use this pattern for small tool pouches, craft organizers, or even gift‑wrap bags. It’s versatile beyond lunchtime.
Conclusion
In this article, we’ve walked through how to create a Super Easy – Make your lunch box at home with just one cut | Lunch box / Tote Bag cutting and sewing – Pattern, covering prep, one‑cut layout, sewing steps, and finishing touches. Armed with a few tools and a simple pattern, you can craft a unique, functional accessory in no time. Your next DIY task just got fun, quick, and satisfying.
Now it’s your turn! Drop an honest opinion or suggestions: Which fabric did you choose? How did you personalize your closure? Share your thoughts and help inspire other crafters.