The Tiger Block de Quilt – Pattern is a striking and bold quilting design that captures the majestic elegance of a tiger through fabric artistry.
Perfect for both beginner and experienced quilters, this pattern combines geometric shapes and vivid colors to create a block that stands out in any quilt project.
Whether you’re working on a jungle-themed quilt or simply want a focal block that makes a statement, the tiger block adds personality and depth to your quilting masterpiece.
The beauty of the Tiger Block de Quilt – Pattern lies in its versatility. It can be used as a single statement piece, repeated across a quilt, or combined with other animal or nature-themed blocks for a cohesive visual narrative.The design offers a balance of challenge and accessibility, helping quilters grow their skills while enjoying a creative and rewarding experience.In this article, we’ll explore everything you need to know to make your own tiger block, including materials, cutting and piecing techniques, color ideas, and troubleshooting tips. If you’re passionate about quilting or looking to add an adventurous flair to your work, this pattern is an excellent place to start.
1. Choosing Materials and Preparing for the Tiger Block
Before diving into the Tiger Block de Quilt – Pattern, it’s essential to gather the right materials and prepare your workspace. Proper preparation ensures a smoother quilting experience and more accurate results.
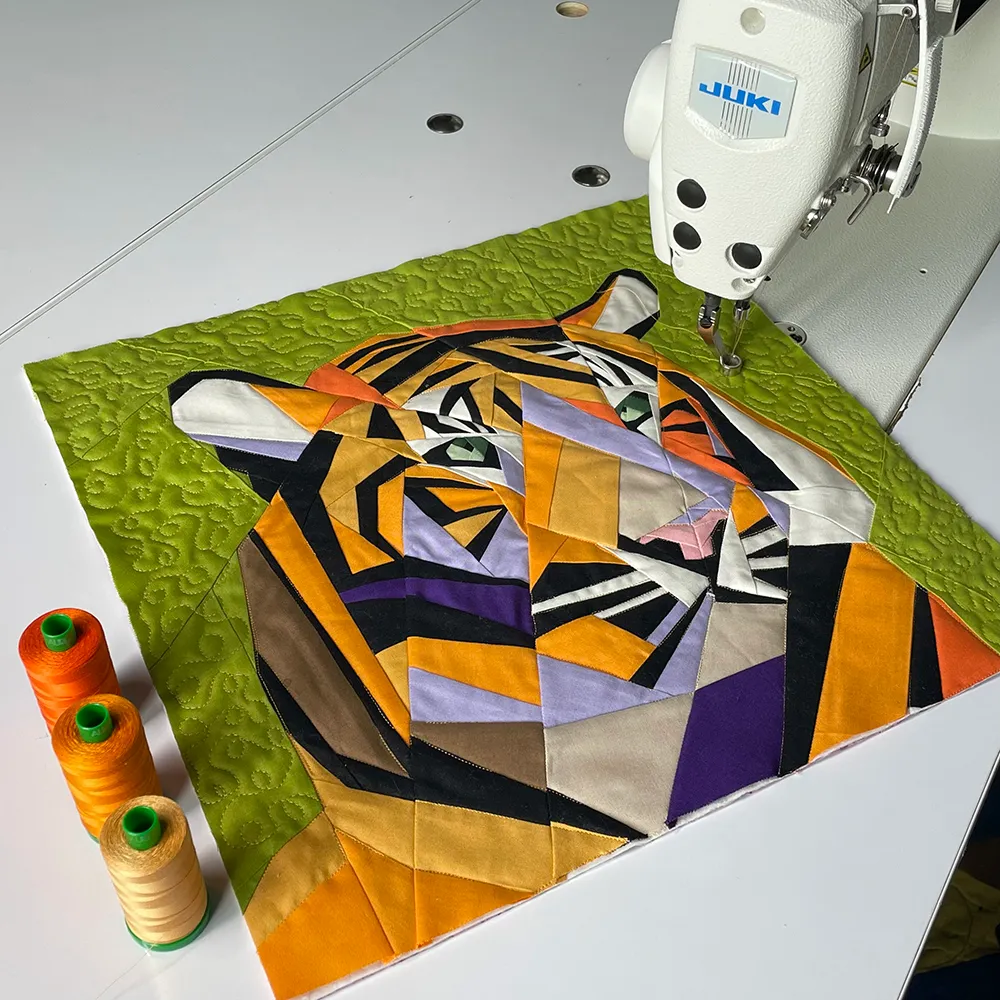
Start with 100% cotton quilting fabric, which is the most common and reliable fabric for quilt blocks. Choose a variety of fabrics in orange, black, white, and neutral shades to reflect the natural coloring of a tiger. You can also add bold background colors like jungle green or sunset red to make the block pop.
Make sure you have a rotary cutter, self-healing cutting mat, and a clear quilting ruler. These tools help achieve clean, precise cuts for the geometric shapes that make up the tiger block. Accuracy is especially important when working with angular patterns like those found in animal motifs.
You’ll also need basic sewing supplies such as thread, pins or clips, a sewing machine, and an iron. Choose high-quality thread in neutral tones like gray or beige to blend with various fabric colors in your block.
Print or draw your Tiger Block de Quilt – Pattern diagram ahead of time. Having a visual reference will make it easier to follow the piecing steps and understand how each fabric section fits into the overall design.
Lastly, pre-wash your fabrics if desired, especially if they are bright or dark colors. This prevents potential color bleeding in the finished quilt and helps you work with fabrics that have already shrunk.
2. Cutting and Piecing the Tiger Block
With your materials prepared, it’s time to begin cutting and piecing the fabric to create your Tiger Block de Quilt – Pattern. This step involves turning your fabric into art by assembling it piece by piece.
Start by cutting your fabrics according to the measurements listed in your tiger block pattern. The block typically consists of triangles, squares, and rectangles that form the tiger’s facial structure, ears, and stripes. Label your pieces to stay organized.
Begin piecing the smaller sections first, such as the eyes, nose, and ears. These smaller facial details are often created with high contrast colors like black and white, giving the tiger its expressive character. Use careful 1/4-inch seams to ensure accuracy.
Next, assemble the middle of the face, often where the most detail and color blending occurs. This section may involve more intricate piecing, such as half-square triangles or diagonal seams. Take your time to line up edges precisely.
Once the facial elements are complete, join them to the side panels that include the tiger’s stripes and background fabric. Stripes may be created with angled seams or appliqué, depending on your pattern version. Both techniques help emphasize the wild, natural look of a tiger’s fur.
Assemble the full block by joining the top, middle, and bottom rows together. Press all seams flat as you go, preferably in one direction to avoid bulk. Ironing carefully also helps the finished block lay flat and square.
Finally, square up the block using your rotary cutter and ruler to make sure it fits seamlessly with the rest of your quilt. A clean, square finish will make quilting and binding much easier later on.
3. Adding Creative Touches and Customization
One of the most enjoyable aspects of working with the Tiger Block de Quilt – Pattern is customizing it to suit your style. From color palettes to additional design elements, there are many ways to make your tiger block unique.
Start with the eyes—the most expressive part of the tiger’s face. Instead of traditional black and white, try using golden yellow or green for a more lifelike and engaging gaze. You can even use specialty fabric or embroidery thread for added texture.
Use bold fabrics with animal prints, marbled designs, or batiks to add depth and interest to the fur sections. Mixing solid and patterned fabrics can create a layered, dynamic look that mimics real fur textures.
If you enjoy embellishing, consider adding embroidery to define facial features such as whiskers, pupils, or fur highlights. Hand-stitched details give a handmade touch and elevate the block from standard to exceptional.
For a more stylized or abstract version of the tiger, use unexpected colors such as purples, blues, or even neon shades. This artistic interpretation is perfect for modern quilts or children’s room decor.
Combine the tiger block with complementary animal-themed blocks like lions, elephants, or leopards to create a wildlife or safari-themed quilt. Each block tells a part of the story, making your quilt both visually appealing and meaningful.
Add a border around the tiger block in a coordinating print or solid to help it stand out when placed with other quilt blocks. A border can also make the block easier to size up or down depending on your quilt layout.
4. Troubleshooting and Expert Tips
Even experienced quilters face challenges when working on detailed blocks like the Tiger Block de Quilt – Pattern, but a few helpful strategies can make the process smoother and more enjoyable.
First, if your block isn’t coming out the right size, check your seam allowances. Using a consistent 1/4-inch seam is crucial. Even small deviations can affect the final size and alignment of the block.
When piecing together angled sections or triangles, pin carefully and avoid stretching the fabric. Bias edges are stretchy by nature, and too much pulling can distort the shape.
Press your seams as you go, but avoid dragging the iron. Use a pressing motion instead of a gliding one to prevent warping. Pressing with steam can also help keep seams crisp and precise.
If you’re having trouble visualizing how pieces come together, color in your pattern diagram with markers or pencils. This can help you see the contrast and ensure that each fabric choice is placed where it belongs.
Keep your workspace organized. Small fabric pieces can be easy to mix up, especially when several shades of orange, black, or beige are used. Label or stack each section clearly for quick reference.
Don’t be afraid to redo a section if it doesn’t look right. Quilting is as much about problem-solving as it is about creativity. Each time you fix a mistake, you improve your skills and end up with a more polished result.
FAQ – Frequently Asked Questions
Q1: Is the Tiger Block de Quilt – Pattern beginner-friendly?
It can be! While it involves several pieces and a bit of detail work, the pattern is manageable for confident beginners and can be a fun challenge for those looking to level up their skills.
Q2: What size is a typical tiger quilt block?
Most tiger blocks are designed at 12×12 inches, but the size can vary depending on your specific pattern. You can always scale the pieces up or down to suit your project.
Q3: Can I use a different color scheme for my tiger block?
Absolutely. While traditional tiger colors are orange, black, and white, you can use any palette that suits your quilt—such as blues for a cool-toned look or pinks for a whimsical style.
Q4: How do I make the stripes on the tiger look realistic?
Use high-contrast fabric with directional patterns or cut stripes on the bias to give a more organic, natural flow to the lines. You can also use appliqué or embroidery for more detailed stripes.
Q5: Do I need a special sewing machine to make this block?
No, a standard domestic sewing machine is perfect. Just ensure it’s well-oiled, threaded correctly, and can handle piecing small sections accurately.
Q6: Can I make a quilt using only tiger blocks?
Yes! A quilt composed entirely of tiger blocks makes a bold and cohesive statement. You can vary the background colors or add borders to create visual movement across the quilt.
Conclusion
The Tiger Block de Quilt – Pattern is a beautiful and exciting addition to any quilter’s pattern collection. Whether you choose to make a single block or an entire quilt filled with tiger faces, this pattern brings character, bold design, and a touch of the wild to your work. It’s an opportunity to stretch your skills, explore color and texture, and create something truly eye-catching.
Throughout this guide, we’ve covered everything you need—from materials and cutting instructions to creative customization ideas and expert tips. With patience and passion, you’ll be able to bring your tiger block to life and add it to a quilt that tells a story.
We’d love to hear from you! Share your honest feedback about this pattern, how your project turned out, and any ideas or suggestions you’d like to see in future articles. Your input helps us continue creating inspiring and helpful content for quilters everywhere.