Creating your own Tiny Geese Keychain – Pattern is a charming and satisfying project for crafters of all levels. This miniature sewing craft combines the classic flying geese quilt design with the functionality of a keychain, resulting in a tiny yet beautiful accessory that you can use every day or gift to someone special. Not only is it a great scrap-busting project, but it’s also portable, fun, and quick to make.
The Tiny Geese Keychain – Pattern is a creative spin on traditional quilting blocks, shrunk down to keychain size. Using this pattern, you can experiment with fabric combinations, colors, and even add embroidery or embellishments to make each keychain unique. Whether you’re new to quilting or just looking for a small project to enjoy over a weekend, this one is worth adding to your list.
Throughout this article, you’ll find a complete guide to making a Tiny Geese Keychain – Pattern—from choosing materials and prepping fabric to sewing, assembling, and finishing your miniature masterpiece. This article is optimized with Google SEO techniques and written in a natural tone, following AdSense content guidelines to ensure it’s helpful, safe, and informative for all readers.
1. Choosing Materials for Your Tiny Geese Keychain
To begin your Tiny Geese Keychain – Pattern, start by selecting the right materials. Since this is a small project, it’s ideal for using up fabric scraps you already have on hand. Look for high-quality cotton, quilting fabric, or lightweight linen. The flying geese units are tiny, so avoid thick or textured fabrics that are difficult to press or sew at small scales.
You’ll need at least three fabrics: one for the background triangles, one for the “geese” triangles, and a backing fabric for the reverse side of the keychain. Coordinated or contrasting fabrics work well—bright prints or solids can make your design pop, while muted tones offer a more minimalist look.
In addition to fabric, gather a small piece of lightweight batting or interfacing. This gives the keychain structure and helps your stitches lay flat. You can also add a layer of felt or fusible fleece if you prefer a slightly padded feel.
You’ll also need a keyring or swivel hook, a small piece of ribbon or fabric loop for attaching it, coordinating thread, a rotary cutter or scissors, and a sewing machine or needle for hand-stitching. A small ruler and hot iron are helpful for pressing your miniature seams accurately.
Precision is key in the Tiny Geese Keychain – Pattern. Working at such a small scale requires accurate cutting and clean piecing. Don’t worry if your first attempt isn’t perfect—practice helps, and even slight imperfections can add charm to the finished piece.
Finally, consider optional decorative elements. A tiny button, initial tag, or hand-stitched border can add personality. This project is all about attention to detail and personal expression, so feel free to make it your own.
2. Assembling the Flying Geese Block
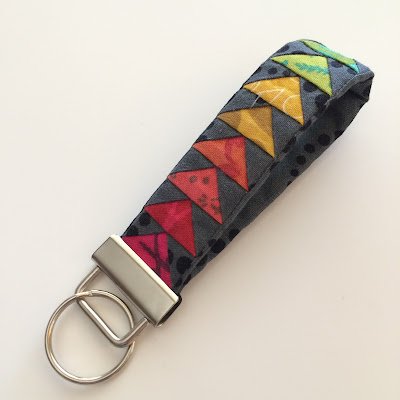
The heart of the Tiny Geese Keychain – Pattern lies in creating miniature flying geese units. This timeless quilt block consists of a central triangle (the “goose”) and two smaller triangles (the “sky”) on either side. For keychain purposes, each unit is typically under 1″ in size.
Start by cutting your fabric pieces. A common size for a single unit is 1″ x 2″ finished, so you’ll need to cut 1.5″ x 2.5″ rectangles for the goose and two 1.5″ squares for the background. Make sure your cuts are as accurate as possible—precision matters in miniature piecing.
To assemble the unit, place one background square on the goose rectangle, right sides together, aligning the corners. Draw a diagonal line on the square and stitch along it. Trim the excess seam allowance and press the triangle open. Repeat on the other side with the second background square.
Once your flying geese unit is complete, give it a good press. The seams should be crisp and the edges clean. If making multiple units for a longer keychain, sew them together using a ¼” seam allowance. For a single-unit keychain, one block is often enough.
Trim the completed unit to ensure it’s square and symmetrical. You can add tiny sashing strips or a border if you want to enlarge it slightly or highlight the central triangle design.
At this point, you’ve finished the most detailed part of the Tiny Geese Keychain – Pattern. The rest of the process involves layering, quilting, and finishing your mini block into a functional accessory.
3. Quilting, Layering, and Stitching
Now that your flying geese block is pieced and pressed, it’s time to assemble the full keychain using the Tiny Geese Keychain – Pattern. This involves layering the front piece with batting and backing fabric to give it structure and durability.
Cut a small piece of batting slightly larger than your finished block. Do the same with your backing fabric. Layer the batting on the bottom, the backing right side up in the middle, and your flying geese block on top, right side up. Use clips or pins to hold everything together.
Quilt the layers together using straight lines, decorative stitching, or simple echo quilting around the geese shapes. Because the piece is so small, hand stitching is also a great option here. This step not only strengthens the piece but also adds to its visual appeal.
Once quilted, trim the layers evenly. The final size should be around 2″ x 3″, depending on how many flying geese units you used and whether you added borders. Make sure all sides are square and cleanly trimmed.
If you’d like to add a fabric loop or ribbon for the keyring, now is the time. Fold a 2″ strip of ribbon or fabric in half and tuck it between the front and back layers, raw edges aligned. Pin it in place securely.
Use binding or simply top-stitch around the edges of the piece to close it. If binding, use a 1″ wide strip of bias tape or fabric to enclose the edges neatly. Hand-stitch the final edge or machine stitch it for durability.
Finally, attach the keyring or swivel hook through the loop. Your Tiny Geese Keychain – Pattern is now complete and ready to use or gift.
4. Creative Uses and Personalization Ideas
One of the joys of making a Tiny Geese Keychain – Pattern is how easily you can customize it. These miniature creations are perfect for personalization, making them ideal gifts for friends, teachers, or coworkers. Add initials, tiny embroidery, or use fabrics that reflect the recipient’s personality or favorite colors.
You can also theme your keychains for seasons or holidays. Use red and green for a Christmas version, pastels for spring, or bold prints for a more modern look. Each keychain takes only a small amount of fabric, so they’re ideal for experimenting with design.
Beyond keychains, you can adapt this pattern to other small accessories. Turn it into a zipper pull, backpack charm, or a mini ornament. Use it as a luggage tag by adding a fabric pocket to the back for a name card.
Another creative idea is to turn it into a scissor fob or needle minder for your sewing kit. This way, your Tiny Geese Keychain – Pattern becomes not just decorative but practical in your crafting life as well.
If you enjoy selling handmade items, these keychains are popular at craft fairs and online marketplaces. They’re affordable to make, highly giftable, and easy to package and ship. Just be sure to use quality hardware and durable stitching to ensure they hold up with use.
Keep a basket of finished keychains by your door or in your sewing room for last-minute gifts. They’re small tokens of care and creativity that anyone can appreciate, and they always bring a smile.
FAQ
What size should I cut the pieces for the Tiny Geese Keychain – Pattern?
A common size is a 1.5″ x 2.5″ rectangle for the goose and two 1.5″ squares for the sky. The final block will be about 1″ x 2″ after sewing and trimming.
Can I sew the Tiny Geese Keychain by hand?
Yes, absolutely! This is a perfect hand-sewing project. The pieces are small and manageable, and hand-stitching adds a charming touch.
What kind of batting should I use?
A lightweight cotton batting or fusible fleece works well. Since this is a keychain, you don’t need thick batting—just enough to give structure.
Do I need a sewing machine?
Not necessarily. While a sewing machine speeds up the process, this project can be entirely hand-stitched. It’s ideal for travel or relaxing evenings.
How do I attach the keyring securely?
Use a fabric loop or ribbon folded in half and stitched into the top seam. Make sure it’s reinforced and stitched multiple times to handle wear and tear.
Is this a beginner-friendly pattern?
Yes! The Tiny Geese Keychain – Pattern is great for beginners. It helps you practice precision and piecing on a small scale and is very forgiving.
Conclusion
By following the steps in this article, you’ve learned how to complete a Tiny Geese Keychain – Pattern from start to finish. From choosing fabrics and assembling the flying geese block to quilting, finishing, and personalizing your keychain, this small project is full of creative potential and practical value.
Whether you’re making it for yourself, as a gift, or to sell at a local market, the keychain is a beautiful and functional piece of handmade art. With endless customization options and minimal materials needed, it’s the kind of project that keeps giving.
We’d love to hearabout your crafting journey. Please leave your honest opinion and suggestions below—did you try different fabrics, hand-stitching, or extra embellishments? Share your experience so others can be inspired by your creativity too!