Buildings 3D Quilt – Pattern is more than just a hobby project—it’s a creative and immersive way to bring the elegance and complexity of architecture into your quilting art. Whether you’re an experienced quilter or just getting started, working with this style allows you to explore dimension, texture, and design in an exciting new form. This unique quilting approach combines the love of fabric with the visual impact of three-dimensional structures, resulting in eye-catching quilts that resemble miniature architectural masterpieces.
If you’ve ever looked at a skyline and felt inspired by the shapes, windows, and rooftops, a Buildings 3D Quilt – Pattern may be the perfect creative outlet. This technique transforms typical flat quilting into an artful expression that can mimic real-life buildings—houses, city blocks, or even whimsical imaginary structures—using shadows, highlights, and thoughtful fabric layering. With the right methods and patterns, your quilt can pop right off the wall with depth and personality.
In this guide, we’ll break down everything you need to know about designing and crafting your own Buildings 3D Quilt – Pattern, including foundational tips, choosing the right materials, advanced techniques for realism, and finishing touches that bring it all together. Whether you’re making a cozy wall hanging or a bold bedspread, you’re about to discover how to turn thread and fabric into a dimensional cityscape masterpiece.
1. Understanding the Concept of Buildings 3D Quilt – Pattern
To begin with, it’s essential to understand what a Buildings 3D Quilt – Pattern truly entails. This quilting style uses visual depth and texture to recreate the appearance of three-dimensional buildings. It typically involves techniques like shadow quilting, perspective layout, and creative use of light and dark fabrics to simulate depth.
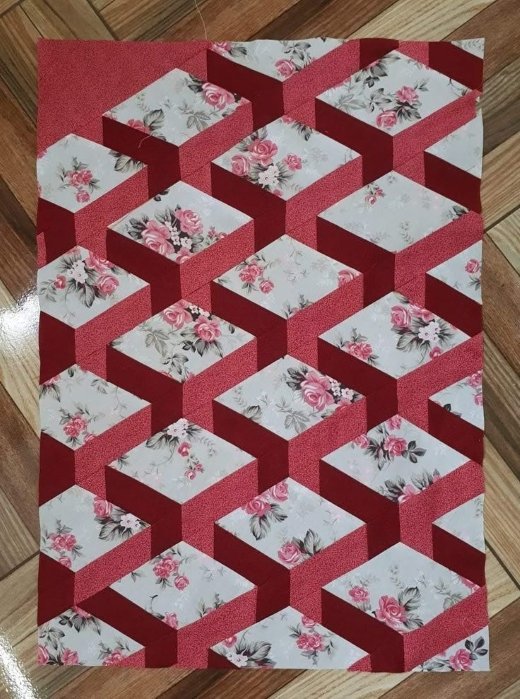
A key part of this concept is using geometric shapes that resemble building elements—rectangles for walls, triangles for rooftops, and squares for windows. When arranged correctly, these shapes start to resemble actual cityscapes or architectural structures. This method goes beyond traditional quilting by requiring a touch of visual storytelling and spatial design.
The pattern itself can be pre-designed or custom-drafted. Many quilters enjoy sketching out their own Buildings 3D Quilt – Pattern using graph paper or digital software, allowing for complete creative freedom. Others prefer using pre-made templates or kits, especially when starting out.
Color selection also plays a crucial role. Light, medium, and dark shades of the same color can be used to create the illusion of light hitting different parts of the building. For example, using a darker fabric on one side of a building block can simulate shadow, while a lighter tone can highlight the sunlit side.
Fabric choice impacts the final look. Solid colors provide clean lines that emphasize the building’s shape, while textures and prints can mimic brick, stone, or glass. Quilters may also add appliqué or embroidery for extra detail, such as doors, signage, or windows.
Finally, mastering the Buildings 3D Quilt – Pattern means practicing patience. Precision cutting and careful piecing are critical to achieving the right visual effect. But once you understand how to use depth and dimension, the creative possibilities are endless.
2. Materials and Tools You’ll Need
Before you start stitching, it’s important to gather all the necessary tools and materials for your Buildings 3D Quilt – Pattern. Choosing the right supplies ensures your quilt is not only visually appealing but also durable and professionally finished.
Start with high-quality cotton quilting fabric. You’ll want a wide range of shades in your palette, including light, medium, and dark tones. These will help create the illusion of depth and light within your 3D structures. Solid colors work best for beginners, but you can experiment with patterns as your confidence grows.
Next, invest in a reliable rotary cutter and self-healing cutting mat. These tools help you achieve clean, accurate cuts that are essential for precise piecing. Also, keep a good pair of fabric scissors on hand for trimming and detailing.
A quilting ruler is crucial for measuring and aligning your pieces correctly. Look for one with grid lines and angle markings so you can easily cut your building blocks to size and maintain proper perspective throughout your quilt.
You’ll also need high-quality thread, preferably cotton or polyester, that matches or contrasts with your fabric depending on the effect you want. Using neutral tones can help keep the stitching subtle, while bold colors can add character and definition.
When it comes to batting, choose a low-loft variety if you want your quilt to lie flatter and emphasize the shapes more than the puffiness. If you prefer a cushier, more tactile look, a higher-loft batting may be your preference.
Finally, don’t forget your sewing machine. Make sure it has a walking foot or quilting foot attachment. These help feed the layers evenly and prevent fabric shifting. If you’re hand-quilting, gather needles, thimbles, and plenty of patience—it’s a slower process but can produce exquisite results.
3. Step-by-Step Design Techniques for Realistic Effects
Designing a Buildings 3D Quilt – Pattern involves more than just sewing pieces together. The goal is to create a visual illusion of depth and structure. With the right layout and techniques, your quilt can look like it’s standing up off the fabric.
Start with a sketch. Either draw on graph paper or use a digital quilting app to draft your layout. Decide whether you’re creating a single building, a street view, or an entire skyline. Keep proportions consistent and plan where your light source will be to guide your shading choices.
Use value contrast for depth. This means placing light and dark fabrics next to each other strategically. A darker side next to a lighter roof gives the illusion of sunlight and shadow. Using medium tones can create mid-ground areas that tie the light and dark together.
Incorporate perspective by using angled lines for rooftops or streets. This makes the quilt appear to stretch into the distance. Techniques like one-point or two-point perspective can help here, similar to drawing or painting scenes with depth.
Stitch direction also matters. Vertical stitches can suggest tall skyscrapers, while horizontal or diagonal lines may mimic shadows or roof slopes. You can even use free-motion quilting to add texture like brick patterns or window grids.
Think about layering. Sometimes, quilting additional pieces on top of the base quilt (like roof tiles or window trims) can add literal dimension, enhancing the 3D effect. This works well for focal points within your design.
Don’t underestimate the power of borders and sashing. These elements frame your quilt and can reinforce the architectural theme. Using “cobblestone” or “brick road” prints for sashing can add an extra layer of storytelling to your finished piece.
4. Finishing and Displaying Your Quilt
Once your Buildings 3D Quilt – Pattern is complete, it’s time to focus on finishing touches that elevate your work from hobby to showpiece. This stage involves binding, backing, quilting, and possibly even framing or hanging.
Binding is the edge finish of your quilt and should complement your design. Choose a solid or patterned fabric that doesn’t clash with the main design. A narrow, dark binding can frame the quilt like a painting, while a light one can make it feel airy and open.
For backing, select a fabric that either matches your theme or adds a surprise detail. Some quilters use map-printed fabrics, blueprints, or neutral tones to keep the focus on the front. Make sure it’s smooth and wrinkle-free before quilting.
Quilting the layers together requires thoughtful stitching. You can follow the building outlines with stitch-in-the-ditch techniques or create shadow effects by quilting slightly outside the lines. Free-motion quilting allows for extra creativity in adding clouds, trees, or architectural textures.
Label your quilt! This is especially important if you plan to display or gift it. Include your name, the date, and maybe a title for your piece. You can embroider this, write it with fabric markers, or print it on iron-on labels.
If you want to hang the quilt, sew a sleeve on the back to insert a dowel. This method preserves the quilt’s shape and allows for easy display on walls, in galleries, or quilt shows. Alternatively, frame smaller pieces for a more formal presentation.
Don’t be afraid to share your work! Post your Buildings 3D Quilt – Pattern on social media, enter it in local contests, or offer it as a class sample if you teach. Quilts like this are unique conversation starters and show incredible artistry.
FAQ: Frequently Asked Questions About Buildings 3D Quilt – Pattern
Q1: Is a Buildings 3D Quilt – Pattern suitable for beginners?
Yes! While it looks complex, beginners can start with simple block designs and learn gradually. Many resources and pre-designed templates make it easier to begin.
Q2: What’s the best fabric for creating a realistic 3D building effect?
Solid-colored cotton is ideal for creating strong contrast and sharp lines, but textured or printed fabric can add realism when mimicking materials like brick or metal.
Q3: How do I make the quilt look more three-dimensional?
Use light and dark shades strategically to mimic lighting and shadows, and incorporate layering techniques or appliqué to create raised features.
Q4: Can I design my own Buildings 3D Quilt – Pattern?
Absolutely! Many quilters design their own using graph paper or digital quilt design software. This allows full creative freedom and personal expression.
Q5: How large should a 3D quilt be?
It depends on your project. Wall hangings are popular for 3D quilts due to their visual impact, but bed-sized quilts can also be stunning when using larger-scale building patterns.
Q6: Do I need special quilting skills to make one?
Basic quilting skills are enough to get started. However, knowledge of visual perspective, fabric
layering, and advanced piecing techniques can greatly enhance the effect.
Conclusion
Creating a Buildings 3D Quilt – Pattern opens up a world where architectural design meets textile art. From choosing fabrics and colors to stitching shadows and structure, this style of quilting allows for both creativity and precision. It’s a rewarding journey that results in a quilt that is not only cozy but also a stunning visual piece.
We hope this guide has helped you feel confident about diving into the world of 3D quilting. If you’ve tried this technique or plan to, we’d love to hear from you! Leave a sincere opinion below and feel free to share suggestions or experiences. Your feedback helps inspire future content and keeps the quilting community thriving.