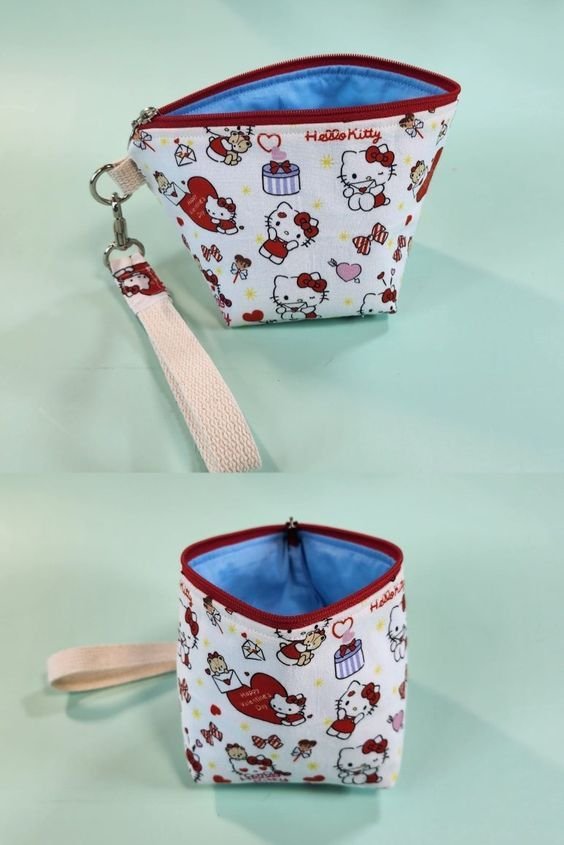
The Triangular Bag with zipper – Pattern is a fascinating intersection of geometric precision and modern textile art, offering a unique silhouette that challenges the traditional square or rectangular shapes of most handbags. Often referred to as a “tetrahedron bag” or “pyramid pouch,” this specific sewing project has gained massive popularity among DIY enthusiasts who want a quick, visually striking accessory that functions as both a coin purse and a statement piece. By following a well-structured Triangular Bag with zipper – Pattern, you can transform simple fabric scraps into a three-dimensional marvel that is as practical as it is aesthetically pleasing.
Mastering the Triangular Bag with zipper – Pattern requires an understanding of how fabric planes interact with one another when joined by a linear fastener. Unlike flat pouches, the magic of the triangular bag happens during the final construction step, where the orientation of the last seam creates the iconic 3D volume. This pattern is highly adaptable, allowing you to scale it up for a quirky evening clutch or scale it down to create a “triangle pouch” for earbuds, jewelry, or small essentials. Because it uses relatively small amounts of material, it is also an incredibly eco-friendly sewing project for those looking to upcycle high-quality fabric remnants.
When you embark on a Triangular Bag with zipper – Pattern, you are not just making a bag; you are practicing essential skills such as zipper installation, seam finishing, and spatial reasoning. The beauty of the zippered triangle design lies in its simplicity—it typically consists of just one rectangular piece of fabric and a single zipper. However, the professional look of the final product depends heavily on your fabric choice, the accuracy of your measurements, and the quality of the notions used. This guide is designed to walk you through every nuance of the pattern, ensuring that your finished handmade bag looks like a boutique find rather than a classroom experiment.
1. Essential Materials and Tools for the Triangular Bag with zipper – Pattern
The first step in any successful Triangular Bag with zipper – Pattern is choosing a fabric with the right amount of body. For a crisp, architectural look, heavyweight cotton canvas, denim, or even faux leather works best, as these materials hold the “pyramid” shape without collapsing under their own weight. If you prefer a softer look, you can use quilting cotton but will need to reinforce it with a fusible interfacing to provide the necessary structure.
The zipper is the most critical component of the Triangular Bag with zipper – Pattern, acting as both the closure and the structural spine of the bag. A nylon coil zipper is usually recommended for beginners because it is easy to sew over and can be trimmed to the exact size needed for your custom pattern. For a more rugged or industrial aesthetic, a metal zipper adds weight and a high-end feel, though it requires more care during the sewing process to avoid breaking needles.
Your sewing machine setup should be optimized for the thickness of your chosen materials. A size 90/14 needle is generally versatile enough for most canvas or interfaced fabrics used in the Triangular Bag with zipper – Pattern. Additionally, using a zipper foot is non-negotiable, as it allows you to stitch close to the zipper teeth, ensuring a clean and professional finish that makes the triangle pouch look seamless and well-constructed.
In terms of notions, you will need high-quality polyester thread that matches or intentionally contrasts with your fabric. For the Triangular Bag with zipper – Pattern, a small piece of ribbon or a leather scrap can be used as a “pull tab” at the end of the zipper. This small detail isn’t just for looks; it provides leverage when opening the bag and hides the raw edges where the zipper ends, which is a hallmark of a professional sewing pattern.
Precise cutting tools are vital for the Triangular Bag with zipper – Pattern because the geometry relies on perfect right angles. Using a rotary cutter, a self-healing mat, and an acrylic ruler will yield much more accurate results than traditional fabric scissors. When the rectangle is cut perfectly, the folds of the triangular bag will align naturally, preventing the “twisted” look that can occur with uneven fabric pieces.
Finally, consider the lining material. While some simple versions of the Triangular Bag with zipper – Pattern are unlined, adding a contrasting lining fabric elevates the project significantly. A pop of color or a fun print inside the zippered bag adds an element of surprise and protects the interior seams, making the pouch more durable for carrying keys or other sharp objects that might snag raw fabric edges.
2. Step-by-Step Construction and Geometry of the Pattern
The core of the Triangular Bag with zipper – Pattern begins with a rectangle where the length is exactly double the width. For example, if your width is 10 inches, your length should be 20 inches plus seam allowances. This specific ratio is the mathematical secret that allows the fabric to fold into a perfect equilateral tetrahedron once the zipper is installed and the side seams are closed.
Installing the zipper is the next phase of the Triangular Bag with zipper – Pattern. You will sew one side of the zipper tape to the short edge of the rectangle, and then bring the other short edge up to meet the other side of the zipper. This creates a fabric tube. It is essential to topstitch along the zipper at this stage, as it prevents the fabric from getting caught in the teeth and gives the handmade pouch a polished appearance.
The most critical moment in the Triangular Bag with zipper – Pattern is the orientation of the final two seams. After creating the tube, you will sew one end shut with a straight horizontal seam. To create the triangular volume, you must turn the bag and sew the opposite end shut in a vertical orientation—perpendicular to the first seam. This “cross-seam” technique is what pulls the fabric into its 3D pyramid shape.
Before sewing the final seam of your Triangular Bag with zipper – Pattern, you must remember the golden rule of zippered pouches: open the zipper halfway. If you sew the bag completely shut with the zipper closed, you will find it nearly impossible to turn the bag right-side out through the small opening. This is a common mistake that can be easily avoided by double-checking the zipper position before your final pass at the machine.
Managing the “bulk” at the corners is a technical skill required for this pattern. When you reach the points where the zipper meets the side seams, you should trim the excess zipper tape and clip the fabric corners at a 45-degree angle. This reduces the internal mass, allowing the triangular bag to have sharp, clean points that look professional and sit flat when the bag is placed on a surface.
The final step is the turning and poking process. Once the seams are finished, you turn the Triangular Bag with zipper – Pattern right-side out through the zipper opening. Using a specialized point turner or a dull chopstick to gently push out the corners ensures the pyramid shape is fully realized. A good steam press with an iron at this stage will set the seams and give the zippered triangle its final, crisp silhouette.
3. Advanced Customizations and Creative Variations
Once you have mastered the basic Triangular Bag with zipper – Pattern, the possibilities for customization are endless. One popular variation is adding a wristlet strap or a “D-ring” to one of the corners. This turns the small pouch into a functional clutch bag, making it easy to carry for a quick run to the store or a night out where you only need the bare essentials.
You can also experiment with patchwork techniques within the Triangular Bag with zipper – Pattern. Instead of using a single piece of fabric, you can quilt together smaller hexies or squares to create the initial rectangle. This adds a beautiful, cozy “shabby chic” vibe to the triangular pouch and is an excellent way to use up your very smallest fabric scraps while creating something truly unique.
For those interested in embroidery, the flat panels of the Triangular Bag with zipper – Pattern offer a great canvas. You should complete any decorative stitching or monogramming on the fabric rectangle before you begin the assembly process. Adding a small embroidered flower or a geometric design can make the zippered bag feel like a personalized, high-end gift for friends or family.
Texture can be introduced by using quilted fabrics or “bubble” fleece. When you use a padded material for the Triangular Bag with zipper – Pattern, the pouch becomes an excellent protective case for delicate items like sunglasses or small camera lenses. The natural padding of the pyramid shape provides a “buffer zone” that flat pouches simply cannot offer, combining style with extra equipment protection.
Color-blocking the zipper is another way to modernize the Triangular Bag with zipper – Pattern. Using a neon zipper against a neutral grey or navy canvas creates a striking contemporary look. You can also find zippers with decorative pulls, such as tassels or charms, which add a playful element to the triangle design without requiring extra sewing steps or complex modifications.
Finally, consider the hardware. Adding metal “feet” or studs to the bottom of a larger Triangular Bag with zipper – Pattern protects the fabric from wear and tear. If you are making a leather version, using heavy-duty hardware and contrast stitching can turn a simple geometric shape into a luxury accessory that rivals designer brands, proving the versatility of this timeless pattern.
FAQ: Common Questions about the Triangular Bag with zipper – Pattern
1. Is the Triangular Bag with zipper – Pattern beginner-friendly?
Yes! This is one of the best projects for beginners because it uses straight lines and a single zipper. The most “difficult” part is simply understanding the fold at the end, but once you see it happen, it feels very intuitive.
2. What size zipper do I need for this pattern?
A standard 7-inch or 9-inch zipper is perfect for a medium-sized pouch. However, since the Triangular Bag with zipper – Pattern is scalable, you can use any size zipper as long as your fabric rectangle is twice as long as the zipper length plus seam allowances.
3. Can I make this bag without a sewing machine?
While a machine is faster and provides stronger seams for the zippered bag, you can certainly sew it by hand using a backstitch. Just ensure your stitches are small and tight to handle the tension of the zipper being pulled open and shut.
4. How do I clean my finished triangular bag?
This depends on the fabric choice. If made from cotton canvas, you can usually machine wash it on a delicate cycle and air dry. For leather or heavily interfaced versions of the pattern, spot cleaning with a damp cloth is recommended to maintain the shape.
5. Why does my bag look lopsided?
This usually happens if the initial fabric rectangle wasn’t a perfect 1:2 ratio or if the final seams weren’t perfectly perpendicular. Precision in the cutting and alignment phase of the Triangular Bag with zipper – Pattern is the key to a symmetrical pyramid.
6. Can I use this pattern to sell items on Etsy?
Absolutely! The Triangular Bag with zipper – Pattern is a great item for craft fairs and online shops. It’s quick to make, uses little material, and has a high “wow factor” because of its unique 3D shape.
Conclusion
Throughout this guide, we have explored the intricate details of the Triangular Bag with zipper – Pattern, a project that proves you don’t need complex blueprints to create something extraordinary.
We covered the essential materials like canvas and nylon zippers, the mathematical 1:2 ratio required for the fabric, and the “cross-seam” technique that gives the bag its iconic 3D pyramid volume. Whether you are a beginner looking to practice zipper installation or an advanced sewist experimenting with fabric textures and hardware, this pattern offers a perfect canvas for your creativity.