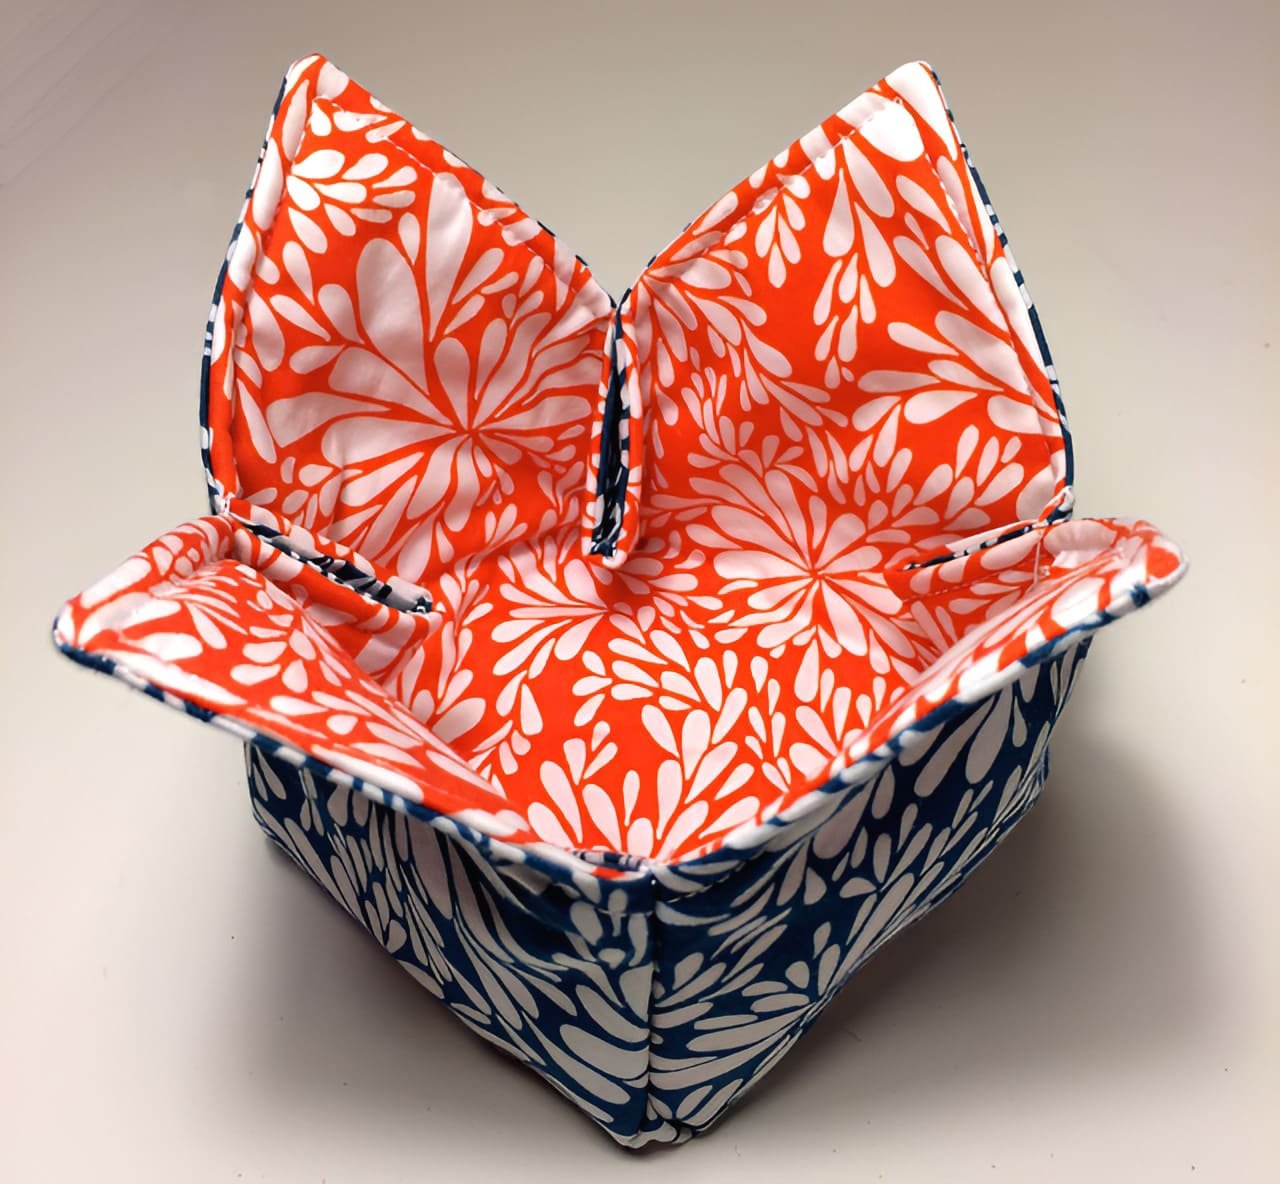
The Tulip Nesting Bowls – Pattern is a breath of fresh air for anyone looking to combine floral elegance with practical home organization through the art of fiber crafts. These charming fabric or crochet containers are designed to mimic the delicate, overlapping petals of a tulip, creating a soft and organic look that standard storage bins simply cannot replicate. Because they are nesting bowls, they offer the unique advantage of being stored inside one another when not in use, making them an excellent space-saving solution for modern homes that value both form and function.
Creating a set of these bowls using a dedicated Tulip Nesting Bowls – Pattern allows you to bring the beauty of a springtime garden into your living space regardless of the season. Whether you use them to hold yarn scraps, jewelry, keys, or even as decorative bread baskets for a brunch table, their versatility is unmatched. The construction usually involves creating a sturdy base and building up walls that flare out slightly, ending in the characteristic pointed tips that define the tulip-inspired silhouette. It is a project that appeals to both beginners and advanced crafters because it focuses on clean lines and satisfying structural geometry.
In this detailed guide, we will explore every facet of the Tulip Nesting Bowls – Pattern, from the selection of stiffening materials that keep the petals upright to the color theories that make the floral design pop. We will dive into the technicalities of scaling the sizes so that each bowl fits perfectly within the next, ensuring a seamless “nesting” experience. By the end of this article, you will understand how to transform simple materials into a coordinated set of organizers that are as beautiful as they are useful. Let’s begin our journey into this delightful floral nesting craft.
1. Choosing the Best Materials for Your Tulip Nesting Bowls – Pattern
The success of any Tulip Nesting Bowls – Pattern depends heavily on the “weight” and “stiffness” of the materials you choose. If you are sewing these bowls, you should opt for a medium-to-heavyweight cotton canvas or a sturdy linen blend. These fabrics provide the necessary body to support the “petals” so they don’t flop over. For those who prefer a crochet tulip bowl, using a t-shirt yarn or a double-stranded mercerized cotton is the best way to ensure the walls of the bowl remain rigid and functional for storage.
Interfacing is the secret hero of the Tulip Nesting Bowls – Pattern when it comes to fabric versions. To get that crisp, upright look, you must use a heavy-duty sew-in or fusible “firm” stabilizer. Brands like Pellon’s Peltex or ultra-firm buckram are ideal because they provide a structural integrity similar to cardboard but are much more durable and often washable. Without this internal support, your fabric nesting bowls will lose their shape the moment you place an item inside them.
When selecting colors for your Tulip Nesting Bowls – Pattern, think about the natural anatomy of a tulip. Many crafters choose a “gradient” approach, where the largest bowl is a deep, saturated pink or red, and each subsequent smaller bowl becomes a lighter shade. This creates a beautiful “blooming” effect when they are nested together. Alternatively, using a solid exterior with a contrasting floral print for the lining can add a surprise pop of color whenever a bowl is emptied.
Thread and needle choice also play a vital role in executing the Tulip Nesting Bowls – Pattern professionally. If you are sewing through multiple layers of fabric and heavy interfacing, you will need a denim or topstitch needle (size 100/16) to prevent breakage. For crochet versions, a hook that is slightly smaller than recommended for your yarn will create a tighter, denser stitch. This high-tension approach is what gives the handcrafted tulip bowls their signature architectural strength.
Don’t forget about “food safety” if you plan to use your finished Tulip Nesting Bowls – Pattern for serving dry goods like crackers or bread. If they will be in contact with food, ensure that your fabrics are 100% natural and have been washed with a dye-free, scent-free detergent. It is also wise to avoid using glues or synthetic stiffening sprays that might leach chemicals. Sticking to 100% cotton materials ensures that your beautiful bowls are as safe as they are stylish.
Finally, consider the base of the bowls in your Tulip Nesting Bowls – Pattern. Some patterns suggest a circular base, while others use a hexagonal shape to make the “petals” easier to attach. Regardless of the shape, you might want to add a layer of felt or a non-slip fabric to the bottom. This prevents the bowls from sliding around on polished wooden tables and adds a high-end, finished feel to your DIY organization project.
2. Master Techniques for Shaping the Petals and Nesting Sizes
The most iconic part of the Tulip Nesting Bowls – Pattern is the petal-shaped rim. To achieve this, the pattern usually involves “darts” or specific decreases that pull the fabric inward at the base and allow it to flare at the top. If you are sewing, precision in clipping your curves is essential. Making small “v-shaped” snips into the seam allowance allows the fabric to turn smoothly, preventing the points of the petals from looking bulky or distorted.
Scaling is another technical challenge in the Tulip Nesting Bowls – Pattern. To ensure the bowls nest perfectly, the diameter of each bowl should typically be 1 to 2 inches smaller than the one before it. However, you must also account for the thickness of the material. If you are using very thick foam interfacing, you may need to increase the size difference to 2.5 inches so the bowls don’t get “stuck” when you try to stack them together. This graduated sizing is what makes the set truly impressive.
For the crochet version of the Tulip Nesting Bowls – Pattern, the “waistcoat stitch” or “knit stitch” is a fantastic technique to use. This stitch creates a very dense, non-stretchy fabric that looks almost woven. It provides the perfect canvas for the petal shapes and prevents the bowl from expanding too much over time. Working in the “back loop only” for the transition between the base and the walls also creates a sharp, clean corner that helps the bowl sit flat.
Assembling the layers of a Tulip Nesting Bowls – Pattern requires a technique called “topstitching.” Once you have sewn the lining to the outer fabric, you will turn it right side out and sew a final line of stitching along the very edge of the petals. This not only looks professional but also “locks” the interfacing in place, preventing it from shifting during use. A contrasting topstitch can also highlight the beautiful curves of the tulip petals.
If your Tulip Nesting Bowls – Pattern feels a bit too plain, you can incorporate “trapunto” or “raised quilting” into the petals. By sewing a line down the center of each petal and adding a small amount of extra batting, you can create a 3D vein effect that mimics a real flower. This level of detail turns a simple storage bowl into a piece of textile art that guests will likely mistake for a high-end boutique purchase.
The “nesting” feature of the Tulip Nesting Bowls – Pattern also benefits from a “flat-felled seam” or a very clean interior finish. Since the inside of the larger bowls will be visible whenever the smaller ones are removed, you want the interior to be just as beautiful as the exterior. Using a coordinated lining fabric and ensuring all raw edges are completely encased will make your set look professional from every possible angle.
3. Practical Uses and Styling for Your Tulip Organizers
One of the most popular ways to use the results of your Tulip Nesting Bowls – Pattern is in the “craft room.” The different sizes are perfect for sorting various items: the largest for skeins of yarn, the medium for fabric scraps, and the smallest for buttons or stitch markers. Having a coordinated set of floral bowls makes the organization process feel like a part of your creative journey rather than a chore, keeping your workspace tidy and inspiring.
In the bedroom or on a vanity, a set made from a Tulip Nesting Bowls – Pattern acts as a stunning “catch-all” for jewelry and cosmetics. The soft fabric petals are much gentler on delicate necklaces and gemstones than ceramic or metal dishes. You can use a light, ethereal fabric like silk or satin for the lining to add a touch of luxury to your nightstand organization, ensuring your treasures are kept safe and stylish.
The kitchen is another fantastic place for your Tulip Nesting Bowls – Pattern creations. They make excellent “dry” snack bowls for movie nights or elegant containers for wrapped candies. During a dinner party, you can use the nested set to hold different types of bread rolls or napkins. Because they are unbreakable kitchen accessories, they are also a safer choice for households with active children or pets.
For those who love a “cottagecore” or “shabby chic” aesthetic, the Tulip Nesting Bowls – Pattern is a perfect fit. You can style them in a tiered tray or on an open shelf to add texture and height to your decor. Even when empty, the nesting flower bowls look like a sculptural art piece. Mixing and matching different floral prints within the same set can create a charming, eclectic look that feels warm and lived-in.
Gifting a set of bowls made from a Tulip Nesting Bowls – Pattern is a thoughtful gesture for housewarmings, bridal showers, or Mother’s Day. Because you can choose the fabrics yourself, you can tailor the gift to the recipient’s favorite colors or home style. A handmade nesting set shows a level of effort and care that store-bought items simply cannot match, making it a sentimental keepsake that will be used for years to come.
Finally, don’t overlook the potential for “seasonal” updates. You can use your Tulip Nesting Bowls – Pattern to make a set in deep oranges and yellows for a fall “tulip” look (reminiscent of autumn leaves) or in crisp whites and silvers for a winter display. The versatile floral design adapts beautifully to any color palette, making it a year-round staple in your DIY repertoire and a constant source of organizational joy.
4. Maintenance and Care for Fabric and Yarn Nesting Bowls
To keep your Tulip Nesting Bowls – Pattern creations looking fresh, regular dusting is key. If you are using them to hold craft supplies or jewelry, they may collect lint over time. A quick pass with a lint roller or a soft-bristled brush will keep the fabric looking vibrant. For crochet nesting bowls, a light shake outdoors is usually enough to remove any trapped dust particles from the stitches.
If your bowls become soiled, the cleaning method depends on the interfacing used in your Tulip Nesting Bowls – Pattern. If you used a washable, sew-in stabilizer, you can gently hand-wash the bowls in cold water. Avoid wringing them out, as this can crush the internal structure and leave permanent creases in the petals. Instead, “blot” them with a dry towel to remove excess moisture and reshape them while they are still damp.
For fabric bowls that have been stiffened with fusible interfacing, “spot cleaning” is the safest option. Use a damp cloth with a tiny drop of mild detergent to treat specific stains. Since the glue in fusible interfacing can sometimes break down with excessive heat or moisture, keeping the Tulip Nesting Bowls – Pattern away from a full soak will extend its lifespan significantly. Always air-dry your handmade bowls in a shaded area.
Over time, the “petals” of your Tulip Nesting Bowls – Pattern might begin to lean outward. This is a natural result of gravity and use. To refresh their shape, you can give them a light “steam” with an iron. Hold the iron an inch away from the fabric and let the steam soften the fibers, then use your hands to “mold” the petals back into an upright position. Once they cool, they will “lock” back into their original floral silhouette.
Storage is easy thanks to the “nesting” nature of the Tulip Nesting Bowls – Pattern. However, if you are putting them away for a long period, make sure they are completely dry to prevent any mildew from forming in the layers of fabric and interfacing. You can place a small piece of acid-free tissue paper between each bowl to prevent the fabrics from rubbing against each other, preserving the vibrant textile colors.
If a thread pulls loose or a stitch pops, repair it immediately to prevent the structural layers from separating. A quick “invisible stitch” (ladder stitch) can fix most issues in a fabric bowl, while a small yarn needle can weave in any loose ends in a crochet version. Taking care of these small details ensures that your Tulip Nesting Bowls – Pattern remains a beautiful and functional part of your home organization for many years.
FAQ – Frequently Asked Questions
Can I make the Tulip Nesting Bowls – Pattern in different sizes?
Yes! Most patterns provide instructions for small, medium, and large sizes. To create even more sizes, you can scale the Tulip Nesting Bowls – Pattern on a photocopier by 10-15% increments. Just remember to maintain the 1-2 inch difference in the base diameter to ensure they still nest properly.
Is the Tulip Nesting Bowls – Pattern suitable for a beginner?
Absolutely. While the petal shape looks complex, it is mostly achieved through straight seams and simple curves. If you can sew a basic round coaster, you can move up to a tulip-shaped bowl. The key is to take your time with the clipping and turning of the petal points.
What is the best interfacing for fabric nesting bowls?
For a professional result, use a heavyweight, non-woven stabilizer like Pellon Peltex 70. This provides a “board-like” stiffness that is essential for the Tulip Nesting Bowls – Pattern. If you want a slightly softer look, you can use a foam-based stabilizer like “ByAnnie’s Soft and Stable.”
Can I use these bowls for plants?
It is not recommended to put a raw plant directly into a fabric or yarn bowl, as the moisture will cause rot and mold. However, you can use your Tulip Nesting Bowls – Pattern as a “cachepot.” Simply place the plant in a plastic, waterproof pot first, and then sit it inside the fabric bowl for a decorative look.
How do I stop the “petals” from flopping?
Flopping is usually caused by using interfacing that isn’t stiff enough. If you have already finished your Tulip Nesting Bowls – Pattern and it feels too soft, you can try applying a fabric stiffener spray or a light coat of diluted white glue to the interior of the petals to give them extra support.
How many bowls are typically in a nesting set?
A standard set made from a Tulip Nesting Bowls – Pattern usually consists of three bowls. However, some advanced crafters create sets of five or even seven for a truly dramatic “matryoshka” effect. The number of bowls is entirely up to you and the amount of fabric or yarn you have on hand!
Conclusion
In this article, we have thoroughly explored the creative and practical journey of the Tulip Nesting Bowls – Pattern. We discussed the vital importance of selecting heavyweight fabrics and stiff stabilizers to give your bowls their life-like floral structure. We also looked at the technical side of graduated sizing to ensure a perfect “nesting” fit, as well as the numerous ways you can style and maintain your set to keep it looking beautiful for years.
Whether you are using them to organize your craft room or as a stunning centerpiece for your dining table, these bowls prove that organization can be an art form. The Tulip Nesting Bowls – Pattern is a perfect project for anyone looking to add a touch of handmade elegance and springtime joy to their daily life.