The Tutorial Turning Points Block – Pattern is a visually dynamic quilting block that blends traditional structure with creative flair.
This block stands out due to its precise angles, dramatic points, and the sense of movement it creates within a quilt layout.
Whether you’re assembling a full-sized quilt or incorporating it into a smaller project like a wall hanging or cushion, this block adds a touch of sophistication and design excellence.
At its core, the Tutorial Turning Points Block – Pattern is about contrast and direction. With a few simple techniques—like half-square triangles and color placement—you can transform your fabric into a stunning geometric masterpiece. This block plays well with both solids and prints, offering endless customization possibilities.
In this detailed guide, we’ll walk you through everything from material selection to construction techniques, all while using the Tutorial Turning Points Block – Pattern as the foundation. You’ll find step-by-step support, pro tips, and ideas to make the most of this engaging quilting block design.
1. Understanding the Turning Points Block Design
The Tutorial Turning Points Block – Pattern is defined by its sharp angles and strong visual direction. Unlike basic blocks that repeat the same shapes in symmetrical rows, this design draws the eye with intentional motion—hence the name “Turning Points.”
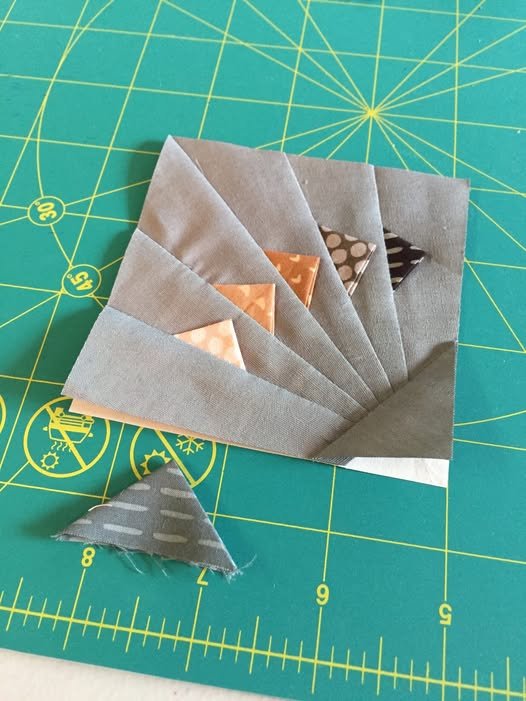
This block is typically composed of half-square triangles (HSTs), quarter-square triangles (QSTs), and rectangles or squares arranged in such a way that it creates a spinning or pinwheel effect. The sharp geometry gives it a crisp look, which is perfect for both modern and traditional quilting styles.
One of the reasons quilters love this block is its versatility. You can use bold solids for a high-impact look or delicate prints for a softer, vintage feel. Changing the fabric layout completely transforms the appearance of the block, so you can use it in multiple quilts without ever repeating the same exact look.
The Tutorial Turning Points Block – Pattern is also a fantastic skill-builder. If you’re familiar with triangle construction but want to refine your precision or try layout variations, this block offers plenty of opportunities for growth without overwhelming complexity.
Another notable feature is that this block works well alone or as part of a repeated pattern. You can create a quilt top with multiple Turning Points blocks, each rotated for added motion, or use it as a central motif surrounded by simpler blocks.
Lastly, it’s ideal for playing with color value and contrast. Use light and dark fabrics strategically to highlight the “turning” effect. This gives your quilt depth and energy, drawing the viewer in and guiding their eye across the surface.
2. Materials and Tools You’ll Need
To create the Tutorial Turning Points Block – Pattern, you’ll need some basic quilting tools and a thoughtful selection of fabrics. Accuracy and preparation are key to ensuring sharp corners and clean lines.
Start with high-quality quilting cotton fabrics. Choose at least two contrasting fabrics—light vs. dark or warm vs. cool—to emphasize the block’s turning effect. If you’re making a multi-block quilt, consider a color palette that maintains contrast while offering variety.
You’ll need a rotary cutter, cutting mat, and quilting rulers, especially one with a 45-degree angle guide. These will help you cut precise triangles and rectangles, which is essential in a design that relies heavily on geometric accuracy.
For sewing, a standard sewing machine with a ¼” presser foot is ideal. Consistent seam allowances are critical to maintaining the alignment and rotation of the block. Using chain piecing can also help speed up the process while maintaining efficiency.
Use quilting pins or clips to hold pieces in place before stitching. When working with triangles, pinning prevents shifting and stretching along the bias edge. This keeps the shapes true and the points crisp.
A reliable iron and pressing mat are essential for crisp seams. Press each seam flat as you go—either open or to one side depending on bulk—and consider using starch spray for added fabric stability.
Lastly, have your Tutorial Turning Points Block – Pattern handy, whether it’s a digital file or printed sheet. Use it to double-check your layout before final assembly. Even experienced quilters benefit from visual references during construction.
3. Step-by-Step Block Construction Guide
Constructing the Tutorial Turning Points Block – Pattern is a fun, structured process. The key is taking your time with cutting and layout to ensure everything aligns beautifully.
Begin by cutting your fabric pieces according to your pattern. This usually includes squares for half-square triangles (HSTs), smaller triangle units, and possibly background rectangles. Make sure all your cuts are accurate, as precision here makes the assembly smoother.
To make the HSTs, place two fabric squares right sides together, draw a diagonal line, and sew a ¼” seam on both sides of the line. Then cut along the line and press your units. Repeat this until you have the number of HSTs required for your block.
Next, assemble any additional triangle-based units such as QSTs or flying geese if your version of the pattern calls for them. These can be made using similar methods, focusing on symmetry and directionality.
Lay out all your units according to the Tutorial Turning Points Block – Pattern diagram. Double-check orientation before sewing. It’s easy to flip a triangle the wrong way, which can distort the turning effect that gives the block its name.
Sew your units into rows, and then sew the rows together. Press seams between rows carefully, and check your points—especially where triangles meet. A stiletto tool can help guide fabric under the needle for better control.
Once the block is complete, square it up using a ruler. Trim off any uneven edges to ensure it measures the correct size, which is usually 12.5” square for standard quilt blocks. A square block ensures smooth joining with others in your quilt.
4. Creative Ideas and Layout Variations
The Tutorial Turning Points Block – Pattern is not just a single-use design—it opens the door to many creative applications. The way you rotate, color, and repeat the block can dramatically change the final outcome.
One fun idea is to rotate each Turning Points block 90 degrees when joining them together. This creates a secondary design where the motion flows in different directions, almost like a dance across your quilt top.
You can also play with negative space. By placing Turning Points blocks next to plain background squares, you allow each one to shine individually. This approach gives the quilt a modern, airy feel.
Experiment with scrappy fabrics if you want a more eclectic look. Keep one color consistent (like a dark triangle in the same position in every block) to maintain unity while letting the other colors vary freely.
Try enlarging the block to make a single, bold statement as a wall quilt or table topper. The striking angles of the Tutorial Turning Points Block – Pattern lend themselves well to modern interior decor pieces.
If you’re designing a sampler quilt, this block makes a great addition. It showcases directional movement and looks great alongside more static or grid-based blocks. It also introduces intermediate-level techniques without overwhelming newer quilters.
Lastly, use your Turning Points block for non-quilt items like tote bags, placemats, or throw pillows. A single block in the right fabric can turn a simple accessory into a conversation piece.
FAQ – Tutorial Turning Points Block – Pattern
Q1: Is the Turning Points block suitable for beginners?
A: Yes, especially for confident beginners who are comfortable with half-square triangles. The block is a great skill builder and introduces essential piecing techniques.
Q2: What size does the finished block usually measure?
A: The most common size is 12.5 inches unfinished (12 inches finished), but you can adjust the size based on your project or preference.
Q3: Can I use pre-cuts like charm packs or layer cakes?
A: Absolutely! Charm packs (5-inch squares) work well for smaller blocks, and layer cakes (10-inch squares) are ideal for making multiple blocks quickly.
Q4: What’s the best way to avoid cutting errors?
A: Always measure twice before cutting, and use a sharp rotary cutter with a clear ruler. Following the cutting diagram from your Tutorial Turning Points Block – Pattern also helps.
Q5: How do I keep my points sharp when sewing triangles?
A: Accurate seam allowances, pinning, and pressing carefully are the best ways to maintain sharp points. Use a stiletto tool to guide fabric through the needle.
Q6: Can I chain piece this block to save time?
A: Yes! Many of the triangle units can be chain-pieced. Just make sure to keep them in order and orient them correctly when assembling the block.
Conclusion
The Tutorial Turning Points Block – Pattern is more than just a quilting block—it’s a creative journey that teaches precision, movement, and design. Whether you’re crafting one block or a full quilt, this pattern offers endless possibilities to express your quilting style.
We’ve walked through what makes this block unique, the tools you’ll need, step-by-step assembly, and fun ways to customize and incorporate it into your projects. It’s perfect for anyone wanting to grow their skills while making something visually striking.
If you’ve tried this block or plan to, we’d love to hear from you. Leave a sincere comment with your thoughts, experiences, or suggestions to help other quilters and inspire even more creativity. Happy quilting!