If you’re looking for a charming and practical way to add a little extra flair to your coffee table or workspace, the Twisted Pinwheel Mug Rug Pattern is an excellent choice.
This fun and stylish pattern is perfect for both beginners and seasoned quilters, offering a great way to practice piecing techniques while creating something beautiful and useful.
The Twisted Pinwheel Mug Rug design features a unique twist on the classic pinwheel block, adding movement and interest to your rug.
Mug rugs are not only great for protecting your furniture from hot drinks, but they also make fantastic gifts. This simple yet beautiful project is ideal for showcasing your fabric stash and can be made with a variety of fabrics to match your home decor. The Twisted Pinwheel Mug Rug pattern is quick to sew, allowing you to create a set of mug rugs in a short amount of time. In this article, we’ll walk you through the step-by-step process of making your own Twisted Pinwheel Mug Rug, from selecting materials to finishing touches.
Let’s dive into the world of quilting and learn how to create the Twisted Pinwheel Mug Rug Pattern that will add a touch of whimsy and warmth to any space. Whether you’re sipping a hot cup of tea or enjoying a fresh cup of coffee, this mug rug will be the perfect companion.
1. Materials Needed for the Twisted Pinwheel Mug Rug Pattern
Before you get started on your Twisted Pinwheel Mug Rug Pattern, it’s important to gather all the necessary materials. Having everything in place will help make the sewing process smoother and more enjoyable. Here’s a list of what you’ll need:
- Fabric: For the Twisted Pinwheel Mug Rug, you’ll need fabric for both the front and back. Choose a variety of fabrics for the pinwheel blocks, such as contrasting colors or patterned fabrics to add visual interest. You’ll also need fabric for the backing of the rug. Cotton fabric is a great choice for this project as it’s easy to work with and gives a nice finish.
- Batting: Batting adds a layer of cushioning to the mug rug and helps it maintain its shape. You can use cotton, polyester, or a blend depending on the thickness and texture you prefer. A medium-weight batting works best for this project.
- Quilting Thread: Use a high-quality quilting thread in a color that complements your fabric choices. A contrasting thread can be used to highlight the quilting design, but a neutral thread will blend seamlessly if you prefer a more subtle finish.
- Rotary Cutter and Mat: A rotary cutter and self-healing cutting mat are essential tools for cutting your fabric accurately. These tools will help you achieve the clean, precise edges necessary for the Twisted Pinwheel design.
- Ruler: A quilting ruler is needed to measure and cut your fabric into the right shapes. It ensures your pinwheel blocks are uniform and even.
- Sewing Machine: A basic sewing machine with a straight stitch is all you need for this pattern. However, if you have a machine with quilting feet, it can help with the quilting process later on.
Once you have gathered these materials, you’ll be ready to start creating your Twisted Pinwheel Mug Rug.
2. Cutting the Fabric for Your Twisted Pinwheel Mug Rug
Now that you have your materials ready, the next step is to cut your fabric pieces for the Twisted Pinwheel Mug Rug. Precision is key in quilting, and using the right tools will ensure your pieces are cut accurately and evenly. Follow these steps to get started:
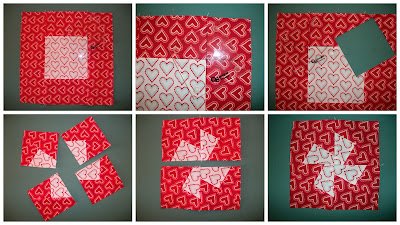
Step 1: Cut the Background Squares
Begin by cutting your background fabric into squares. These squares will form the foundation of your pinwheel blocks. Depending on the size of the mug rug you’re making, you’ll need four to six background squares, each measuring around 4.5 inches.
Step 2: Cut the Pinwheel Fabric Pieces
For each pinwheel block, you’ll need four triangle pieces. Use a quilting ruler to cut your pinwheel fabric into squares and then cut those squares diagonally to create triangles. Each triangle should measure about 4.5 inches on each side, and you’ll need to cut four triangles for each pinwheel.
Step 3: Cut the Mug Rug Backing
The backing fabric for your mug rug should be slightly larger than the quilt top, approximately 1 inch larger on all sides. Cut this piece to the desired size for your finished rug.
Step 4: Cut the Batting
Cut the batting the same size as the backing fabric. It’s always a good idea to make the batting slightly larger than the quilt top to ensure that it extends beyond the edges when quilting.
With all your fabric pieces cut, you’re ready to move on to the next step—sewing the pinwheel blocks!
3. Sewing the Twisted Pinwheel Blocks
Now comes the fun part—putting your Twisted Pinwheel Mug Rug together! This step involves sewing the pinwheel blocks and assembling them into the main part of the rug. Here’s how to get started:
Step 1: Join the Triangles
To form each pinwheel block, take two of the fabric triangles and sew them together along one side, creating a rectangle. Press the seams open to reduce bulk. Repeat with the remaining triangles, making two small half-square triangle units for each pinwheel block.
Step 2: Assemble the Pinwheel
Next, sew the two half-square triangle units together to form a larger square. Press the seams again to ensure the block lies flat. You should now have one completed pinwheel block. Repeat this process to create as many blocks as needed for your mug rug.
Step 3: Arrange the Blocks
Once your pinwheel blocks are sewn, lay them out in the arrangement you desire. You can place the blocks in a grid pattern or offset them for a more dynamic look. Ensure the pinwheels are positioned in a way that creates a balanced design.
Step 4: Sew the Blocks Together
Once you’ve arranged your blocks, it’s time to sew them together. Begin by sewing the blocks into rows, and then join the rows together to form the full top of the mug rug. Press the seams flat as you go to keep everything neat.
Step 5: Quilt the Rug
To add texture and ensure that the layers stay together, quilt your mug rug top. You can quilt in simple straight lines, follow the pinwheel design, or create your own pattern. Quilting will also help your mug rug hold its shape and durability over time.
4. Finishing the Twisted Pinwheel Mug Rug
After completing the pinwheel blocks and quilting, the final step is to add the binding and complete your Twisted Pinwheel Mug Rug. This step gives your rug a polished look and ensures it’s ready for use.
Step 1: Trim the Edges
Trim any excess fabric from the edges of the mug rug to make it even. Make sure all the seams are secure and there are no loose threads hanging.
Step 2: Add the Binding
Cut strips of fabric for the binding, typically 2.5 inches wide. Attach the binding to the edges of the rug, folding it over the raw edges and sewing it down. Make sure the corners are mitered for a neat finish.
Step 3: Stitch the Binding
Once the binding is attached, fold it over to the back of the rug and sew it in place. This step can be done by hand or with a sewing machine, depending on your preference.
Step 4: Final Touches
Give the mug rug a final press with the iron to smooth out any wrinkles. Your Twisted Pinwheel Mug Rug is now ready to be used or gifted to someone special!
FAQ – Twisted Pinwheel Mug Rug Pattern
1. How big is the finished Twisted Pinwheel Mug Rug?
The finished size of a mug rug typically ranges from 8×8 inches to 10×10 inches, but you can adjust the size based on your preferences and the number of pinwheel blocks you make.
2. Can I use different colors for the pinwheels?
Absolutely! The beauty of the Twisted Pinwheel Mug Rug Pattern is that you can experiment with different colors and fabrics. Use contrasting colors for a bold look or soft pastels for a more subtle design.
3. Is this pattern suitable for beginners?
Yes, the Twisted Pinwheel Mug Rug is perfect for beginners. The pattern is simple and doesn’t require complex techniques, making it a great project to practice piecing and quilting.
4. Can I make a larger rug with this pattern?
Yes, you can increase the number of blocks to make a larger rug or even a table runner. Just adjust the size of your fabric pieces accordingly.
5. How do I care for my finished mug rug?
To care for your mug rug, machine wash it on a gentle cycle and tumble dry on low heat. You can also spot clean if needed to preserve the design.
Conclusion
In this article, we’ve guided you through the process of creating a Twisted Pinwheel Mug Rug Pattern, from cutting the fabric to finishing the quilted edges. This pattern is perfect for quilters of all levels, offering a fun and functional project that will add a personal touch to your home. Whether you’re using it for your own coffee breaks or giving it as a thoughtful gift, this mug rug will bring warmth and color to any space. We’d love to hear your thoughts and suggestions—feel free to leave a comment below!