If you’ve been searching for a fun, visually striking project to add to your quilting repertoire, the Twister Block Tutorial is the perfect choice.
This quilting technique involves using a unique cutting method that transforms simple squares of fabric into dynamic, spiraled blocks.
With its distinctive, eye-catching look, the Twister block quilt pattern has become increasingly popular among quilters of all levels.
In this article, we will guide you through the steps to create your own Twister Block Quilt, provide helpful tips, and share inspiration for how to incorporate this fun pattern into your own quilting projects.
The Twister Block quilt pattern uses a tool, often called the “Twister ruler,” to cut squares into triangular pieces that, when pieced together, create a circular pattern that appears to twist. It’s a technique that combines traditional piecing with a little bit of magic, as it makes simple squares come to life with dramatic results. By following this Twister Block Tutorial, you will be able to create a quilt that showcases beautiful spirals and intricate designs.
Whether you’re a beginner quilter or an experienced one, this Twister Block Tutorial will help you achieve fantastic results in no time. The key to mastering the pattern lies in the use of accurate measurements, the right tools, and patience. This tutorial breaks down the process into easy steps, making it accessible to all quilters. Let’s dive in and get started on making your very own Twister Block Quilt.
1. Materials Needed for the Twister Block Quilt
Before you begin your quilting project, it’s essential to gather all the necessary materials. The Twister Block Quilt pattern is simple but requires a few specific items to achieve the desired effect. Here’s a list of what you’ll need:
Fabric: For a standard Twister Block, you’ll need squares of fabric. The pattern works best with 5-inch charm squares, but you can also cut your own squares to any size that fits your design. Choose fabric colors and patterns that complement each other for a harmonious look. You’ll need a mix of contrasting fabrics to make the “twist” effect stand out.
Twister Ruler: This specialized tool is a must-have for the Twister block technique. The ruler is designed to help you cut your fabric squares into triangles that form the spiraling pattern when sewn together. You can find Twister rulers in various sizes, such as the mini Twister or the large Twister ruler. For this tutorial, the regular Twister ruler should work well, but be sure to check your pattern instructions for the best size to use.
Rotary Cutter and Cutting Mat: A rotary cutter allows for precise cutting of your fabric squares and ensures your edges remain sharp and clean. Pair this with a cutting mat to protect your work surface and to cut with accuracy.
Sewing Machine and Thread: For assembling your quilt blocks, you’ll need a reliable sewing machine. Use a neutral-colored thread for piecing the quilt blocks together. If you’re using a bold fabric pattern, choose a thread that matches one of the dominant colors.
Iron and Ironing Board: Pressing your fabric at each step of the process ensures that the seams lie flat, making your quilt blocks more professional-looking and easier to piece together.
2. How to Cut the Twister Blocks
The cutting process is where the magic of the Twister Block Quilt pattern happens. Follow these steps to properly cut the fabric pieces:
Step 1: Prepare Your Fabric Squares: Begin by cutting your fabric into 5-inch squares. You can either use pre-cut charm squares or cut your own fabric from larger pieces. Select a mix of fabrics that contrast well with each other to make the final spiral effect pop.
Step 2: Lay Out the Squares: Once you have your 5-inch squares ready, arrange them in a grid pattern on your work surface. The layout of the fabric squares will determine the design of the quilt, so take some time to play around with different color combinations and placements.
Step 3: Use the Twister Ruler: Place the Twister ruler on top of each square. The ruler will guide you to make the proper cuts. Align the lines of the ruler with the edges of the square, then use your rotary cutter to cut along the lines. Each square will now be divided into smaller triangles that will form the twists.
Step 4: Repeat for All Squares: Continue cutting all your squares with the Twister ruler until all the fabric pieces are cut into triangles. Take your time to ensure each piece is cut accurately to maintain uniformity throughout the quilt.
Step 5: Organize the Cut Pieces: After cutting the squares, you’ll have several smaller triangles. It’s important to keep track of the order in which the pieces will be sewn together. Sorting the cut pieces into groups according to their positions in the final block design will make the sewing process smoother.
3. Sewing the Twister Block Together
Now that you’ve cut your squares into triangles, it’s time to sew them together. This is where the Twister block truly begins to take shape. Follow these steps to piece your blocks:
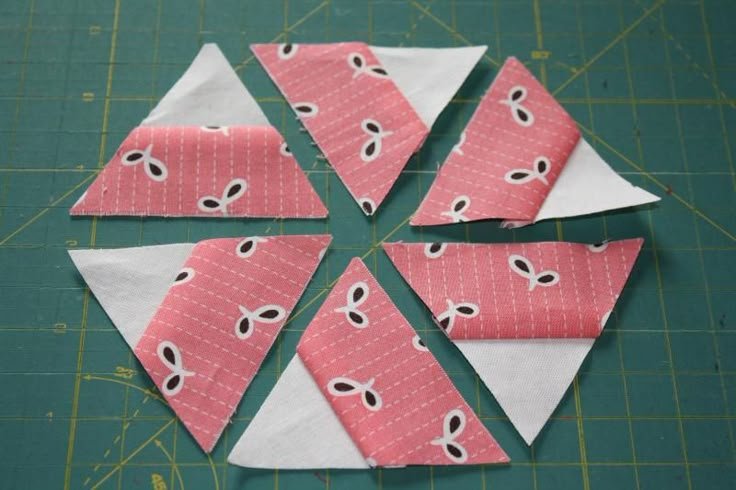
Step 1: Arrange the Pieces: Take the cut triangles and arrange them according to your pattern. The triangles should form a circular, twisted design when pieced together. Start by arranging the pieces in a circular layout, keeping the flow of colors consistent across the block.
Step 2: Sew the Pieces Together: Begin sewing the pieces together using a quarter-inch seam allowance. Sew the triangles into smaller sections first, then piece the sections together to form the full block. It’s essential to match up the seams precisely for a smooth, twisty effect.
Step 3: Press the Seams: After sewing each seam, use your iron to press the seams flat. Pressing the seams open or to one side helps eliminate bulk and ensures your blocks maintain their shape. Continue pressing as you sew each section to keep the fabric smooth.
Step 4: Complete the Block: Once all pieces of the block are sewn together, you should have a completed Twister Block that showcases the circular, spiraling pattern. At this point, you can double-check the block for accuracy and make sure the colors flow smoothly.
Step 5: Repeat for More Blocks: If you’re creating a full quilt, repeat the process for all the blocks you need. Lay out the blocks in a design you like, and piece them together using the same method.
4. Assembling and Quilting the Twister Block Quilt
Once all your Twister Blocks are sewn and pressed, it’s time to assemble them into a quilt top. Follow these steps to bring your quilt together:
Step 1: Arrange the Blocks: Lay the blocks out on a flat surface, experimenting with different arrangements until you find the layout that you like. You can arrange the blocks in a traditional grid or opt for a more dynamic arrangement with blocks rotated in different directions.
Step 2: Join the Blocks: Use your sewing machine to join the blocks together. Be sure to match the seams precisely to maintain the integrity of the twisted pattern. Join the blocks row by row and then sew the rows together to form the quilt top.
Step 3: Add the Quilt Sandwich: After assembling the quilt top, you’ll need to create the quilt sandwich. Lay the quilt backing fabric on a flat surface, followed by the batting, and then the quilt top. Baste the layers together with safety pins or thread basting.
Step 4: Quilting the Layers: Use your sewing machine or hand quilting techniques to quilt through all the layers. Choose a quilting design that complements the spiral pattern of the Twister Block Quilt, such as a simple stipple or meander design.
Step 5: Bind the Quilt: Once the quilt is quilted, trim the edges and add the quilt binding to finish the quilt. You can choose a binding that matches the fabric colors or opt for a contrasting fabric to make the edges stand out.
FAQ – Frequently Asked Questions
- What size should I cut my fabric squares for the Twister block pattern?
For the Twister Block Quilt, 5-inch squares are commonly used, but you can adjust the size depending on the ruler and pattern you’re following.
- Do I need a special ruler to make the Twister block?
Yes, a Twister ruler is essential for cutting the fabric into the correct shapes. The ruler is designed specifically for this technique and ensures that your cuts are accurate.
- Can I make a Twister block quilt with scraps?
Absolutely! Twister blocks work well with fabric scraps. You can use a variety of leftover fabrics to create a scrappy Twister quilt that has a unique, eclectic look.
- How can I make the Twister blocks stand out in my quilt?
To make the Twister Block Quilt more striking, use contrasting fabrics that emphasize the spiral effect. Bold, high-contrast colors create a more dramatic effect, while softer tones offer a more subtle design.
- How many Twister blocks do I need for a full quilt?
The number of blocks required for a full quilt depends on the size you want. For a lap quilt, you’ll typically need around 12-16 blocks, while a larger quilt may require more.
- Can I use the Twister technique with other quilt patterns?
Yes, the Twister Block Tutorial can be applied to various quilt designs. You can use the Twister method for table runners, pillows, or even small wall hangings.
Conclusion
In this article, we’ve covered everything you need to know about the Twister Block Tutorial – Quilt pattern, from the materials required to the step-by-step process for cutting, sewing, and assembling the quilt. With a few tools, a little patience, and some creativity, you can create a stunning Twister Block Quilt that will surely be a conversation piece.
We hope this tutorial has helped you get started on your Twister block journey. If you have any feedback, suggestions, or questions, please feel free to leave a comment. Happy quilting!