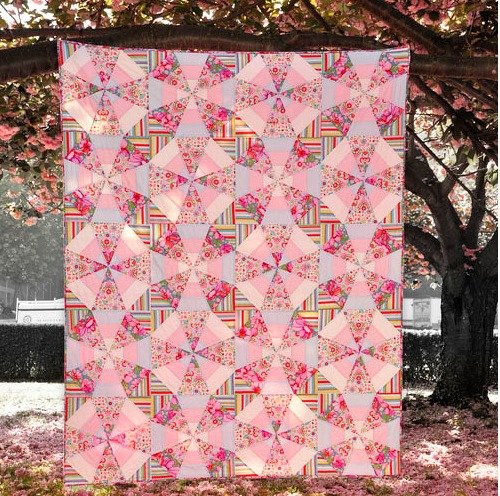
The Whirl kaleidoscope Quilt – Pattern is a breathtaking masterpiece of textile art that combines geometric precision with the fluid movement of a spinning vortex. If you have ever looked through a kaleidoscope and felt mesmerized by the shifting colors and symmetrical shapes, you will understand why the Whirl kaleidoscope Quilt – Pattern is currently taking the quilting world by storm. This specific design allows quilters to play with fabric gradients, radial symmetry, and color theory in a way that creates a three-dimensional illusion on a flat surface.
Crafting a Whirl kaleidoscope Quilt – Pattern requires a blend of patience and a keen eye for focal points, but the result is a stunning heirloom that looks far more complex than it actually is to assemble. Many enthusiasts love this quilt design because it offers a modern twist on traditional kaleidoscope blocks, utilizing wedge-shaped templates and rotary cutting techniques to achieve that signature “whirl” effect. Whether you are an experienced quilter or a motivated beginner, mastering this pattern will significantly elevate your quilting portfolio.
In this comprehensive guide, we are going to dive deep into everything you need to know about the Whirl kaleidoscope Quilt – Pattern. We will explore the essential materials, the importance of fabric selection, and the step-by-step logic behind the construction of these mesmerizing spinning blocks. By focusing on precise seam allowances and accurate cutting, you can ensure that your finished quilt lays flat and displays the perfect geometric harmony that makes this pattern so iconic in the modern quilting community.
1 Understanding the Whirl kaleidoscope Quilt – Pattern
The Whirl kaleidoscope Quilt – Pattern is a variation of the traditional kaleidoscope block that introduces a sense of motion through the strategic placement of triangular segments. Unlike a static star pattern, this design uses diagonal lines and contrasting colors to trick the eye into seeing a spiral or a “whirl.”
When you begin working with a Whirl kaleidoscope Quilt – Pattern, the first thing you must understand is the repeat. Most designs are based on an eight-point or twelve-point star structure where each wedge is a mirror image or a sequential rotation of the previous one.
The “Whirl” aspect comes from the asymmetrical placement of colors within each wedge. By shifting the value (lightness or darkness) of the fabric across the block, you create a visual centrifugal force that draws the viewer’s eye toward the center and then spins it outward.
In the world of SEO-optimized quilting content, this pattern is often categorized under complex geometric quilts or optical illusion quilts. However, the Whirl kaleidoscope Quilt – Pattern is unique because it relies heavily on fussy cutting, a technique where you select a specific motif from a fabric to repeat in every segment.
Modern variations of the Whirl kaleidoscope Quilt – Pattern often utilize paper piecing to ensure that every point meets perfectly at the center. This method eliminates the “bulk” that often plagues circular designs and ensures that your seam intersections are crisp and professional.
Ultimately, this pattern is about artistic expression. While the technical rules provide the structure, the Whirl kaleidoscope Quilt – Pattern truly comes to life when the quilter experiments with bold prints, batiks, or even solid monochromatic palettes to emphasize the structural lines.
2 Choosing the Best Fabrics for Your Quilt
The success of your Whirl kaleidoscope Quilt – Pattern depends almost entirely on your fabric choices. To achieve the best “whirl” effect, you should look for fabrics with high contrast and directional prints that can be manipulated to show movement.
Many experts suggest using multi-colored floral prints or large-scale abstracts for the Whirl kaleidoscope Quilt – Pattern. When you cut these fabrics into wedges, the different sections of the print create a secondary pattern that is completely unique to your specific quilt top.
Color value is your best friend when working with this pattern. You need a mix of darks, mediums, and lights to define the edges of the “whirl.” Without a clear value scale, the pieces might blend together, and the intricate geometric shapes will be lost to the eye.
Don’t forget the importance of the background fabric. In a Whirl kaleidoscope Quilt – Pattern, the background acts as the negative space that allows the central motif to “pop.” A neutral solid or a subtle tone-on-tone print is usually the safest bet for maximum impact.
When shopping for materials, keep the grainline of the fabric in mind. Because the Whirl kaleidoscope Quilt – Pattern involves many diagonal cuts, your fabric edges will be on the bias, which makes them prone to stretching. High-quality 100% cotton fabric is recommended for stability.
Finally, consider the scale of the print. A very small, “busy” print might disappear in the small wedges of a Whirl kaleidoscope Quilt – Pattern, whereas a large-scale motif can be strategically cut to create a stunning, synchronized kaleidoscope effect that looks like professional textile art.
3 Essential Tools and Cutting Techniques
To execute a flawless Whirl kaleidoscope Quilt – Pattern, you need more than just a standard ruler. A specialized kaleidoscope ruler or a 60-degree triangle ruler is often essential for ensuring that every wedge is identical in size and angle.
The cutting process is where the magic happens. For the Whirl kaleidoscope Quilt – Pattern, many quilters use a rotating cutting mat. This allows you to trim around your templates without moving the fabric, which prevents misalignment and ensures your fabric strips remain perfectly straight.
If you are using the fussy cutting method for your Whirl kaleidoscope Quilt – Pattern, you might want to create a window template out of cardboard. This helps you preview exactly which part of the fabric pattern will appear in each wedge of the kaleidoscope block.
Accuracy is the name of the game. Even a 1/8-inch error in your cuts can cause the center of your Whirl kaleidoscope Quilt – Pattern to bunch up or “volcano.” Using a sharp rotary blade and applying firm pressure is vital for achieving those razor-sharp points.
Organization is also key. Once you have cut your pieces for the Whirl kaleidoscope Quilt – Pattern, lay them out on a design wall or a flat surface. This allows you to see the “whirl” develop before you commit to sewing, giving you a chance to swap fabric segments for better balance.
Lastly, consider using fabric starch. Starching your fabric before cutting for the Whirl kaleidoscope Quilt – Pattern gives the cotton a paper-like stiffness. This makes it much easier to handle the bias edges and ensures that your triangular pieces don’t distort during the sewing process.
4 Assembly and Finishing Touches
Assembling the Whirl kaleidoscope Quilt – Pattern usually happens in sections. Instead of sewing all the wedges together at once, you will likely sew them into halves or quarters. This “modular” approach helps you manage the seam bulk at the very center of the block.
The scant quarter-inch seam is a quilter’s secret weapon for the Whirl kaleidoscope Quilt – Pattern. Because there are so many seams meeting in the middle, a slightly smaller seam allowance ensures that your block ends up the correct unfinished size without losing the tips of your triangles.
Pressing techniques are equally important. For a Whirl kaleidoscope Quilt – Pattern, many quilters prefer to press seams open to reduce the thickness at the center point. Alternatively, you can “spin” the seams at the intersection, which allows the center to lay perfectly flat.
Once your blocks are finished, the border selection can frame your Whirl kaleidoscope Quilt – Pattern beautifully. A mitered border often complements the geometric nature of the kaleidoscope, while a simple floating border can give the design room to breathe.
For the quilting design itself, consider stitching in the ditch to emphasize the “whirl” or using a free-motion spiral to enhance the sense of movement. The quilting should support the Whirl kaleidoscope Quilt – Pattern, not distract from the intricate piecing you’ve worked so hard on.
Finally, when you bind your Whirl kaleidoscope Quilt – Pattern, choose a color that matches the outermost points of your whirls. This creates a seamless visual transition and makes the entire quilt project look cohesive, professional, and ready for display or gifting.
Frequently Asked Questions (FAQ)
1. Is the Whirl kaleidoscope Quilt – Pattern suitable for beginners?
While it is more advanced than a simple charm square quilt, a motivated beginner can definitely tackle it. Using foundation paper piecing (FPP) can make the process much easier for those who struggle with accurate cutting and point matching.
2. How much fabric do I need for a standard Whirl kaleidoscope Quilt – Pattern?
This varies based on the size, but generally, you will need more fabric than a standard quilt because of fussy cutting waste. It is recommended to buy at least 20-30% extra of your main print to ensure you have enough matching motifs.
3. What is the difference between a standard Kaleidoscope and a Whirl Kaleidoscope?
A standard kaleidoscope is usually symmetrical in color and shape. The Whirl kaleidoscope Quilt – Pattern uses color shading and asymmetrical placement to create a specific visual “spin” or “vortex” effect that suggests motion.
4. Can I make this pattern without a special ruler?
Yes, you can use a standard square ruler if you mark the angles manually, but it is much more difficult. Investing in a 60-degree or 45-degree triangle ruler is highly recommended for the Whirl kaleidoscope Quilt – Pattern to maintain consistency.
5. Why do my center points never line up?
This is usually due to seam allowance inconsistency. Ensure you are using a scant 1/4″ seam and that you are not stretching the bias edges of the fabric as you sew. Pinning at the intersections is non-negotiable!
Conclusion
The Whirl kaleidoscope Quilt – Pattern is a rewarding project that transforms simple fabric into a dynamic work of art. Throughout this article, we have explored the importance of fabric value, the necessity of precise cutting, and the technical steps required to assemble a perfect spinning block.
By mastering these elements, you can create a quilt that not only showcases your technical skills but also serves as a stunning centerpiece in any home. We hope this guide inspires you to pick up your rotary cutter and start your own Whirl kaleidoscope Quilt – Pattern journey today!