The Woven Star Block Pattern is one of the most visually stunning and rewarding designs in the world of traditional quilting, offering a unique blend of geometric precision and artistic flair. This intricate quilt pattern creates a mesmerizing optical illusion where fabric strips appear to weave over and under one another, forming a central star that radiates outward with elegance and depth. Whether you are a seasoned quilter looking for a sophisticated challenge or an ambitious beginner ready to master the art of the woven star, this guide will walk you through everything you need to know about creating this timeless masterpiece.
When you dive into the Woven Star Block Pattern, you are engaging with a legacy of craftsmanship that prioritizes both form and function. This specific star quilt design relies heavily on the interaction of light and dark fabrics to emphasize the “woven” effect, making fabric selection a crucial part of the creative process. By carefully choosing your cotton fabrics and maintaining precise quarter-inch seam allowances, you can transform simple squares and triangles into a complex-looking block that serves as a showstopper for any quilt top project.
Beyond its aesthetic appeal, the Woven Star Block Pattern is an excellent way to sharpen your technical skills, particularly in the areas of fussy cutting, half-square triangles (HSTs), and point matching. The beauty of this pattern lies in its versatility; it can be adapted for modern, minimalist aesthetics or kept traditional with floral and reproduction prints. As we explore the construction and history of this design, you will discover why the Woven Star remains a favorite among the global quilting community.
1 Understanding the Woven Star Block Pattern Fundamentals
The Woven Star Block Pattern is primarily defined by its ability to simulate a basketweave texture through the strategic placement of fabric. Unlike a standard sawtooth star, the “woven” variation uses overlapping color paths to trick the eye into seeing three-dimensional layers. This effect is achieved through a combination of half-square triangles and specialized piecing techniques that require a high degree of accuracy during the cutting phase.
To begin your project, you must understand the grid system behind the Woven Star Block Pattern. Most versions of this block are based on a 9-patch grid or an 8×8 grid, depending on the complexity of the “weave.” This structure ensures that each component of the star aligns perfectly, allowing the “interlocking” arms of the star to meet at precise intersections without losing their points in the seams.
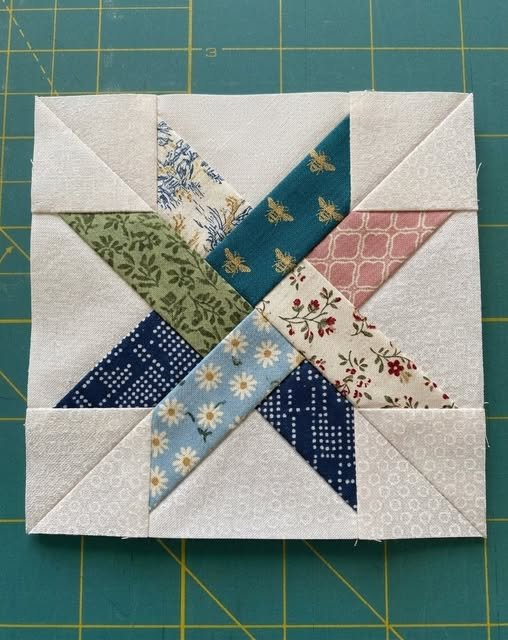
Fabric contrast is the “secret sauce” of a successful Woven Star Block Pattern. You generally need at least three distinct values: a light background, a medium “weave” fabric, and a dark “accent” fabric. Using high-contrast quilt fabrics ensures that the woven illusion is sharp and visible even from a distance, which is essential for large-scale projects like king-sized quilts or wall hangings.
One of the key terms associated with this design is interlocking geometry. In the context of the Woven Star Block Pattern, this refers to the way the diagonal lines of the star arms connect to the central square. By focusing on the flow of the colors, you can create a secondary pattern where the background fabric also appears to be part of the structural weave, adding another layer of complexity to your quilt block.
Precision is non-negotiable when working with the Woven Star Block Pattern. Because there are many intersecting seams, even a slight deviation in your seam allowance can lead to a block that won’t lay flat or “waves” at the edges. Professional quilters recommend using a scant 1/4 inch seam and pressing seams open to reduce bulk at the points where multiple fabric layers meet.
Finally, the Woven Star Block Pattern serves as a fantastic canvas for free-motion quilting. Once the block is pieced, the “woven” areas provide natural channels for stitching, while the background areas offer space for decorative motifs like feathers or pebbles. This synergy between the pieced design and the quilted texture is what makes the Woven Star a perennial favorite in quilt shows and competitions.
2 Essential Materials and Tools for the Woven Star Block
Before you start cutting into your favorite fat quarters, you must gather the right tools to ensure the Woven Star Block Pattern turns out perfectly. A high-quality rotary cutter with a fresh blade is the most important tool in your arsenal, as dull blades can cause fabric fraying or inaccurate cuts. Precise cutting is the foundation upon which the entire “woven” illusion is built.
You will also need a variety of acrylic quilting rulers, specifically a square ruler that matches the finished size of your block. For the Woven Star Block Pattern, a 12.5-inch square ruler is often the standard, allowing you to trim your finished blocks to a consistent size. Additionally, a 6×24 inch ruler is helpful for cutting the initial strips that will eventually become your triangles and squares.
The choice of thread can make or break your Woven Star Block Pattern. It is highly recommended to use a fine, 50wt cotton thread in a neutral color like gray or tan. Fine thread takes up less space in the seam, which helps your points stay sharp and prevents the block from “growing” as you add more pieces. This is a common tip found in advanced quilting tutorials.
Marking tools are equally vital for this pattern. Since the Woven Star Block Pattern involves several diagonal seams, using a heat-erasable pen or a chalk marker to draw stitching lines can significantly improve your accuracy. Marking the “sew-line” on the back of your fabric squares is a foolproof way to ensure your half-square triangles are perfectly symmetrical every time.
Don’t forget the importance of a good cutting mat and a reliable steam iron. For the Woven Star Block Pattern, “pressing” is different from “ironing.” You should press the iron down vertically to set the seams without stretching the fabric. Using a tailor’s clapper can help flatten those thick intersections where the “weaving” effect is most concentrated, resulting in a professional-grade finish.
Lastly, consider using fabric starch or a fabric stabilizer. Treating your fabric before cutting makes it stiffer and less prone to shifting, which is incredibly helpful when dealing with the bias edges common in the Woven Star Block Pattern. Starch ensures that your woven star remains crisp and holds its shape throughout the entire assembly process, from the first cut to the final binding.
3 Step-by-Step Construction of the Woven Star
The journey of creating a Woven Star Block Pattern begins with the “Unit A” assembly, which usually consists of the corner squares and the background elements. Most quilters start by cutting their background fabric into four large squares. These squares provide the “negative space” that allows the star to pop, making the woven elements the undisputed star of the show.
Next, you will move on to creating the star points using the “no-waste” flying geese method or traditional half-square triangles. In the Woven Star Block Pattern, these units are what create the diagonal movement. You must be careful to keep your colors consistent; if you swap the placement of your medium and dark fabrics, the “over-under” weaving effect will be lost, resulting in a different geometric quilt block.
Assembling the “inner weave” is the most exciting part of the Woven Star Block Pattern. This involves joining your triangles to the center square. Many patterns suggest a “partial seam” technique for more advanced versions, but most standard Woven Star designs can be assembled in rows. Laying your pieces out on a design wall before sewing is a lifesaver to ensure no pieces are rotated incorrectly.
Once the rows are completed, it is time to join them to form the full Woven Star Block Pattern. This is the moment of truth where you check your point alignment. Pinning at every intersection is tedious but necessary. By “nesting” your seams—pressing one row to the left and the next to the right—you can feel the seams lock together, which is the key to achieving those perfect star points.
After the block is fully sewn, the squaring up process begins. Even the most careful quilter might find their Woven Star Block Pattern is a fraction of an inch off. Using your square ruler, trim the block to the exact size required by your project. This step is vital if you plan on joining multiple blocks together, as it prevents the quilt top from becoming distorted or lumpy.
To finish the construction phase of your Woven Star Block Pattern, give the entire block a final press with a bit of steam. Observe how the colors interact; the “woven” paths should be clear and continuous across the block. This sense of flow is what distinguishes a well-executed woven star from a standard patchwork design, marking your transition into a truly skilled textile artist.
4 Design Variations and Creative Customization
Once you have mastered the basic Woven Star Block Pattern, the world of customization opens up to you. One popular variation is the Scrappy Woven Star, where each “weave” strip is a different fabric. This turns a structured, formal pattern into a vibrant, eclectic celebration of color. It is a fantastic way to use up fabric scraps while still maintaining a cohesive design through a consistent background color.
Another way to modernize the Woven Star Block Pattern is through the use of solid fabrics. While traditional prints are lovely, solids emphasize the sharp angles and the mathematical beauty of the weave. Using a monochromatic palette—various shades of the same blue or green—can create a sophisticated, gradient effect that looks incredibly modern and high-end, perfect for a contemporary home.
You can also play with the scale of the Woven Star Block Pattern. An oversized, 24-inch “Big Block” can serve as a stunning baby quilt or a center medallion for a larger piece. Conversely, miniature 4-inch versions of the woven star can be used to create intricate borders or decorative pillows. Changing the size challenges your precision and allows for different quilting applications.
Incorporating fussy cutting into your Woven Star Block Pattern can add a hidden layer of detail. If you have a fabric with a specific motif—like a flower or a small animal—you can center that motif within the middle square of the star. This draws the eye to the center and gives the quilt block a personalized touch that makes it feel like a unique work of art rather than a repetitive pattern.
Advanced quilters often experiment with foundation paper piecing (FPP) for the Woven Star Block Pattern. FPP allows for incredibly thin points and complex angles that are difficult to achieve with traditional piecing. This method is ideal if you want to create a “micro-weave” or if you are using delicate fabrics like silk or linen that tend to shift during sewing.
Finally, consider the layout of your Woven Star Block Pattern in the final quilt. Setting the blocks “on point” (diagonally) creates a much more dynamic visual than a standard straight set. You can also alternate the woven star with plain blocks to allow for elaborate quilting designs in the open spaces. The possibilities for innovation within this single pattern are truly endless, limited only by your imagination.
FAQ – Frequently Asked Questions
Is the Woven Star Block Pattern suitable for beginners?
While it is more complex than a basic four-patch or nine-patch, an adventurous beginner can certainly tackle it. The key is to take your time with the cutting and use plenty of pins. Following a detailed step-by-step quilting guide and practicing with scrap fabric first will help build the confidence needed for this pattern.
What is the best fabric for a Woven Star quilt?
High-quality 100% cotton quilting fabric is the best choice. It has the right weight and “grip” to stay in place while sewing. Avoid slippery fabrics like satin or heavy fabrics like denim until you are very comfortable with the Woven Star Block Pattern, as they can make achieving sharp points much more difficult.
How do I make the “weave” look more realistic?
The secret to a realistic weave in the Woven Star Block Pattern is color value. Use a dark, medium, and light version of the same color family. The dark fabric should represent the “shadows” where one strip goes under another, which reinforces the three-dimensional illusion of the woven design.
Can I machine quilt a Woven Star project?
Absolutely! The Woven Star Block Pattern looks fantastic with both straight-line machine quilting and more organic free-motion designs. Many quilters choose to “stitch in the ditch” along the weave lines to emphasize the structure of the star before adding decorative stitching to the background.
How long does it take to make one Woven Star block?
For an intermediate quilter, a single 12-inch Woven Star Block Pattern typically takes about 45 to 90 minutes to cut and piece. This doesn’t include the time for fabric selection or final quilting. It is a “slow-sewing” project that rewards patience and attention to detail.
What is the difference between a Woven Star and a Friendship Star?
A Friendship Star is a much simpler 4-point star made of four half-square triangles and five squares. The Woven Star Block Pattern is significantly more complex, involving more pieces and a specific layout designed to mimic an interlaced or “woven” appearance that the simpler star lacks.
Conclusion
In summary, the Woven Star Block Pattern is a magnificent example of how simple shapes can be combined to create breathtaking complexity. Throughout this article, we have explored the essential quilting techniques, the necessary tools, and the creative variations that make this pattern a staple in the sewing room.
From selecting the perfect contrast fabrics to mastering the final squaring up of the block, every step is an opportunity to improve your craft and produce a stunning piece of textile art.