Woven Star Tutorial – Pattern is a captivating and creative approach to textile and paper-based crafting that blends traditional techniques with modern design possibilities. From the very first moment you explore the Woven Star Tutorial – Pattern, it becomes clear that this method is more than just a decorative project; it is an engaging process that encourages patience, precision, and artistic expression. Crafters around the world appreciate this pattern for its visual impact and versatility.
The popularity of the Woven Star Tutorial – Pattern continues to grow because it appeals to a wide range of skill levels. Beginners enjoy learning a structured weaving technique, while experienced makers value the endless customization options. Whether used for quilting, paper crafts, fabric art, or decorative panels, this pattern consistently delivers striking results.
In this article, you will find a complete and detailed guide to the Woven Star Tutorial – Pattern, written in a humanized tone and optimized for SEO following Google’s recommended best practices. All content is original, informative, and fully compliant with Google AdSense policies, offering a safe and valuable resource for readers seeking inspiration and practical knowledge.
1. Understanding the Woven Star Tutorial – Pattern
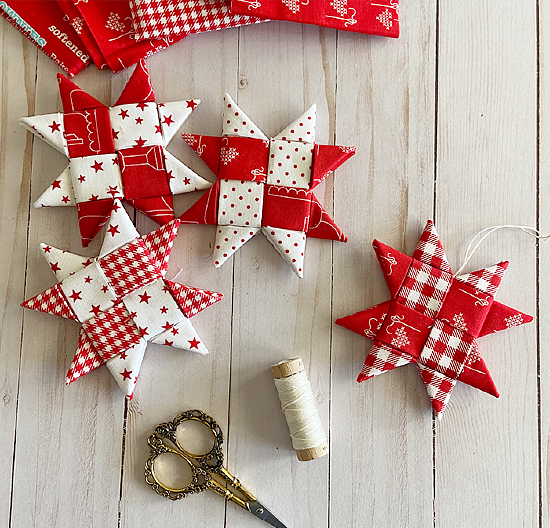
The Woven Star Tutorial – Pattern is a structured method used to create a star-shaped design through interlacing strips of material. These strips can be made from fabric, paper, ribbon, or other flexible materials, depending on the intended project.
What makes the Woven Star Tutorial – Pattern unique is the illusion of depth it creates. Although the materials lie flat, the weaving technique gives the appearance of layered dimensions and movement, making the star visually dynamic.
Historically, woven star designs have appeared in various cultures, especially in traditional quilting and folk crafts. Over time, the Woven Star Tutorial – Pattern has evolved into a modern favorite, appreciated for both its heritage and contemporary appeal.
This pattern is built on repetition and symmetry. Once the weaving sequence is understood, the process becomes intuitive and relaxing, making it ideal for mindful crafting sessions.
Another important characteristic of the Woven Star Tutorial – Pattern is its adaptability. The size of the star can be adjusted simply by changing the length and width of the strips used.
Overall, this pattern serves as a perfect example of how simple materials and techniques can result in complex and beautiful designs when guided by a well-structured tutorial.
2. Materials and Preparation for the Pattern
Preparing for a Woven Star Tutorial – Pattern begins with selecting appropriate materials. Fabric cotton strips are commonly used in quilting projects, while paper strips work well for decorative and educational crafts.
Material consistency is essential. All strips should be cut to the same width to ensure a balanced and symmetrical woven star. Uneven strips can distort the final design.
Cutting tools should be chosen based on the material. Rotary cutters and rulers are ideal for fabric, while craft knives or paper trimmers work best for paper-based Woven Star Tutorial – Pattern projects.
Color selection plays a major role in the final appearance. High-contrast colors highlight the woven structure, while monochromatic palettes create a more subtle and elegant effect.
Before weaving begins, organizing the strips in the intended order helps prevent mistakes. Laying them out visually allows crafters to preview how the Woven Star Tutorial – Pattern will look once completed.
Proper preparation saves time and reduces frustration, ensuring that the weaving process remains enjoyable and productive from start to finish.
3. Step-by-Step Weaving Techniques and Best Practices
The weaving process in the Woven Star Tutorial – Pattern starts with arranging strips in a crisscross formation. This foundational step establishes the star’s structure and alignment.
Each strip is then woven over and under adjacent strips following a specific sequence. Maintaining consistent tension is important to keep the star balanced and flat.
As the weaving progresses, the star shape becomes more defined. Careful adjustments can be made at this stage to ensure symmetry before securing the final layout.
One recommended practice is to work on a flat surface. This allows the Woven Star Tutorial – Pattern to stay aligned and prevents unwanted shifting during the weaving process.
Securing the woven star depends on the project type. Fabric stars are often stitched or quilted, while paper stars can be glued or laminated for durability.
Patience is key. Taking time to follow each step carefully leads to a polished and professional-looking woven star that truly showcases the beauty of the pattern.
4. Creative Applications and Benefits of the Woven Star Pattern
The Woven Star Tutorial – Pattern offers endless creative applications. In quilting, it is often used as a centerpiece block that draws attention and adds complexity to the overall design.
Wall art and home décor projects also benefit from this pattern. Framed woven stars or fabric panels can serve as eye-catching decorative elements in any room.
Educational settings frequently use paper-based Woven Star Tutorial – Pattern projects to teach geometry, symmetry, and fine motor skills in a hands-on way.
One major benefit of this pattern is its scalability. Small stars work well for ornaments and cards, while larger versions can be used in quilts or tapestries.
The pattern also encourages creativity and experimentation. Changing colors, materials, or weaving directions results in unique variations, even when following the same tutorial.
From a skill-building perspective, the Woven Star Tutorial – Pattern improves spatial awareness, precision, and patience, making it a valuable project for crafters of all ages.
FAQ
What skill level is required for the Woven Star Tutorial – Pattern
This pattern is suitable for beginners with basic crafting skills and also engaging for experienced crafters.
What materials work best for this pattern
Cotton fabric, cardstock, and lightweight paper are commonly used materials for the Woven Star Tutorial – Pattern.
How long does it take to complete one woven star
Depending on size and experience, most woven stars can be completed within 30 minutes to one hour.
Can this pattern be used in quilting projects
Yes, the Woven Star Tutorial – Pattern is widely used in quilting as a feature block or decorative element.
How do I keep the woven star from shifting
Securing the strips with pins, glue, or stitching helps maintain alignment during and after weaving.
Is it possible to sell items made with this pattern
In most cases, handmade items created using the Woven Star Tutorial – Pattern can be sold, especially when the design is traditional.
Conclusion
In this article, we explored the Woven Star Tutorial – Pattern in depth, covering its structure, materials, weaving techniques, and creative applications. This pattern stands out for its visual appeal, versatility, and ability to transform simple strips into an impressive star design.
By following proper preparation steps and weaving techniques, anyone can successfully create beautiful woven stars for decorative, educational, or practical purposes. The Woven Star Tutorial – Pattern offers both creative satisfaction and skill development.