The Yankee 3 Yard Quilt – Pattern is an exceptional choice for quilters who value both efficiency and aesthetic appeal, offering a streamlined approach to creating a stunning handmade blanket with minimal waste. This specific quilt design has gained massive popularity in the sewing community because it simplifies the fabric selection process, requiring exactly three one-yard cuts of fabric. By following the Yankee 3 Yard Quilt – Pattern, you can transform a small amount of material into a lap-sized masterpiece that looks much more complex than its construction actually suggests.
When you decide to work with the Yankee 3 Yard Quilt – Pattern, you are embracing a philosophy of “quick-and-easy” quilting that doesn’t sacrifice the quality of the final product. It is an ideal project for those who have a few beautiful yards of fabric in their stash but aren’t sure how to combine them effectively. The Yankee 3 Yard Quilt – Pattern relies on clever geometric arrangements to create visual interest, making it a perfect gift for birthdays, holidays, or charitable donations where time is often of the essence.
To achieve the best results with the Yankee 3 Yard Quilt – Pattern, understanding the relationship between your three chosen fabrics is crucial. Usually, this quilt pattern works best when you select a “focus” fabric, a “supporting” fabric, and a “background” or “accent” fabric to create contrast. Because the Yankee 3 Yard Quilt – Pattern is so well-structured, even a beginner can finish a quilt top in a single afternoon, providing a sense of accomplishment and a beautiful addition to any home decor.
1. Selecting the Perfect Fabrics for Your Yankee 3 Yard Quilt – Pattern
The success of your Yankee 3 Yard Quilt – Pattern depends heavily on your fabric choices and their contrast levels. Since you only have three yards to work with, each selection must pull its weight. We recommend choosing a large-scale print for the first yard, a medium-scale print or stripe for the second, and a solid or small-scale tone-on-tone for the third. This variety ensures that the quilt blocks are distinct and that the overall pattern doesn’t look muddled or overly busy.
When picking colors for the Yankee 3 Yard Quilt – Pattern, consider using the “light, medium, dark” rule. If all three fabrics have the same color value, the beautiful geometric lines of the Yankee 3 Yard Quilt – Pattern will get lost. By ensuring one fabric is significantly darker or lighter than the others, you allow the eye to follow the secondary patterns that emerge once the blocks are sewn together. High-quality 100% cotton quilting fabric is always the best choice for durability and ease of sewing.
Preparation is key before you make your first cut in the Yankee 3 Yard Quilt – Pattern. While some quilters prefer to work with unwashed fabric for the “crunchy” vintage look, pre-washing can prevent future shrinking and bleeding, especially if you are using high-contrast colors like red and white. Once your fabric is ironed and flat, you can follow the quilting instructions to maximize every inch of your three yards, ensuring there is enough left over for a coordinated binding.
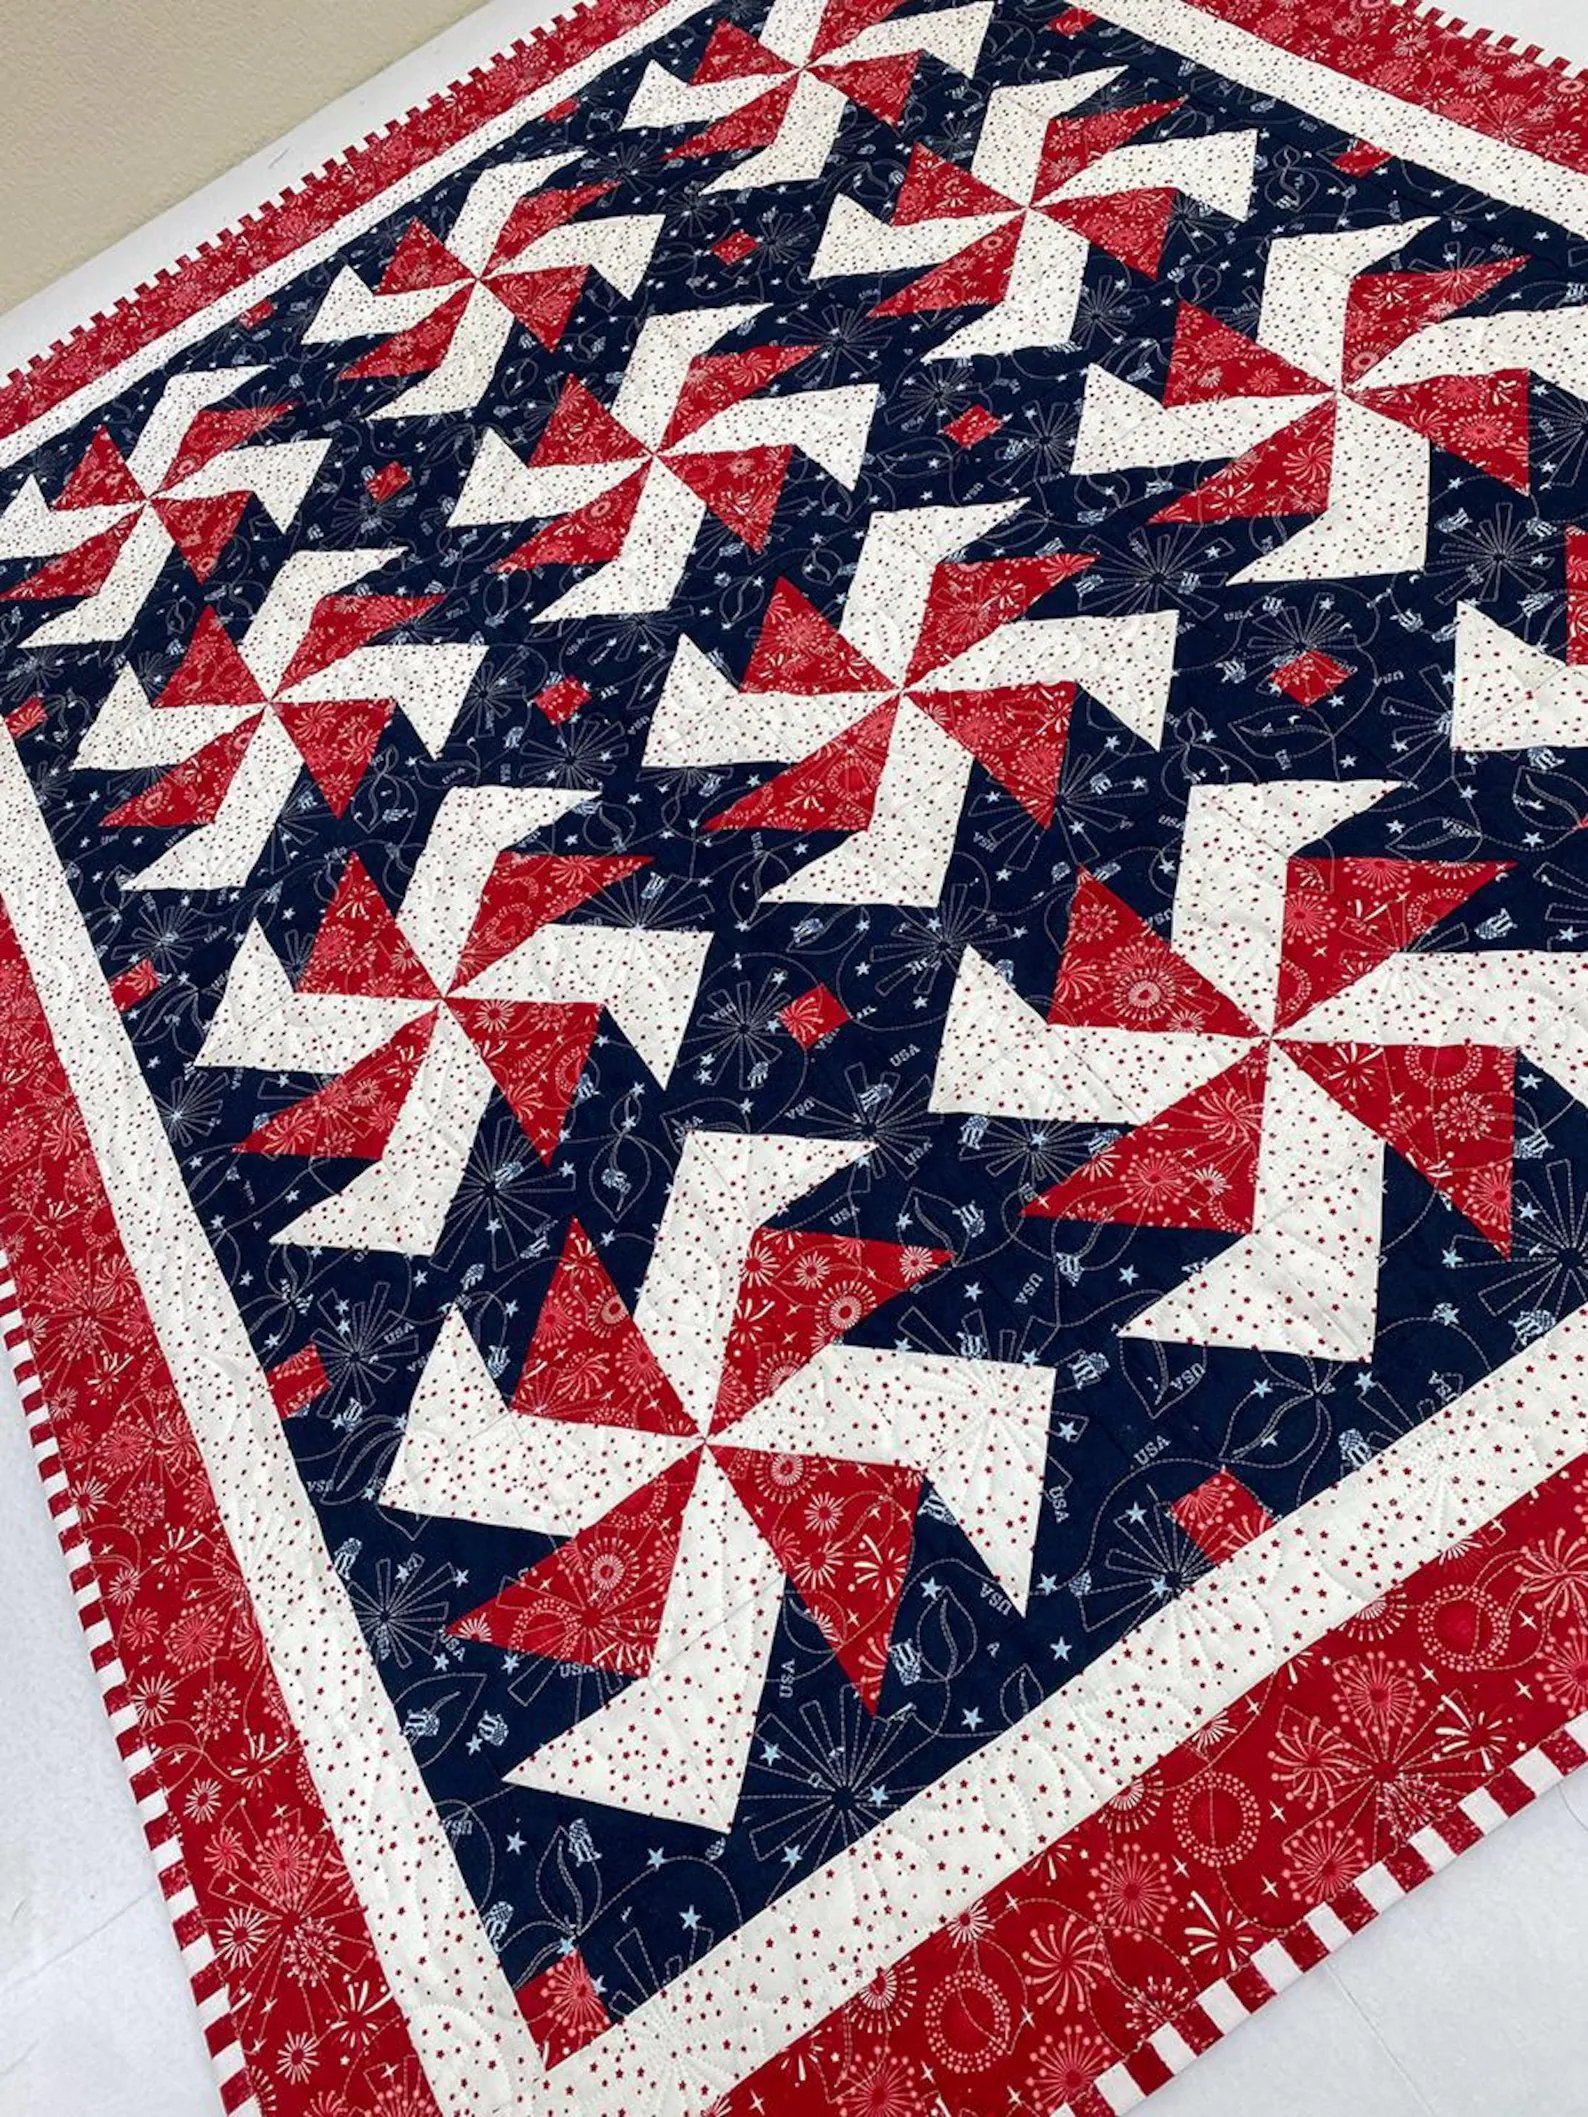
The Yankee 3 Yard Quilt – Pattern is particularly well-suited for “theme” quilts. For instance, if you have three yards of patriotic red, white, and blue fabrics, the Yankee pattern creates a classic Americana look that feels timeless. Similarly, using soft pastels can result in a beautiful baby quilt. The versatility of the Yankee 3 Yard Quilt – Pattern means you can adapt it to any season or occasion just by swapping out your three primary fabric choices.
Precision cutting is essential for the Yankee 3 Yard Quilt – Pattern because the fabric requirements are so exact. Using a sharp rotary cutter and a non-slip quilting ruler will help you maintain the accurate dimensions needed for the blocks to fit together perfectly. Most versions of this pattern utilize strips and squares, so keeping your edges straight will save you a lot of frustration when it comes time to align your seams and intersections.
Lastly, don’t forget to label your fabrics as “Fabric A,” “Fabric B,” and “Fabric C” according to your Yankee 3 Yard Quilt – Pattern instructions. This simple step prevents confusion during the assembly process, especially if your fabrics have similar colors. Following the quilt layout precisely ensures that you won’t run out of material and that your finished Yankee quilt looks exactly like the professional examples found in quilting magazines and online tutorials.
2. Construction Techniques and Assembly of the Yankee Pattern
The assembly of the Yankee 3 Yard Quilt – Pattern usually begins with strip piecing. This technique involves sewing long strips of different fabrics together before cutting them into segments. Strip piecing is a major time-saver and is one of the reasons the Yankee 3 Yard Quilt – Pattern is considered a “fast” quilt. It reduces the amount of individual handling of small pieces and improves the accuracy of your quilt blocks.
Once your strips are cut and sewn into units, you will begin forming the individual blocks for the Yankee 3 Yard Quilt – Pattern. This pattern often features a mix of “four-patch” units or “half-square triangles,” depending on the specific variation you are following. The key to a professional finish is to press your seams carefully. Most quilt patterns suggest pressing to the darker fabric to prevent the seam allowance from showing through the lighter sections of the quilt top.
As you arrange the blocks for your Yankee 3 Yard Quilt – Pattern, you will notice the secondary patterns starting to form. This is the most exciting part of the process! You may want to use a “design wall” or a large flat surface to lay out all your blocks before sewing them into rows. This allows you to check for any mistakes in orientation, ensuring that the Yankee 3 Yard Quilt – Pattern flow is consistent across the entire surface of the quilt.
Joining the rows of the Yankee 3 Yard Quilt – Pattern requires careful pinning at every intersection. To get those perfect “nesting” seams, ensure that the seam allowances of the top row are pressed in the opposite direction of the row below it. This reduces bulk and allows the points of your Yankee 3 Yard Quilt – Pattern to meet exactly, giving the finished product a clean, high-end look that reflects your skill as a maker.
The Yankee 3 Yard Quilt – Pattern usually includes instructions for a simple border. Since the three yards are used efficiently for the main body and the binding, the border is often created from the remaining strips. If you want a larger quilt, you can always add an extra yard of a coordinating fabric for a wider border, but the charm of the Yankee 3 Yard Quilt – Pattern lies in its ability to be a complete project using only the original three yards.
Finally, the quilting process itself can enhance the Yankee 3 Yard Quilt – Pattern. Whether you choose “stitch-in-the-ditch” for a minimalist look or a more elaborate free-motion design like swirls or feathers, the quilting adds the final layer of texture. Because the Yankee quilt is a manageable size, it is an excellent project for practicing your machine quilting skills at home on a standard sewing machine before tackling larger bed-sized quilts.
3. Customizing the Yankee 3 Yard Quilt for Gifts and Decor
One of the greatest benefits of the Yankee 3 Yard Quilt – Pattern is how easily it can be personalized. For a nursery, you can use high-contrast black and white fabrics with a single pop of yellow. The Yankee 3 Yard Quilt – Pattern structure makes these modern color stories look sophisticated. Because the project is quick, many quilters find it to be their “go-to” pattern for last-minute baby shower invitations or unexpected gifts for friends.
If you are making the Yankee 3 Yard Quilt – Pattern for a masculine gift, consider using flannels or batiks in deep blues, greys, and greens. Flannel adds an extra layer of warmth and coziness, though it can be slightly bulkier to sew. The geometric nature of the Yankee 3 Yard Quilt – Pattern appeals to many tastes, making it a versatile choice that isn’t overly floral or feminine, depending on the prints you select from your local fabric shop.
For those who enjoy a “scrappy” look, the Yankee 3 Yard Quilt – Pattern can be adapted by using multiple scraps that equal one yard total for each “fabric” section. This is a brilliant way to clear out your scrap bin while still following a structured quilt design. As long as you maintain a consistent color value for each of the three “yards,” the Yankee 3 Yard Quilt – Pattern will still have its signature organized and balanced appearance.
Holiday-themed versions of the Yankee 3 Yard Quilt – Pattern are also a huge hit. Using three yards of Christmas-themed fabrics allows you to create a festive lap quilt in just a few hours. These make excellent housewarming gifts during the winter months. Because the Yankee 3 Yard Quilt – Pattern is so efficient, you can often make several tops from a single holiday fabric collection, ensuring all your gifts have a consistent but unique feel.
The Yankee 3 Yard Quilt – Pattern can also be scaled up. If you love the design but need a queen-sized quilt, you can simply double or triple the number of blocks you produce. You would then need six or nine yards of fabric, maintaining the three-fabric ratio. This scalability makes the Yankee 3 Yard Quilt – Pattern a valuable tool in any quilter’s library, as it works for projects ranging from small wall hangings to large bedspreads.
Finally, consider adding a personalized quilt label to the back of your Yankee 3 Yard Quilt – Pattern project. Including the name of the recipient, the date, and the name of the quilt pattern adds a sentimental touch. It turns a quick sewing project into a historical document that your family will treasure. The Yankee 3 Yard Quilt – Pattern is a testament to the fact that you don’t need a year of work to create something that carries deep emotional value.
4. Finishing and Caring for Your Yankee 3 Yard Quilt
After your Yankee 3 Yard Quilt – Pattern top is finished and quilted, the binding is the final step. Most 3-yard patterns are designed so that the remaining fabric from one of your yards can be used to create the binding strips. A “double-fold” binding is recommended for durability. Hand-sewing the binding to the back of the quilt provides a clean, invisible finish, while machine-sewing is faster and more durable for quilts that will be washed frequently.
Caring for your Yankee 3 Yard Quilt – Pattern masterpiece is relatively simple. We recommend washing your quilt on a gentle cycle with cold water. To maintain the vibrancy of the colors, use a “color catcher” sheet in the wash, especially the first few times. Air-drying is the gentlest method, but a low-heat tumble dry can give the quilt that classic, crinkly texture that many quilters find irresistible and cozy.
When not in use, store your Yankee 3 Yard Quilt – Pattern in a cool, dry place. Avoid plastic storage bins, which can trap moisture; instead, use a clean cotton pillowcase or a specialized acid-free textile box. If you display your Yankee quilt on a rack, try to refold it periodically in different ways to prevent permanent creases from forming along the fold lines, which can eventually weaken the fabric fibers.
If you are using the Yankee 3 Yard Quilt – Pattern for a charity project, it is often helpful to include a small care card. Let the recipient know that the quilt is machine-washable and made from 100% cotton. The Yankee 3 Yard Quilt – Pattern is a favorite for charity groups because its speed allows a single person or a small group to produce many quilts in a short amount of time, providing comfort to those in need.
As you become more familiar with the Yankee 3 Yard Quilt – Pattern, you might start to see ways to tweak the design. Perhaps you’ll add a row of “piping” to the binding or experiment with “fussy cutting” a specific motif from your focus fabric. The Yankee 3 Yard Quilt – Pattern is a fantastic foundation for growth, encouraging you to develop your skills while always providing a reliable and beautiful result at the end of the day.
Ultimately, the Yankee 3 Yard Quilt – Pattern is about the joy of making. It removes the stress of complex calculations and overwhelming fabric choices, letting you focus on the rhythmic pleasure of the sewing machine. Whether you are a master quilter or just starting out, the Yankee 3 Yard Quilt – Pattern offers a satisfying, high-quality experience that celebrates the enduring tradition of American quilting in a modern, efficient format.
FAQ: Frequently Asked Questions about Yankee 3 Yard Quilt – Pattern
1. Is the Yankee 3 Yard Quilt – Pattern suitable for absolute beginners?
Yes, it is one of the best patterns for beginners! It uses basic shapes and straightforward quilting techniques. The “3-yard” constraint also makes the fabric shopping process much less intimidating for someone just starting their quilting journey.
2. Can I use a fat quarter bundle instead of three full yards?
A fat quarter bundle usually contains 18″ x 21″ pieces. While you can certainly use the Yankee 3 Yard Quilt – Pattern with fat quarters, you will need to do a bit more piecing to get the same length as a full yard. It is generally easier to use three continuous yards as the pattern intended.
3. What is the typical finished size of a Yankee 3 Yard Quilt?
Most Yankee 3 Yard Quilt – Patterns result in a lap-sized quilt, typically around 40″ x 60″ or 45″ x 60″. This is the perfect size for snuggling on the sofa or for use as a decorative throw.
4. How do I choose the “Fabric A” in the Yankee 3 Yard Quilt – Pattern?
“Fabric A” is usually your focus fabric. Look for a print that you absolutely love—maybe something with a large floral design, a novelty print, or a bold geometric pattern. Fabrics B and C should then be chosen to complement the colors found in Fabric A.
5. Do I need any special rulers for the Yankee 3 Yard Quilt – Pattern?
While a standard 6″ x 24″ quilting ruler is usually enough, a square-up ruler can be helpful for ensuring your blocks are perfectly square before you sew them into rows. This helps the Yankee quilt lay flat once it is finished.
6. Can I make this pattern if I don’t have a lot of sewing space?
Absolutely! Because the Yankee 3 Yard Quilt – Pattern involves smaller pieces and a lap-sized finish, it is much easier to manage in a small sewing room or even on a kitchen table than a large king-sized quilt would be.
Conclusion
In this article, we have explored the efficiency and beauty of the Yankee 3 Yard Quilt – Pattern, a design that has revolutionized the way many quilters approach their craft. We discussed how to select high-contrast fabrics, the time-saving benefits of strip piecing, and how to customize the Yankee 3 Yard Quilt – Pattern for various gift-giving occasions.
By following this pattern, you can create a high-quality, professional-looking quilt with minimal stress and maximum creative satisfaction. The Yankee 3 Yard Quilt – Pattern is truly a versatile tool that belongs in every sewist’s collection, from the novice to the expert.