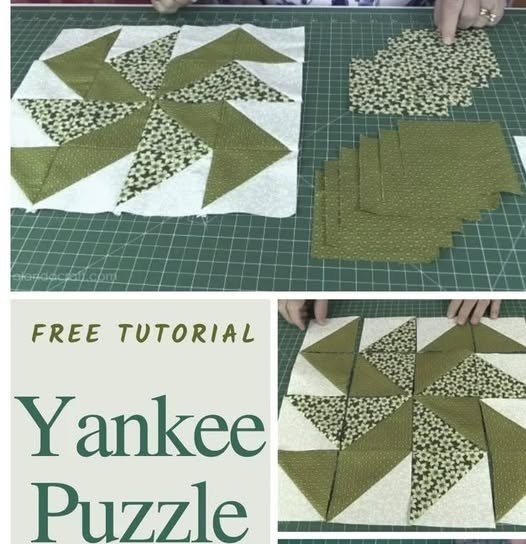
The Yankee Puzzle Quilt Block – Pattern is one of those timeless designs that captures the essence of early American quilting history while remaining incredibly relevant for modern makers. This specific quilt pattern is beloved for its energetic, pinwheel-like appearance and its ability to create a sense of constant motion across a fabric surface. Whether you are a seasoned quilter or a curious beginner, mastering the Yankee Puzzle Quilt Block – Pattern allows you to tap into a tradition that balances geometric precision with artistic flair.
As you begin your journey with the Yankee Puzzle Quilt Block – Pattern, it is essential to understand that this design relies heavily on the use of Half-Square Triangles (HSTs). The way these triangles are oriented creates the signature “puzzle” effect that gives the block its name. Historically, this block design was often used to use up scraps, but today’s quilters often use high-contrast quilting fabrics to make the interlocking shapes pop. The Yankee Puzzle is more than just a series of stitches; it is a visual representation of how simple shapes can form complex, beautiful narratives.
When working with the Yankee Puzzle Quilt Block – Pattern, precision is your best friend. Because the design features several intersecting seams, maintaining a consistent quarter-inch seam allowance is the secret to ensuring your corners match perfectly. This article will guide you through the intricacies of the Yankee Puzzle Quilt Block – Pattern, explaining the technical terms and providing the structural foundation you need to create a stunning masterpiece. From selecting your color palette to the final press, every step is an opportunity to refine your quilting skills.
1 Understanding the Yankee Puzzle Quilt Block – Pattern Geometry
The Yankee Puzzle Quilt Block – Pattern is fundamentally a four-patch design, meaning the grid is divided into four equal quadrants. Within these quadrants, the placement of HSTs (Half-Square Triangles) determines the final look. Unlike simpler blocks, the Yankee Puzzle requires a specific rotation of these triangles to create the “windmill” or “puzzle” effect that draws the eye toward the center.
One of the most important aspects of the Yankee Puzzle Quilt Block – Pattern is the fabric contrast. To make the pattern visible, you generally need at least two contrasting colors—often referred to as a “light” and a “dark” value. If the values are too similar, the intricate geometric shapes will blend together, and the unique “puzzle” identity of the block will be lost to the observer’s eye.
When we talk about the Yankee Puzzle Quilt Block – Pattern, we are essentially discussing a masterclass in triangular construction. Each block is typically composed of four large squares, and each of those squares is further divided. The beauty of this sewing project lies in its versatility; by changing the orientation of just one triangle, you can transform the Yankee Puzzle into an entirely different historical block.
To achieve success with this pattern, many quilters utilize the “two-at-a-time” method for creating Half-Square Triangles. This technique involves placing two squares of fabric right sides together, marking a diagonal line, and sewing a quarter inch away from that line on both sides. This method ensures that your Yankee Puzzle Quilt Block – Pattern remains square and reduces the risk of fabric stretching.
Another key term to remember is nesting seams. When assembling your Yankee Puzzle Quilt Block – Pattern, you will want to press your seams in opposite directions. This allows the fabric “bumps” to lock together perfectly at the intersections. This technique is vital for any quilt pattern that features multiple points meeting in the center, as it reduces bulk and helps your sewing machine glide through the layers.
Finally, the Yankee Puzzle Quilt Block – Pattern is often scaled to different sizes, such as 6-inch, 9-inch, or 12-inch blocks. Choosing the right size depends on the final dimensions of your quilt top. Beginners often find that a 12-inch block is easier to handle because the individual fabric pieces are larger and more manageable during the assembly and pressing stages.
2 Essential Materials for Your Yankee Puzzle Quilt Block – Pattern
Before you sit down at your machine to tackle the Yankee Puzzle Quilt Block – Pattern, gathering the right tools is paramount. You will need high-quality 100% cotton quilting fabric, which offers the stability required for geometric piecing. Using a rotary cutter and a self-healing mat is also highly recommended to ensure that every cut for your quilt block is perfectly straight and accurate.
An accurate acrylic ruler is another “must-have” for the Yankee Puzzle Quilt Block – Pattern. Since this block relies on the precise measurement of triangles, even a sixteenth of an inch error can lead to a lopsided result. Many quilters prefer rulers with a non-slip backing to prevent the fabric from shifting while cutting the diagonal lines necessary for the puzzle pieces.
Thread choice also plays a significant role in the Yankee Puzzle Quilt Block – Pattern. A 50-weight cotton thread is ideal because it is strong enough to hold the seams but thin enough not to add extra bulk. When you are sewing multiple layers of fabric together in a quilt block, heavy thread can actually change the dimensions of the block, leading to “shrunken” results.
Pressing is often confused with ironing, but in the Yankee Puzzle Quilt Block – Pattern, pressing is the correct technique. You should lift and set the iron down rather than sliding it across the fabric. This prevents the bias edges of the triangles from stretching. A good steam iron can help flatten the seams of your Yankee Puzzle, making the final quilt look professional and crisp.
You might also consider using fabric starch or a sizing spray when preparing your materials for the Yankee Puzzle Quilt Block – Pattern. Starching the fabric before cutting makes it stiffer and less likely to distort. Since the HSTs involve cutting on the bias (the diagonal grain of the fabric), this extra stability is a lifesaver for maintaining the integrity of the pattern.
Lastly, don’t forget your seam ripper. Even the most experienced quilters occasionally misplace a triangle in the Yankee Puzzle Quilt Block – Pattern. Because the blocks are rotated in a specific way, it is easy to accidentally sew a piece upside down. Having a seam ripper handy ensures you can quickly correct mistakes and keep your quilting project on track without frustration.
3 Step-by-Step Construction of the Yankee Puzzle Quilt Block – Pattern
The first step in assembling the Yankee Puzzle Quilt Block – Pattern is the preparation of your squares. For a standard block, you will typically need two squares of your dark fabric and two squares of your light fabric. Ensure they are cut to the exact dimensions specified in your quilt instructions. Precision at this stage is the foundation of a successful Yankee Puzzle.
Once your squares are cut, you will move on to creating the Half-Square Triangles. Mark a diagonal line on the back of the lighter fabric squares. Place a light square and a dark square right sides together. By sewing on both sides of that line and cutting down the middle, you create two identical HST units for your Yankee Puzzle Quilt Block – Pattern. Repeat this with your remaining squares.
After cutting your units apart, it is time to trim to size. This is a step many beginners skip, but it is crucial for the Yankee Puzzle Quilt Block – Pattern. Use a square ruler to ensure each HST is perfectly square and matches the required measurement. Trimming away the “dog ears” (the little triangles of fabric that hang off the edges) will make the assembly of the quilt block much smoother.
Now comes the “puzzle” part of the Yankee Puzzle Quilt Block – Pattern. Lay out your four HST units on a flat surface or a design board. You must rotate them so that the dark triangles point toward the center in a way that mimics a rotating blade. This layout is what defines the Yankee Puzzle and differentiates it from other blocks like the “Pinwheel” or “Broken Dishes.”
Once you are happy with the layout, sew the units together in rows. Sew the top two units together, then the bottom two units together. This creates two rectangular halves of your Yankee Puzzle Quilt Block – Pattern. Be sure to check that your seams are nested at the center point. This ensures that when you join the two halves, the middle of the “puzzle” aligns perfectly.
The final step is to join the two rows. Pin carefully at the center intersection to prevent shifting. After sewing the final seam, give your Yankee Puzzle Quilt Block – Pattern a final press. Many quilters prefer to press the center seam open to reduce the “hump” where all the points meet. Congratulations, you have completed the core of the Yankee Puzzle pattern!
4 Design Variations and Creative Uses for the Pattern
While the traditional Yankee Puzzle Quilt Block – Pattern uses two colors, there is no rule saying you can’t go “scrappy.” A scrappy Yankee Puzzle uses a variety of different fabrics for the “dark” portions while keeping a consistent “light” background. This gives the quilt a vibrant, eclectic feel that is perfect for using up your fabric stash and creating a one-of-a-kind heirloom.
You can also play with the scale of the Yankee Puzzle Quilt Block – Pattern. Creating tiny 4-inch blocks can result in an intricate, mosaic-like quilt that looks incredibly difficult but uses the same basic techniques. Conversely, using “jumbo” 18-inch blocks allows you to finish a quilt top very quickly, making it a great choice for a fast baby quilt or a modern throw.
The way you arrange multiple Yankee Puzzle Quilt Block – Pattern units can create secondary patterns. For example, if you place four blocks together so that the dark corners meet in the middle, you create a large, secondary diamond shape. This “secondary design” is a hallmark of advanced quilt composition and adds a layer of depth to your finished textile art.
Another creative variation involves the use of fussy cutting. This is when you cut your fabric to highlight a specific motif, like a flower or a bird, within the triangles of the Yankee Puzzle Quilt Block – Pattern. This technique requires more fabric and careful planning, but it turns a standard quilt pattern into a personalized storytelling piece that captures the imagination.
Modern quilters often experiment with “negative space” in the Yankee Puzzle Quilt Block – Pattern. By using a solid, neutral background and very bright, saturated colors for the puzzle pieces, you can create a minimalist quilt that feels fresh and contemporary. The Yankee Puzzle is a perfect candidate for this style because its lines are so clean and sharp.
Finally, consider using the Yankee Puzzle Quilt Block – Pattern for smaller projects. A single block makes a beautiful quilted pillow cover, a potholder, or even the center of a tote bag. Because the block is so visually striking on its own, it doesn’t always need a full quilt to shine. It is a versatile tool in any quilter’s repertoire.
Frequently Asked Questions (FAQ)
Is the Yankee Puzzle Quilt Block – Pattern suitable for absolute beginners?
Yes, it is! While it looks complex, it is actually just an arrangement of Half-Square Triangles. If you can sew a straight line and measure accurately, you can successfully complete this quilt block.
What is the difference between a Yankee Puzzle and a Pinwheel block?
While they look similar, the Yankee Puzzle Quilt Block – Pattern typically involves a specific orientation of triangles that creates a more “interlocking” look compared to the simpler rotation of a standard pinwheel.
How do I prevent the points of my triangles from getting cut off?
The key is the quarter-inch seam allowance. When you sew your units together, make sure your needle passes exactly through the “X” created by the previous seams on the back of the block. This preserves your sharp points.
Can I use pre-cut fabrics like Charm Squares for this pattern?
Absolutely. Using 5-inch Charm Squares is a fantastic way to make a Yankee Puzzle Quilt Block – Pattern. You simply pair two squares together to make your HSTs, which saves you a significant amount of cutting time.
What is the best way to press the seams?
For the Yankee Puzzle, many experts suggest pressing toward the darker fabric to prevent the seam allowance from showing through the lighter fabric. However, pressing seams open is also popular to help the block lie as flat as possible.
How many blocks do I need for a full-sized quilt?
This depends on the block size. If you are making 12-inch blocks, a standard Throw Quilt (60″ x 60″) would require 25 Yankee Puzzle Quilt Block – Pattern units arranged in a 5×5 grid.
Conclusion
In this guide, we have explored the rich history and technical construction of the Yankee Puzzle Quilt Block – Pattern. We covered the importance of fabric contrast, the precision of Half-Square Triangles, and the various tools needed to bring this quilt pattern to life.
We also looked at how to troubleshoot common issues like “lost points” and how to expand your creativity through scrappy designs and secondary patterns. The Yankee Puzzle remains a staple in the world of quilting because it is both a challenge for the mind and a joy for the eyes.