The Quilt Cross My Heart – Tutorial is a wonderful way to express your love for textile arts through a design that is as meaningful as it is beautiful. Creating a quilt is more than just sewing pieces of fabric together; it is an act of patience and creativity that results in a functional piece of art. This specific pattern, known for its interlocking heart shapes and clean geometric lines, has become a favorite for both modern quilters and those who appreciate traditional aesthetics. Whether you are looking to make a heartfelt gift for a wedding, a newborn, or simply to add a touch of warmth to your home decor, this guide will provide all the necessary steps to achieve a professional finish.
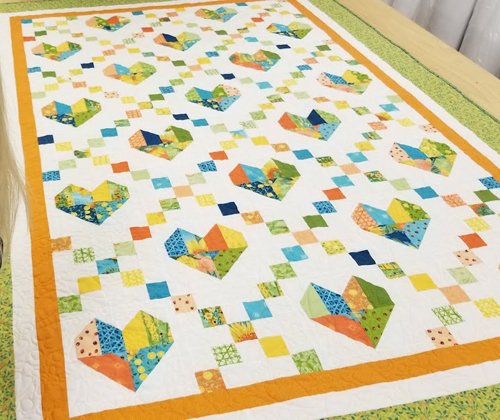
When you dive into the Quilt Cross My Heart – Tutorial, you are engaging with a project that emphasizes precision and color play. The “Cross My Heart” motif typically uses a combination of squares and half-square triangles to form the iconic heart imagery, framed by contrasting borders that make the central design pop. This pattern is particularly rewarding because it allows for extensive customization, enabling you to choose a color palette that reflects your personal style or the specific theme of a room. By mastering this design, you gain valuable skills in quilt block construction and seam nesting, which are fundamental techniques for any serious crafter.
In this comprehensive Quilt Cross My Heart – Tutorial, we will explore every facet of the process, from selecting the right cotton quilting fabric to the final binding stages. Optimization of your workspace and understanding the technical requirements of the pattern are key to avoiding common pitfalls like mismatched corners or uneven borders. As we move through the detailed steps, remember that the beauty of a handmade quilt lies in the journey of its creation. By following these SEO-optimized instructions and focusing on high-quality materials, you will produce a stunning heirloom-quality piece that stands the test of time and brings comfort to whoever wraps themselves in it.
1. Choosing the Right Materials for Your Quilt Cross My Heart – Tutorial
The foundation of any successful project begins with the selection of high-quality quilting supplies. For the Quilt Cross My Heart – Tutorial, it is highly recommended to use 100% cotton fabric because of its durability and ease of handling under a sewing machine. Cotton provides the stability needed for the crisp points required in the heart shapes.
In addition to the fabric, you will need a reliable rotary cutter and a self-healing cutting mat. These tools ensure that your measurements remain exact, which is vital when working with the geometric blocks of this specific pattern. Accuracy during the cutting phase prevents headaches later when you are trying to align your seams.
Don’t forget the importance of choosing the right quilting thread. A 50wt cotton thread is usually the best choice for piecing, as it is strong but thin enough to not add bulk to your seam allowances. Matching your thread color to your background fabric is a standard practice that yields a much cleaner, more professional look.
Your color story is where the Quilt Cross My Heart – Tutorial truly comes to life. Many quilters opt for a “scrappy” look using various shades of red and pink, while others prefer a minimalist approach with a single bold color against a neutral white or grey background. Selecting a high-contrast fabric for the “cross” element is essential for visibility.
Before you start sewing, ensure you have a fresh universal sewing needle in your machine. A dull needle can skip stitches or damage the delicate fibers of your textile art. Taking the time to prep your machine is a small step that significantly impacts the overall quality of your finished quilt top.
Lastly, consider your quilting batting. Depending on whether you want a heavy, warm quilt or a light, decorative throw, you might choose between cotton, wool, or polyester blends. The loft of the batting will determine how much your stitching stands out once the Quilt Cross My Heart – Tutorial is complete.
2. Cutting and Preparing the Fabric Pieces with Precision
The first active step in the Quilt Cross My Heart – Tutorial involves cutting your fabric into the specific dimensions required for the blocks. This pattern relies on square units and rectangles that come together to form the heart. Use your acrylic ruler to double-check every measurement before making the first cut with your rotary tool.
Consistency is the most important factor during this stage of the Quilt Cross My Heart – Tutorial. If one square is even an eighth of an inch off, the error will compound as you join more pieces together. This is why many experts suggest the “measure twice, cut once” rule to maintain the integrity of the quilt’s geometry.
Labeling your cut pieces is a great way to stay organized, especially if you are working with multiple colors. Using small notes or specialized quilt clips helps you keep track of which fabric strip belongs to the heart and which belongs to the negative space or background. This level of organization makes the assembly process much faster.
Once all the pieces are cut, it is beneficial to lay them out on a design wall or a large flat surface. This allows you to see the Quilt Cross My Heart – Tutorial layout in its entirety before a single stitch is sewn. You can rearrange colors and check the balance of the design to ensure it meets your visual expectations.
Preparing your fabric also involves pressing—not ironing. Use a hot iron to press out any wrinkles from your fabric before you start cutting. This ensures that the fabric lies flat and that your measurements are true to the pattern instructions. Steam can sometimes distort the grain, so use it sparingly or with a dry setting.
If you are using very dark or vibrant fabrics, you might want to consider a pre-wash or using a color catcher. This prevents “bleeding,” where the darker dyes might ruin the lighter sections of your Quilt Cross My Heart – Tutorial during its first wash. Protecting your hard work starts with these small, preventative measures.
3. Assembling the Heart Blocks and Joining the Rows
The heart of the Quilt Cross My Heart – Tutorial lies in the assembly of the individual blocks. You will start by creating Half-Square Triangles (HSTs), which are the building blocks for the rounded tops of the hearts. Mastering the HST technique is a vital skill that you will use in many other quilting projects.
When sewing your pieces together, always use a quarter-inch seam allowance. This is the standard in the quilting world and is crucial for ensuring that all your blocks end up the same size. Most modern sewing machines have a specific 1/4″ presser foot to help you maintain this consistency throughout the Quilt Cross My Heart – Tutorial.
As you finish each seam, remember to press towards the dark side. This technique prevents the seam allowance from showing through the lighter fabrics on the front of the quilt. Properly pressed seams also allow the blocks to lay flatter, which makes the quilting process much smoother when you reach the final stages.
Once your individual heart blocks are finished, it’s time to join them into rows. This is where the “cross” part of the Quilt Cross My Heart – Tutorial becomes visible. Pay close attention to your pinning technique; placing pins at every intersection will help you achieve those perfectly matched points that every quilter dreams of.
After the rows are completed, you will sew the rows together to finish the quilt top. This is often the most exciting part of the Quilt Cross My Heart – Tutorial, as you finally see the full pattern emerge. Be careful not to stretch the fabric as you sew these long seams, as it can cause the quilt to “wave” or become distorted.
A final press of the entire quilt top is necessary before moving on to the next phase. Look for any loose threads or unraveled seams and fix them now. A clean, well-pressed top is much easier to manage during the basting and quilting steps, ensuring a beautiful result for your Quilt Cross My Heart – Tutorial.
4. Finishing Touches: Quilting, Binding, and Care
The final section of our Quilt Cross My Heart – Tutorial focuses on the “sandwiching” and finishing of your piece. You will layer your completed top with the batting and the backing fabric. Using curved safety pins or a temporary spray adhesive for basting will keep the layers from shifting while you sew.
Choosing a quilting motif is a personal choice. You can follow the lines of the hearts for a stitch-in-the-ditch look, or try Free Motion Quilting (FMQ) to add swirls or floral patterns that contrast with the geometric heart shapes. The quilting not only holds the layers together but adds a beautiful texture to the finished textile.
Once the quilting is done, you must “square up” the quilt by trimming the excess batting and backing. This creates a clean edge for the binding. The binding is a long strip of fabric that wraps around the raw edges of the quilt, providing a framed finish and protecting the seams of your Quilt Cross My Heart – Tutorial.
For the binding application, you can choose to sew it entirely by machine for speed and durability, or finish the back by hand for a traditional, invisible look. Hand-finishing the binding is a relaxing way to conclude the Quilt Cross My Heart – Tutorial, giving you time to reflect on the work you’ve put into the project.
Proper care is essential for maintaining the life of your handmade quilt. It is recommended to wash your quilt on a gentle cycle with cold water and a mild detergent. Air drying or tumble drying on low heat will keep the fibers from becoming brittle, ensuring your Quilt Cross My Heart – Tutorial remains soft for years.
Finally, don’t forget to add a quilt label to the back. Include your name, the date, and perhaps the name of the pattern. This turns your Quilt Cross My Heart – Tutorial project into a documented piece of history, allowing future generations to know who crafted this beautiful, heart-filled creation.
FAQ: Common Questions About the Quilt Cross My Heart – Tutorial
Is this tutorial suitable for absolute beginners?
Yes, the Quilt Cross My Heart – Tutorial is designed to be accessible for beginners. While it requires some basic knowledge of how to operate a sewing machine, the shapes are geometric and the instructions focus on foundational skills like the quarter-inch seam.
How much fabric do I need for a throw-sized quilt?
Generally, for a standard throw size using the Quilt Cross My Heart – Tutorial, you will need approximately 3 to 4 yards of background fabric and a variety of fat quarters or scraps for the hearts themselves. Always check your specific pattern measurements before buying.
Can I use a regular sewing machine for the quilting part?
Absolutely! Most home sewing machines can handle the straight-line quilting or walking foot quilting required for this project. If you have a larger quilt, just take your time “rolling” the fabric to fit through the arm of the machine.
What is the best way to ensure my heart points are sharp?
The secret to sharp points in the Quilt Cross My Heart – Tutorial is accurate cutting and consistent seam allowances. Pinning at the intersections and slowing down your sewing speed as you approach the corners will also help you maintain precision.
Can I resize this pattern to make a baby quilt?
Yes, the Quilt Cross My Heart – Tutorial is very easy to scale. You can simply reduce the number of heart blocks you make or reduce the size of the individual squares to create a smaller, charming baby quilt.
Do I need to wash my fabric before starting?
Pre-washing is a personal preference. Some quilters like the “crinkle” look that happens when unwashed fabric shrinks slightly after the first wash, while others prefer to pre-wash to ensure no color bleeding occurs later on.
Conclusion
In this Quilt Cross My Heart – Tutorial, we have covered everything from the initial material selection to the final binding and care of your masterpiece. We learned that the key to a beautiful quilt lies in the details: choosing high-quality cottons, maintaining a precise 1/4″ seam, and taking the time to press each block carefully.
This pattern is a testament to the love and effort we pour into our hobbies, resulting in a piece that is both decorative and deeply personal. We hope this guide has inspired you to start your own journey with the Quilt Cross My Heart – Tutorial and that you find joy in every stitch.