Woven Fabric Basket – Tutorial is an excellent project for any sewing enthusiast or home organizer looking to blend functionality with a touch of handmade charm. Creating your own storage solutions allows you to customize colors, sizes, and textures to perfectly match your interior decor, all while engaging in a meditative crafting process. This Woven Fabric Basket – Tutorial will guide you through the intricate yet rewarding steps of turning simple fabric strips into a sturdy, artistic container that is as durable as it is beautiful.
Working with textiles in a structural way opens up a world of creative possibilities, especially when you master the art of weaving with fabric. This Woven Fabric Basket – Tutorial focuses on a technique that uses interfacing and fabric scraps to provide the necessary stiffness, ensuring your basket doesn’t just look good but actually holds its shape. Whether you are looking to organize your sewing room, create a unique gift basket, or simply find a home for those loose remote controls, this method is a versatile skill to add to your crafting toolkit.
As we dive into this Woven Fabric Basket – Tutorial, remember that the quality of your finish depends heavily on precision during the cutting and pressing stages. Using a rotary cutter and a self-healing mat will make the process much smoother and more professional. We will explore how to prepare your materials, weave the base and sides, and finish the top edge for a polished look. Prepare your workstation and gather your favorite fabrics, because we are about to embark on a journey that transforms flat cloth into a sophisticated three-dimensional object.
1. Material Selection and Preparation for Your Woven Fabric Basket – Tutorial
The success of your Woven Fabric Basket – Tutorial begins with choosing the right materials to provide both aesthetics and strength. I highly recommend using 100% cotton fabric because it presses beautifully and holds a crisp edge, which is essential for the weaving process. You can use fat quarters or even long strips of upcycled denim to give your basket a more rustic, eco-friendly feel while maintaining the structural integrity needed for a storage bin.
To ensure your basket doesn’t collapse, you must use a heavy-weight fusible interfacing or fusible fleece. In this Woven Fabric Basket – Tutorial, the interfacing acts as the “bones” of the project, giving the fabric strips a leather-like thickness that makes the weaving much easier to handle. Without this support, the fabric would be too flimsy to stand upright, so don’t skip the step of ironing your stabilizer to the wrong side of your fabric strips.
Cutting your strips is the next critical phase of the Woven Fabric Basket – Tutorial. For a medium-sized basket, strips that are 2 inches wide work perfectly, but you will need to fold them lengthwise to hide the raw edges. This results in 1-inch wide finished strips that are sturdy and clean. Consistency is key here; using a quilting ruler to ensure every strip is identical will prevent gaps in your weave and make the final assembly much more symmetrical.
In this Woven Fabric Basket – Tutorial, we focus on a “double-fold” method for the strips. This means folding the edges to the center and then folding the strip in half again, much like making bias tape. By sewing a straight stitch down both long edges of each strip, you add extra reinforcement and a decorative topstitch that catches the light beautifully once the basket is woven together. It takes a bit of time, but the result is a high-end look.
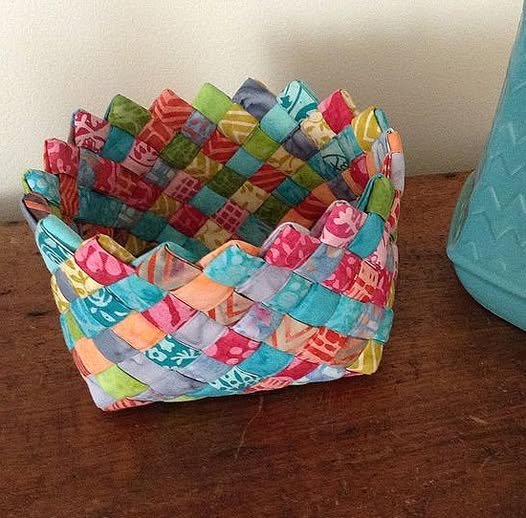
Color coordination is where your personality shines through in this Woven Fabric Basket – Tutorial. You can choose two contrasting colors to create a bold checkerboard pattern, or use a variety of shades within the same color family for a sophisticated ombre effect. If you are a fan of scrap quilting, this is the ultimate way to use up those long remnants that are too narrow for a quilt block but too pretty to throw away.
Lastly, make sure you have plenty of wonder clips or pins on hand. As you follow this Woven Fabric Basket – Tutorial, you will find that holding the woven base in place while you transition to the sides can be a bit tricky. Clips are much easier to use than pins when dealing with multiple layers of interfaced fabric, as they won’t bend or distort the weave as you work toward the final shape.
2. Weaving the Base and Transitioning to the Sides
The foundation of your project in this Woven Fabric Basket – Tutorial is the woven base. Lay half of your prepared strips vertically on your work surface, side by side, and secure the top edges with a bit of masking tape or clips to keep them from shifting. Now, begin weaving your horizontal strips through the vertical ones in a classic “over-under” pattern. Ensure each row is pushed tightly against the previous one to create a solid, gap-free surface.
Once your base reaches the desired square or rectangular size, it is time for the most important part of the Woven Fabric Basket – Tutorial: turning the corners. To create the walls of the basket, you will need to fold the strips upward at a 90-degree angle. This transition is where the basket starts to take its three-dimensional form. It helps to have a heavy object, like a large book or a tailor’s clapper, to weigh down the base while you start working on the vertical height.
As you build the sides in this Woven Fabric Basket – Tutorial, you will continue the weaving pattern, but now you are working in a circular or “around the corner” fashion. Each horizontal strip will eventually wrap all the way around the basket and meet back at the start. I recommend overlapping the ends of these horizontal strips by at least an inch and hiding the join behind a vertical strip to keep the exterior looking seamless and professional.
Tension is everything when you are working on the walls of your Woven Fabric Basket – Tutorial. If you weave too loosely, the basket will bulge and lose its shape; if you weave too tightly, the sides may pull inward, creating a “waist” in the middle of your basket. Aim for a firm, even tension that keeps the vertical strips standing straight up. Periodically step back and look at your basket from a distance to ensure the sides are rising evenly on all four corners.
One pro-tip for this Woven Fabric Basket – Tutorial is to use a small amount of fabric glue or a few hidden hand-stitches at the corners of the base. This provides extra security while you are still learning the rhythm of the weave. As the basket grows taller, the weight of the strips will help hold everything in place, but that initial transition from the flat base to the upright walls is the most delicate part of the entire construction.
Keep weaving until you reach your desired height, but remember to leave about two inches of the vertical strips exposed at the top. This extra length is necessary for the finishing process of the Woven Fabric Basket – Tutorial. Whether you want a shallow tray for jewelry or a deep bin for yarn, the weaving process remains the same—just keep adding horizontal strips until you are satisfied with the proportions of your handmade storage solution.
3. Securing the Top Edge and Adding Finishing Touches
The final stage of our Woven Fabric Basket – Tutorial involves securing the top edge so it never unravels. There are two main ways to do this: the “tuck-in” method or the “binding” method. For a clean, modern look, you can fold the remaining vertical strips over the top horizontal strip and tuck them back into the weave on the inside of the basket. This creates a smooth, rounded top edge that looks great from every angle.
If you prefer a more decorative finish in your Woven Fabric Basket – Tutorial, you can create a separate fabric binding, similar to how you would finish a quilt. Simply trim all your vertical strips so they are flush with the top horizontal row, and then sew a long strip of fabric around the entire perimeter. This adds a nice pop of color and hides all the raw ends of the woven strips, providing a very sturdy and professional rim.
For those who want to take their Woven Fabric Basket – Tutorial to the next level, adding handles is a fantastic option. You can weave the handles directly into the sides using longer strips, or you can attach leather straps with rivets for a high-end, boutique feel. Handles make the basket much more practical for carrying items from room to room and add a secondary texture that complements the woven fabric beautifully.
Inside the basket, you might notice the woven texture can be a bit bumpy. If you want a smoother interior, this Woven Fabric Basket – Tutorial can be modified by adding a fabric liner. While not strictly necessary, a liner protects your items from snagging on the woven strips and gives you a chance to use a fun, hidden print on the inside. You simply sew a fabric box slightly smaller than your basket and drop it inside, securing it at the top rim.
Don’t forget to give your finished project a final press with a steam iron. In any Woven Fabric Basket – Tutorial, heat is your friend. Steaming the finished basket helps the fibers and the interfacing “set” into their new shape, making the basket feel much more rigid and permanent. If your basket feels a little soft, you can also apply a light coat of fabric stiffener spray to the exterior to give it that extra boost of durability.
Now that your basket is complete, take a moment to admire the intricate pattern you’ve created. This Woven Fabric Basket – Tutorial results in a piece that is truly unique, reflecting your personal style and your dedication to the craft. Whether it sits on a shelf holding craft supplies or serves as a centerpiece on a dining table, your woven creation is a testament to the beauty of slow, intentional making.
4. Creative Variations and Practical Uses for Your Basket
Once you have mastered the basic technique in this Woven Fabric Basket – Tutorial, the world of customization opens up to you. You can experiment with different strip widths—imagine a basket made with very wide strips for a chunky, bold look, or very narrow strips for a delicate, intricate appearance. Each variation changes the “scale” of the weave and gives the basket an entirely different personality.
Another exciting variation to try after finishing this Woven Fabric Basket – Tutorial is using different materials entirely. You can mix fabric strips with burlap, ribbon, or even lace to create a multi-textured piece. Using a metallic fabric for some of the strips can add a modern, festive touch that makes the basket perfect for holiday decor or as a sophisticated gift container for a special occasion.
Shape is another area where you can push the boundaries of this Woven Fabric Basket – Tutorial. While square and rectangular baskets are the easiest for beginners, you can create a round basket by starting with a circular woven base. This requires a bit more manipulation of the strips as you turn the corners, but the resulting “nest” shape is incredibly charming and perfect for holding round items like fruit or balls of yarn.
For those interested in sustainable crafting, this Woven Fabric Basket – Tutorial is a goldmine for upcycling. Old button-down shirts, vintage linens, and even worn-out curtains can be sliced into strips and given a second life. Not only does this save money on materials, but it also adds a layer of history and story to your project, making it a conversation piece in your home.
Think about the functionality of your woven creation beyond simple storage. Small versions of this Woven Fabric Basket – Tutorial can be used as plant pot covers (just place a saucer inside first!), while larger versions can serve as stylish toy bins for a nursery. Because they are made of fabric, they are soft and safe for children’s rooms, yet sturdy enough to hold a significant amount of weight if you’ve used enough interfacing.
Finally, consider the seasonal possibilities. You can follow this Woven Fabric Basket – Tutorial using bright pastels for Easter, deep oranges and browns for Autumn, or sparkling silvers and blues for Winter. Changing your fabric choices allows you to refresh your home organization with the seasons, ensuring that your space always feels curated, cohesive, and filled with the warmth of handmade art.
FAQ – Frequently Asked Questions
1. Can I make this Woven Fabric Basket – Tutorial without a sewing machine?
While a sewing machine makes the process of preparing the strips much faster, you can certainly do it by hand. You would use a hidden ladder stitch to close the fabric strips. It will take significantly longer, but it’s a great “slow-stitch” project to do while watching a movie.
2. How do I clean my woven fabric basket?
Since the basket contains interfacing and multiple layers of fabric, I recommend spot cleaning with a damp cloth and mild detergent. Machine washing might cause the basket to lose its shape or the interfacing to pull away from the fabric. If it gets dusty, a quick vacuum with a brush attachment works wonders.
3. What if my basket isn’t standing up straight?
This usually happens if the interfacing isn’t heavy enough or if the weave is too loose. You can try to “rescue” it by spraying the inside with heavy starch or fabric stiffener and let it dry over a box that is the same size as your basket to help it regain its rectangular form.
4. How much fabric do I need for a standard Woven Fabric Basket – Tutorial?
For a medium basket (about 8×8 inches), you will generally need about 1 to 1.5 yards of fabric total, depending on how many colors you use. If you are using fat quarters, 4 to 6 pieces should be plenty to give you enough strips for both the base and the sides.
5. Is this project suitable for beginners?
Absolutely! While it looks complex, the “over-under” weave is very intuitive. The most challenging part for a beginner is keeping the strips aligned. As long as you take your time with the pressing and use plenty of clips, even a novice sewer can achieve a beautiful result with this Woven Fabric Basket – Tutorial.
Conclusion
In this Woven Fabric Basket – Tutorial, we have explored the entire process of creating a sturdy and stylish fabric container from scratch. From the careful selection of cotton fabrics and fusible interfacing to the rhythmic process of weaving the base and building the walls, you now have the knowledge to create your own custom storage solutions.
We covered the importance of tension, the various ways to finish the top edge, and how to add personal touches like handles or liners to make your project truly unique.