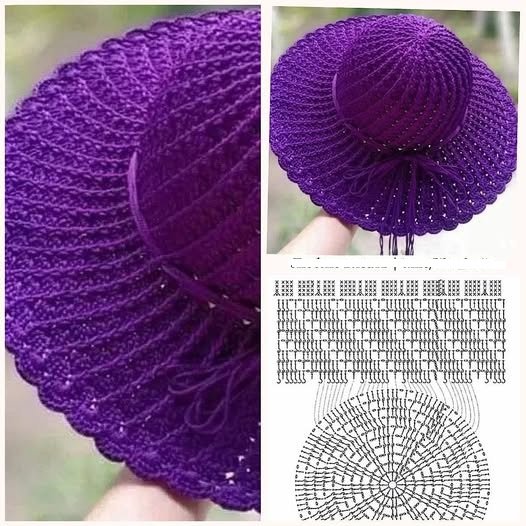
Crochet Sun Hat – Tutorial is your ultimate guide to creating a stylish, functional, and breathable accessory that is perfect for bright summer days or relaxing beach vacations. Making your own headwear allows you to customize the fit, color, and brim width to perfectly match your personal style while ensuring maximum sun protection. In this comprehensive Crochet Sun Hat – Tutorial, we will walk you through every stage of the process, from choosing the right materials to finishing the brim with professional-looking stitches that hold their shape against the wind.
The beauty of a handmade crochet hat lies in its unique texture and the cooling properties of natural fibers. Unlike store-bought synthetic hats, a project following this Crochet Sun Hat – Tutorial prioritizes comfort and air circulation, preventing that uncomfortable “sweaty” feeling often associated with summer headgear. Whether you are a seasoned fiber artist or a beginner looking for a rewarding project, the rhythmic nature of the stitches used here provides a relaxing experience that results in a high-quality, durable piece of wearable art.
As we dive into this Crochet Sun Hat – Tutorial, remember that the secret to a great hat is in the tension and the gradual increases used to form the crown. We will explore various techniques to ensure your hat doesn’t turn out too pointy or too flat, but rather curves gracefully to the shape of your head. Get your hooks ready and find a comfortable, sunny spot to work, as we explore the steps needed to craft your very own DIY summer hat that will surely become a staple in your warm-weather wardrobe for years to come.
1. Choosing the Best Materials for Your Crochet Sun Hat – Tutorial
Selecting the right yarn is the most critical first step in any Crochet Sun Hat – Tutorial. For summer wear, you should strictly avoid wool or heavy acrylics, as they trap heat and can be quite uncomfortable in the sun. Instead, look for 100% cotton yarn, raffia, or linen blends. These fibers are breathable, absorb moisture, and have the structural integrity required to keep a brim from flopping over your eyes.
The weight of the yarn also plays a significant role in the final look of your Crochet Sun Hat – Tutorial project. Most crafters prefer a “Worsted” or “Aran” weight for a sturdy, classic look, while a “DK” weight offers a lighter, more delicate feel. If you are using raffia yarn, which is a popular choice for this Crochet Sun Hat – Tutorial, keep in mind that it doesn’t have much “give,” so you will need to adjust your grip and pace to maintain consistent tension.
Regarding your crochet hook, I recommend using a size slightly smaller than what the yarn label suggests. If you are following this Crochet Sun Hat – Tutorial with a cotton yarn that calls for a 5.0mm hook, try using a 4.0mm or 4.5mm. This creates a denser fabric that provides better UV protection and helps the hat maintain its “bucket” or “cloche” shape without needing extra starch or wire.
In addition to your main supplies, you will need a few essential notions to successfully complete this Crochet Sun Hat – Tutorial. A reliable stitch marker is indispensable because hats are typically worked in continuous rounds without joining. Without a marker to indicate the start of each row, it is very easy to lose track of your increases, which can lead to an asymmetrical crown or a hat that is the wrong size.
Don’t forget to have a measuring tape nearby. Since every person’s head size is different, this Crochet Sun Hat – Tutorial encourages you to measure as you go. You will need to check the diameter of the flat circle you create for the crown to ensure it matches the standard sizing for an adult, child, or toddler. Accuracy at the beginning of the project prevents the frustration of a hat that is too tight or constantly slipping.
Lastly, consider adding a bit of millinery wire or a length of fishing line for the final round of the brim. While not strictly necessary, many advanced versions of a Crochet Sun Hat – Tutorial suggest this to give the brim a “memory” so it can be flipped up or down and stay in place. This small addition can turn a simple crochet project into a high-end fashion piece that looks like it came from a boutique.
2. Mastering the Crown and Increasing Techniques
The crown is the foundation of our Crochet Sun Hat – Tutorial, and it always starts with a “magic ring” or a small chain loop. The goal is to create a flat, circular disc that will eventually sit on top of the head. In this Crochet Sun Hat – Tutorial, we use a standard increase pattern, usually starting with 6 or 8 single crochet stitches and doubling them in the next round to keep the fabric laying perfectly flat.
A common pitfall in a Crochet Sun Hat – Tutorial is the “ruffling” effect, which happens if you increase too quickly, or the “coning” effect, which happens if you don’t increase enough. To avoid this, we follow a mathematical progression: in each new round, you add one more “plain” stitch between your increases. This creates a smooth, even expansion that is the hallmark of a professionally made crochet sun hat.
As you work through this part of the Crochet Sun Hat – Tutorial, focus on the placement of your increases. Instead of placing them directly on top of the increases from the previous row, try to “stagger” them. This prevents the circle from turning into a hexagon or an octagon, ensuring a perfectly round shape that conforms naturally to the human head.
Once the diameter of your flat circle reaches about 6.5 to 7 inches for an average adult, it is time to stop increasing. This is a pivotal moment in the Crochet Sun Hat – Tutorial. From here, you will work even rounds without any increases, which causes the sides of the hat to grow downward. This transition defines the “body” of the hat and determines how deep it will sit on your forehead.
During the “even” rounds of the Crochet Sun Hat – Tutorial, you can experiment with different stitch patterns. While single crochet provides the most sun protection, adding a few rows of double crochet or a “V-stitch” can create decorative ventilation holes. This is a great way to personalize your hat and make it more breathable for extremely hot climates or tropical vacations.
Keep trying the hat on as you progress through this stage of the Crochet Sun Hat – Tutorial. The body should end just above your ears. If you want a deeper “bucket hat” style, add more rows; if you prefer a shorter “fedora” style, stop a bit earlier. Being able to customize the height is one of the greatest benefits of following a DIY crochet hat tutorial rather than buying a one-size-fits-all version.
3. Crafting a Sturdy and Stylish Brim
The brim is arguably the most important part of any Crochet Sun Hat – Tutorial because it provides the actual shade. To start the brim, you will begin increasing again. For a subtle, downward-sloping brim, you might increase in every 4th or 5th stitch. For a wide, dramatic “floppy” brim, you will need to increase more frequently to allow the fabric to spread outward.
In this Crochet Sun Hat – Tutorial, we recommend using a slightly tighter tension for the brim than you used for the body. This extra stiffness helps the brim resist gravity. If you find your brim is sagging too much, you can try “doubling up” your yarn or switching to a smaller hook size for these final rows. This adds density and “body” to the outer edge of the sun hat.
The width of your brim is entirely up to you. A 2-inch brim is practical for gardening or hiking, while a 5-inch brim creates a glamorous, high-fashion look. As you work through this Crochet Sun Hat – Tutorial, remember that the wider the brim, the heavier it becomes. If you go very wide, you will definitely need to use a stiffening technique to keep the edges from falling into your field of vision.
For a clean finish in your Crochet Sun Hat – Tutorial, consider using the crab stitch (also known as the reverse single crochet) for the very last round. This stitch creates a twisted, rope-like edge that looks very sophisticated and adds a significant amount of structural strength to the perimeter of the hat. It is a favorite technique among designers of crochet summer accessories.
If you want to add a decorative touch, this is the stage of the Crochet Sun Hat – Tutorial where you can change yarn colors. A contrasting color on the last two rows of the brim can tie the whole look together, matching your favorite swimsuit or sundress. Small details like a “scalloped” edge or a simple shell stitch can also add a feminine flair to the finished product.
Once the brim is the desired length, fasten off your yarn securely. One secret tip in this Crochet Sun Hat – Tutorial is to weave your ends in very deeply, following the curve of the stitches. Because hats are handled frequently and often stuffed into beach bags, you want to ensure the yarn tails never pop out, maintaining the professional quality of your handmade sun hat.
4. Shaping, Blocking, and Final Finishing Touches
After completing the stitches in our Crochet Sun Hat – Tutorial, your hat might look a little “wavy” or misshapen from being held in your lap. This is where “blocking” comes in. Blocking is the process of wetting the fibers and letting them dry in a specific shape. For a hat, you can use a hat form, a balloon inflated to the size of your head, or even a stainless steel bowl from your kitchen.
Lightly steam your hat with an iron (if the yarn fiber allows it) or mist it with water. Place it on your chosen form and smooth out the brim with your hands. In this Crochet Sun Hat – Tutorial, we emphasize that blocking is the difference between a “crafty” looking hat and a “boutique” looking one. It sets the stitches and gives the hat a permanent, professional silhouette.
Once dry, you can add embellishments to your project from this Crochet Sun Hat – Tutorial. A simple crochet ribbon, a faux-leather cord, or even a few crochet flowers pinned to the side can completely change the vibe of the hat. Many people like to add a “chin strap” made of simple chains or braided yarn, especially for kids’ hats, to keep them from blowing away.
If your cotton hat feels a bit too soft after washing, you can use a commercial fabric stiffener or a traditional starch spray. Apply it to the brim while the hat is on its form. This is a common practice for those following a Crochet Sun Hat – Tutorial who want that “crisp” straw-hat look while still enjoying the softness and durability of cotton or linen yarn.
Maintenance is also an important part of our Crochet Sun Hat – Tutorial. Most cotton hats can be hand-washed in cold water with a gentle detergent. Avoid the dryer, as it can shrink the cotton and ruin the shape you worked so hard to create. Instead, always re-block the hat on a form after washing to ensure it keeps its perfect fit for many summers to come.
Finally, take a moment to admire your work! You have followed this Crochet Sun Hat – Tutorial to create a custom, eco-friendly, and stylish piece of clothing. Whether you’re heading to the farmer’s market, the beach, or just your backyard, you’ll be doing so with the pride of knowing you made it yourself. Don’t forget to share your creation with other fiber enthusiasts and inspire them to start their own summer crochet project.
FAQ – Frequently Asked Questions
1. How do I know if the hat will fit my head before I finish it?
The best way is to measure the “crown diameter.” For a standard adult head (22 inches circumference), your flat circle should be about 7 inches across before you stop increasing. Always use a measuring tape during your Crochet Sun Hat – Tutorial to ensure the math matches your physical size.
2. Can I use acrylic yarn for this Crochet Sun Hat – Tutorial?
While you can, it is not recommended. Acrylic is plastic-based and does not breathe. It will make your head very hot in the sun. For the best results in any summer crochet project, natural fibers like cotton, linen, or raffia are always the superior choice for comfort and durability.
3. My brim is flopping over my eyes. How do I fix it?
This usually happens if the stitches are too loose or if you increased too many times in the brim rows. You can try frogging (ripping back) a few rows and using a smaller hook, or you can sew a piece of millinery wire into the final round to provide the necessary support.
4. Is this Crochet Sun Hat – Tutorial suitable for beginners?
Yes! If you know the basic stitches like the magic ring, single crochet, and how to increase, you can absolutely make this hat. It is a great project for learning how to shape 3D objects and understanding the geometry of crochet rounds.
5. How much yarn do I need for a full sun hat?
Typically, an adult-sized hat with a medium brim requires about 200 to 300 yards of worsted weight cotton yarn. If you are planning a very wide, dramatic brim, you might want to have a third ball of yarn on hand just in case.
Conclusion
In this Crochet Sun Hat – Tutorial, we have walked through the essential steps of creating a beautiful and functional summer accessory. We started with the importance of selecting breathable natural fibers like cotton and raffia, moved into the technical details of crown increases, explored the construction of a sturdy brim, and finished with the vital “blocking” process.
This project is more than just a hat; it is a custom-fit piece of sun protection that showcases your skill and creativity as a crafter. By following these SEO-optimized steps, you now have the tools to create a variety of styles, from trendy bucket hats to elegant wide-brimmed sunshades.