Rose keychain Crochet – Tutorial is the perfect project for crafters who want to combine the elegance of floral design with the practicality of a daily accessory. Whether you are a seasoned fiber artist or a beginner looking for a quick and satisfying win, creating a crochet rose keychain allows you to practice essential stitches while producing a charming gift or a popular item for your craft stall. In this guide, we will walk through every step to ensure your finished product is durable, beautiful, and professionally finished.
The beauty of a Rose keychain Crochet – Tutorial lies in its versatility and the minimal amount of materials required to get started. Using just small scraps of cotton yarn, a reliable crochet hook, and a standard keyring, you can transform a simple thread into a three-dimensional blossom that never wilts. This project is specifically designed to be sturdy enough to withstand the wear and tear of being attached to a set of keys or a handbag, making it as functional as it is aesthetic.
As we dive into this Rose keychain Crochet – Tutorial, keep in mind that the secret to a great handmade keychain is in the details and the tension of your stitches. We will explore how to select the right colors, how to structure the petals for maximum impact, and the best ways to secure the hardware so your rose stays attached for years to come. Prepare your workspace, grab your favorite red or pink yarn, and let’s begin crafting a piece of art that you can carry with you everywhere you go.
1. Choosing the Right Materials for Your Rose keychain Crochet – Tutorial
The foundation of any successful Rose keychain Crochet – Tutorial starts with the yarn choice, and for keychains, mercerized cotton is the gold standard. Unlike wool or acrylic, cotton doesn’t pill easily and holds its shape exceptionally well over time, which is vital for an item that will be handled frequently. I recommend a weight like Sport or DK to keep the rose delicate but substantial enough to be seen.
Choosing the correct crochet hook size is equally important in this Rose keychain Crochet – Tutorial. To ensure your petals are firm and the stuffing or assembly points are hidden, use a hook that is slightly smaller than what the yarn label suggests. For instance, if using DK yarn, a 2.5mm or 3.0mm hook will create the tight, crisp crochet stitches necessary for a professional-looking floral accessory.
You will also need a high-quality metal keyring and perhaps a small lobster claw clasp. Integrating these into your Rose keychain Crochet – Tutorial requires a bit of planning, as you want the attachment point to be reinforced. Having these ready before you start helps you visualize exactly where the final “stem” or loop of the rose will connect to the metal hardware.
In addition to the basics, don’t forget the tapestry needle and sharp scissors. The tapestry needle is essential for weaving in ends and, more importantly, for the “rolling” and sewing phase of the crochet flower. Because a keychain is a small-scale project, your finishing techniques need to be very clean, with no visible knots or loose threads showing through the petals.
Color selection plays a huge role in the success of your Rose keychain Crochet – Tutorial. While classic red is always a bestseller, consider soft pastels like dusty rose, lavender, or even a bold yellow. Using a variegated yarn can also add a natural depth to the petals, mimicking the way light hits a real flower, which adds a layer of sophistication to your handmade accessory.
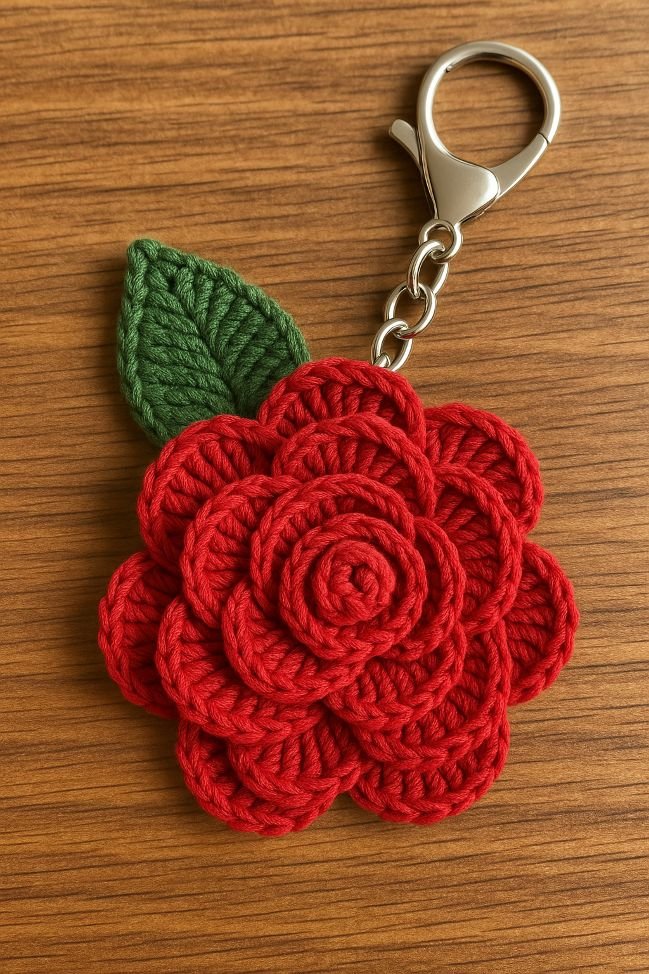
Lastly, consider adding a small leaf or a decorative bead to your Rose keychain Crochet – Tutorial. A single green leaf crocheted into the base not only adds a pop of contrast but also provides a wider surface area to secure the keyring loop. Small details like this make your work stand out in a crowded market and provide a more “complete” feel to the finished design.
2. Mastering the Basic Stitches for the Rose Petals
Every Rose keychain Crochet – Tutorial begins with a foundation chain, which determines how many layers your rose will have. For a keychain-sized flower, a chain of 30 to 40 is usually sufficient to create a full bloom without it becoming too bulky for a pocket. This initial foundation chain should be worked with even tension to prevent the base of the rose from warping.
The first row of our Rose keychain Crochet – Tutorial involves creating a series of spaces, often using a mesh stitch or V-stitches. These spaces act as the “pockets” where your petals will later be anchored. It is important to count your stitches carefully here, as an extra space can lead to an asymmetrical flower that won’t roll correctly during the assembly phase.
Transitioning to the petals, you will be using a combination of single crochet, half double crochet, and double crochet. By starting a petal with a shorter stitch and peaking in the middle with taller stitches, you create the classic rounded edge seen in nature. In this Rose keychain Crochet – Tutorial, we focus on creating “graduated petals” that start small and grow larger toward the end of the strip.
To make your Rose keychain Crochet – Tutorial truly pop, try using the picot stitch at the very center of your largest petals. A picot adds a tiny pointed tip that gives the rose a more “English Garden” or “Tea Rose” appearance. This small technical addition is a great way to show off your skills and adds a textured, high-end feel to the crochet pattern.
As you work across the row, pay close attention to the “turning” of your work. The strip will naturally begin to curl as the petals get heavier; this is a good sign! It means your Rose keychain Crochet – Tutorial is developing the necessary “spring” to coil into a tight, realistic bud. Keep your hands relaxed but your stitches firm to avoid any gaps in the fabric.
Finally, when you reach the end of the petal row, ensure you leave a very long yarn tail—at least 12 inches. This is a critical tip in any Rose keychain Crochet – Tutorial because you will use this specific tail to sew the entire flower together. Using the same yarn for assembly ensures that the “seams” are completely invisible and the flower looks like a single, seamless piece of art.
3. The Art of Rolling and Shaping the Flower
The assembly phase is where the magic of the Rose keychain Crochet – Tutorial truly happens. Start by laying your crocheted strip flat on a clean surface with the “pretty” side facing up. Beginning with the smallest petals (the ones you worked at the start of the chain), begin to roll the strip inward, keeping the bottom edge of the foundation chain perfectly level.
As you roll, the petals will naturally fan out. In this Rose keychain Crochet – Tutorial, the way you hold the roll is vital; if you roll it too tight, the rose will look like a cylinder; if too loose, it will look flat. Aim for a “Goldilocks” tension where the center looks like a tight bud and the outer petals have room to “breathe” and curve outward like a real blooming flower.
Once the shape is perfect, use your tapestry needle to sew through the bottom layers. You must pass the needle through every single layer of the spiral to ensure the rose doesn’t “telescope” out or unravel. This structural sewing is the most important part of the Rose keychain Crochet – Tutorial, especially since a keychain will be pulled and moved constantly.
After the base is secure, it is time to attach the keyring hardware. I recommend crocheting a small “tab” of 5 or 6 chain stitches directly onto the base of the rose, or sewing the metal ring into the center of the green calyx (if you made one). This integrated approach makes the Rose keychain Crochet – Tutorial much more durable than just using a thin thread to tie the ring on.
If you find that your petals are a bit floppy, you can use a small amount of fabric stiffener or even a dab of clear-drying glue on the underside of the outer petals. This helps the crochet rose maintain its “open” look even when it’s stuffed inside a dark bag or pocket. Shaping is a manual process, so take your time to pull and pinch the petals until they look just right.
For a final professional touch in this Rose keychain Crochet – Tutorial, look at the rose from all angles. If you see any gaps, use the remaining yarn tail to bridge them. A well-assembled handmade rose should look beautiful from the top, sides, and bottom. Once you are satisfied, knot the yarn securely inside the center of the flower where it can’t be seen and clip the excess.
4. Scaling and Customizing Your Crochet Rose Designs
Now that you have mastered the standard version, this Rose keychain Crochet – Tutorial can be adapted for different styles. For example, you can create a “Mini Rose” by using lace weight thread and a 1.0mm hook. These tiny treasures are incredibly popular as dainty accessories or even as charms for zippers, showing how the same pattern can yield vastly different results.
You can also experiment with “Two-Tone Roses” by changing colors for the final row of petals. Imagine a white rose with a delicate pink edge; this is achieved by joining a new color for the last few petals of the strip. This advanced tip in our Rose keychain Crochet – Tutorial adds a level of realism and artistic flair that attracts more attention to your crochet portfolio.
Another customization involves the “Stem and Leaf” addition. Instead of just a flower, you can crochet a thick, short cord (an i-cord) to represent a stem and attach the keyring to the end of that. This gives the Rose keychain Crochet – Tutorial a different silhouette and makes it easier to find your keys at the bottom of a large bag.
Think about the “Scent Factor.” A unique way to customize your Rose keychain Crochet – Tutorial is to place a tiny drop of rose essential oil on a small piece of felt and tuck it into the center of the rose before you finish sewing it shut. This creates a scented keychain that provides a pleasant aroma every time you use your keys, adding a sensory layer to your craft.
For those looking to sell their work, packaging is the final step of the Rose keychain Crochet – Tutorial. Placing the finished rose on a professional cardstock backing with your logo makes it look like a high-end boutique item. Since you’ve spent the time to make a beautiful SEO-optimized crochet project, presenting it well is the best way to honor your hard work.
Finally, remember that practice makes perfect. Your first Rose keychain Crochet – Tutorial might not be perfect, but by the third or fourth one, you will develop a “feel” for the yarn and the rolling technique. Each rose you make is a chance to refine your tension and explore new color combinations, making this a hobby that grows with you over time as a creative artist.
FAQ – Frequently Asked Questions
1. How long does it take to complete one Rose keychain Crochet – Tutorial?
For most intermediate crocheters, one rose takes about 20 to 30 minutes to crochet and another 10 minutes to assemble and attach the hardware. It is a very efficient project for those looking to build up stock for a craft fair or to make multiple gifts in one evening.
2. What is the best way to clean my crochet rose keychain?
Because keychains get dirty, I recommend using washable cotton yarn. If it gets stained, spot clean it with a damp cloth and mild soap. Avoid putting it in the washing machine, as the metal keyring could damage the machine or the agitation could distort the delicate petal shapes.
3. My rose keeps falling apart at the base. What can I do?
This usually happens if the sewing isn’t deep enough. When you are at the assembly stage of the Rose keychain Crochet – Tutorial, make sure your needle passes through every single layer of the coiled foundation chain. Think of it like pinning all the layers together with your yarn.
4. Can I use acrylic yarn instead of cotton?
You can, but be aware that acrylic yarn tends to get “fuzzy” or “hairy” with frequent handling. For an item like a keychain that is constantly in and out of pockets, mercerized cotton will stay looking “new” for much longer than acrylic will.
5. How do I make the rose look more “realistic”?
The secret is in the petal height. Make sure your stitches in the center of the petal are significantly taller than the stitches at the edges. Also, when rolling, don’t keep it perfectly symmetrical—nature is slightly imperfect, so a bit of variation in the roll makes the crochet rose look more organic.
Conclusion
This Rose keychain Crochet – Tutorial has provided a comprehensive look at creating a durable and stylish floral accessory from scratch.
We have covered the importance of selecting high-quality cotton yarn, the technical steps for crafting graduated petals, and the crucial “roll and sew” method that brings the flower to life. By following these steps, you’ve learned not just a pattern, but a technique for creating 3D art that is both beautiful and functional.