Crochet Hair Accessory – Tutorial projects are the perfect way to combine your passion for fiber arts with functional, everyday fashion that adds a personal touch to any outfit. Whether you are looking to create a vintage-inspired headband, a trendy oversized scrunchie, or a delicate floral hair clip, a Crochet Hair Accessory – Tutorial provides the foundational skills needed to transform small amounts of yarn into high-quality wardrobe essentials. In the world of handmade fashion, these small projects are highly sought after because they are quick to finish, require minimal materials, and offer endless opportunities for customization to suit your unique style.
Designing your own hair pieces allows you to move away from mass-produced plastic accessories and toward sustainable, comfortable alternatives that don’t snag or pull on your hair. This Crochet Hair Accessory – Tutorial is specifically crafted to guide you through the nuances of choosing the right fibers and stitches that offer both elasticity and durability. By mastering the techniques shared here, you will be able to create gifts for friends, items for your craft stall, or simply a collection of beautiful pieces to organize your own tresses with a touch of handmade elegance.
As we dive into this Crochet Hair Accessory – Tutorial, remember that the beauty of these projects lies in the details—the choice of a soft cotton blend, the addition of a shimmering bead, or the precision of a tight stitch. We will explore how to work around elastic bands, how to shape delicate bows, and how to ensure your finished product looks professional and polished. Get your favorite hooks ready as we embark on this creative journey to craft the ultimate crochet hair accessory that balances comfort with modern aesthetic appeal.
1. Choosing the Best Materials for Your Crochet Hair Accessory – Tutorial
The first step in any successful Crochet Hair Accessory – Tutorial is selecting the right yarn, as the fiber content directly affects how the accessory sits against your head. For items like headbands or hair ties, a cotton and spandex blend is often the gold standard because it provides the necessary “memory” to keep the item from stretching out over time. Pure cotton is excellent for its breathability and lack of “fuzz,” which helps prevent the yarn from tangling with individual hair strands during use.
When following a Crochet Hair Accessory – Tutorial, the weight of the yarn is equally important; usually, a Fingering or Sport weight yarn is preferred for a delicate, sophisticated look. Heavier yarns like worsted can work for thick winter headbands, but for year-round wear, thinner threads allow for more intricate stitch patterns and a lighter feel. Using a smaller ergonomic crochet hook than usual can also help create a denser fabric that maintains its shape even after multiple wears.
Hardware plays a vital role in this Crochet Hair Accessory – Tutorial as well, especially if you are making scrunchies or clips. You will need high-quality snag-free elastics or metal “alligator” clips that can be easily covered with your crochet work. Many crafters forget that the underlying structure needs to be sturdy; a weak hair tie will snap, rendering your beautiful crochet work useless, so always invest in durable base components before you begin.
Another essential material to have ready for this Crochet Hair Accessory – Tutorial is a set of stitch markers and a sharp tapestry needle. Because hair accessories are often small and worked in the round or in very short rows, losing your place can lead to lopsided designs. A tapestry needle is crucial for weaving in ends extremely securely—since hair accessories undergo a lot of stretching and pulling, those tails need to be tucked away with extra care to prevent unraveling.
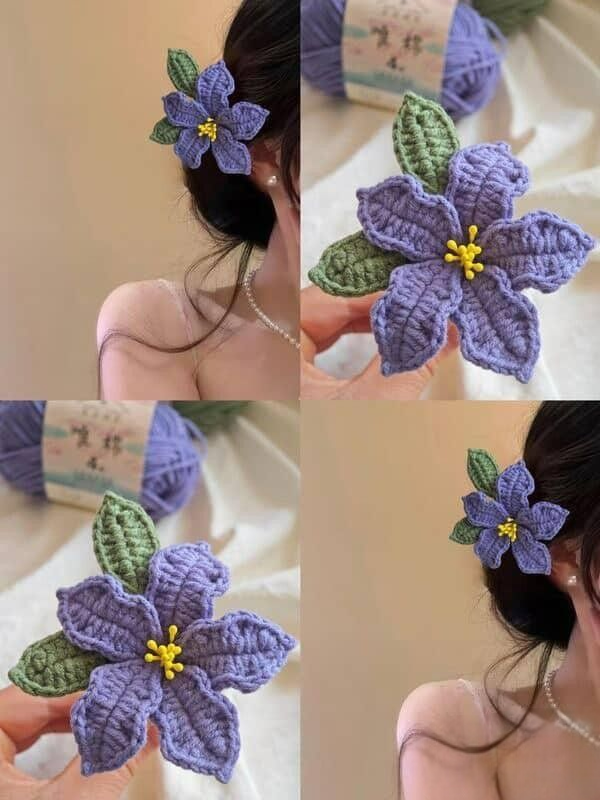
For those looking to add a bit of flair, consider incorporating seed beads or embroidery thread into your Crochet Hair Accessory – Tutorial supplies. Adding these elements can elevate a simple headband into a piece of wearable jewelry. If you are using beads, make sure they have a large enough center to be pre-strung onto your yarn before you start your first chain, ensuring they are locked into the stitches as you go for maximum security.
Lastly, think about the finish of your yarn; a mercerized finish provides a slight luster that looks beautiful under sunlight, perfect for outdoor events or weddings. This Crochet Hair Accessory – Tutorial encourages you to experiment with colors that complement your hair tone—warm golds and bronzes for brunettes, or cool silvers and blues for those with lighter hair. Having a clear vision of your palette from the start ensures a cohesive and professional result that you will be proud to wear.
2. Fundamental Stitches and Tension Mastery for Hair Pieces
In this Crochet Hair Accessory – Tutorial, we focus on stitches that provide a balance of decorative lace and structural integrity. The Single Crochet (sc) is the most common stitch used for the base of hair ties because it creates a tight, firm fabric that hides the elastic band underneath. When working over an elastic, it is important to pack the stitches closely together so that when the band is stretched, the rubber or elastic doesn’t peek through the gaps.
To add texture to your Crochet Hair Accessory – Tutorial projects, the Half Double Crochet (hdc) is a fantastic middle-ground stitch. It provides more height than a single crochet but is denser than a double crochet, making it ideal for headbands that need to be soft yet substantial. By working in the “third loop” of the hdc, you can create a knit-like ribbing effect that looks incredibly modern and high-end, perfect for a minimalist hair wrap.
Tension is arguably the most difficult part of a Crochet Hair Accessory – Tutorial to master, as it must be consistent. If your tension is too loose, the accessory will slip off the hair; if it is too tight, it might cause headaches or be difficult to stretch over a ponytail. A good rule of thumb is to aim for a “firm but flexible” feel, where the fabric has enough give to accommodate movement but snaps back to its original dimensions once removed.
For more ornamental designs, the Shell Stitch or Picot Border can be introduced in this Crochet Hair Accessory – Tutorial. These decorative flourishes are perfect for the edges of a “cottagecore” style kerchief or a dainty bow. When working these more open stitches, ensure you are using a slightly smaller hook to keep the loops from becoming “floppy,” which can happen easily with lightweight yarns used for hair items.
Understanding how to increase and decrease is also a key component of this Crochet Hair Accessory – Tutorial. For example, when making a tapered headband that is wider at the top and narrower at the nape of the neck, smooth transitions are necessary to avoid unsightly bumps. Using the invisible decrease method ensures that the shaping remains hidden, providing a sleek profile that looks like it was made by a professional designer.
Finally, don’t overlook the importance of the Slip Stitch (sl st) for finishing edges. In this Crochet Hair Accessory – Tutorial, we use the slip stitch to “surface crochet” or to reinforce the edges of a piece that might be prone to stretching. Running a row of slip stitches along the perimeter of a headband can act as a “stabilizer,” preventing the item from growing larger over time and ensuring it stays perfectly fitted to your head.
3. Step-by-Step Construction of a Classic Crochet Scrunchie
The scrunchie is a staple of the Crochet Hair Accessory – Tutorial world because it is incredibly beginner-friendly and satisfyingly fast to make. To start, you will join your yarn to a standard hair elastic with a slip stitch. You then work a high volume of single crochet stitches directly around the elastic, often 2 or 3 times as many stitches as you think you need, to create that classic ruffled look when the band is relaxed.
Once the base is covered, this Crochet Hair Accessory – Tutorial moves into the volume-building phase. In the second round, you will typically work multiple stitches into each stitch from the first round. For a very “frilly” scrunchie, you might put three double crochets into every single stitch. This exponential growth causes the fabric to wave and fold over itself, creating the iconic 80s and 90s silhouette that is currently back in fashion.
For a more sophisticated variation in this Crochet Hair Accessory – Tutorial, try using a V-stitch for the outer rounds. This creates a more delicate, lace-like appearance that looks beautiful in a silk-blend yarn. The key is to keep your stitches even so that the ruffles are distributed uniformly around the circle. If one side is more crowded than the other, the scrunchie will hang unevenly when worn in a bun or ponytail.
Assembly is minimal, but the “join” at the end of each round must be handled carefully. In this Crochet Hair Accessory – Tutorial, I recommend using the invisible join technique rather than a standard slip stitch to close your rounds. This prevents a visible “seam” from running through your ruffles, ensuring that the accessory looks perfect from every angle, no matter how it is twisted or turned in the hair.
After completing the stitches, it is time to weave in the ends. Because a scrunchie is constantly being pulled and twisted, you should weave the yarn tail through the stitches in several different directions. In this Crochet Hair Accessory – Tutorial, we suggest a “zig-zag” path for the needle, which locks the yarn in place against the friction of daily use. This ensures your hard work doesn’t come apart at a critical moment.
The final touch in this Crochet Hair Accessory – Tutorial is to give the scrunchie a gentle steam. Using a handheld steamer or the steam setting on an iron (without touching the yarn directly!), you can “set” the stitches and open up the fibers. This makes the ruffles lay more beautifully and gives the cotton a softer, more luxurious drape that feels wonderful against the skin and hair.
4. Customizing Your Hair Accessories for Different Occasions
Mastering the basic Crochet Hair Accessory – Tutorial is just the beginning; the real fun starts when you customize your pieces for specific events. For a formal wedding or a gala, you can use metallic thread or yarn with integrated sequins. A simple headband worked in a dark velvet yarn with a few strategically placed pearls can look as elegant as any high-end designer piece, proving that crochet is not just for casual wear.
Seasonal variations are another way to apply the lessons from this Crochet Hair Accessory – Tutorial. In the autumn and winter, you can use wool or alpaca blends to create ear-warmer style headbands that are both stylish and functional. Adding a “twist” at the front (a technique called the crochet turban twist) adds a modern architectural element that is very popular in contemporary street style and boutiques.
For children’s accessories, this Crochet Hair Accessory – Tutorial can be adapted to include whimsical elements like animal ears, bright neon colors, or “un-poppable” crochet bubbles. When making items for kids, it is extra important to use washable acrylic or cotton so that the accessories can be easily cleaned after a day of play. Safety is also paramount, so ensure any beads or buttons are sewn on with industrial-strength thread.
You can also use the techniques from this Crochet Hair Accessory – Tutorial to create “sets.” A matching scrunchie and headband combo makes for a fantastic gift package. You can even create a crochet hair wrap that integrates with a braid, using long chains and decorative leaf or star motifs at the ends. This “boho-chic” look is a favorite for summer festivals and beach vacations, offering a unique way to display your craft.
If you are a professional seller, focusing on the “branding” of your Crochet Hair Accessory – Tutorial items can make a huge difference. Attaching your crochet flowers or bows to customized cardstock or wooden displays makes them look like retail-ready products. The small size of these items makes them perfect for “add-on” purchases at your shop, as customers often can’t resist a cute, handmade hair tie at the checkout counter.
Finally, remember that fashion is about self-expression. Use this Crochet Hair Accessory – Tutorial as a template, but don’t be afraid to break the rules. Mix different yarn weights, combine textures like leather cord and cotton yarn, or create oversized “statement” bows that turn heads. Your hair is a canvas, and with a crochet hook in hand, you have the power to create one-of-a-kind art that you can wear every single day.
FAQ – Frequently Asked Questions
1. Is a Crochet Hair Accessory – Tutorial suitable for complete beginners?
Absolutely! Most hair accessories are small and use basic stitches like the single and double crochet. A scrunchie is often the very first project a new crocheter completes because it is fast and helps you practice working in the round without the complexity of a large garment.
2. Will crochet hair accessories damage my hair?
No, in fact, they are often safer than store-bought ties. Since you are using soft yarn and high-quality elastics, there are no sharp plastic or metal bits to snag or break your hair. Cotton yarn is particularly gentle on the hair cuticle, reducing frizz and breakage.
3. How do I clean my handmade crochet hair accessories?
It depends on the yarn used in your Crochet Hair Accessory – Tutorial. If you used cotton or acrylic, you can hand wash them in lukewarm water with a drop of mild soap. Lay them flat on a towel to air dry to ensure they keep their shape. Avoid machine washing, as the agitation can cause pilling or stretch out the elastic.
4. Can I sell items made from this Crochet Hair Accessory – Tutorial?
Yes! Hair accessories are high-margin items because they use very little yarn and can be made quickly. They are excellent for Etsy shops, craft fairs, or as low-cost items to fill out your inventory. Just make sure to use high-quality materials so your customers are happy with the durability.
5. What is the best way to attach a crochet bow to a metal clip?
The most secure way is to “sew-wrap” it. Use a matching yarn tail to sew through the back of the crochet piece and around the top bar of the clip multiple times. For extra security, a small dab of hot glue or E6000 craft glue between the yarn and the metal can prevent it from sliding.
Conclusion
This Crochet Hair Accessory – Tutorial has walked you through the essential steps of creating beautiful, functional, and stylish pieces for your hair.
We explored the importance of selecting high-quality mercerized cotton and snag-free elastics, mastered the tension required for comfortable wear, and followed a detailed guide for constructing a trendy scrunchie. Beyond the basics, we’ve seen how simple stitch variations and the addition of beads or metallic threads can transform a basic project into an elegant accessory suitable for any occasion, from a casual day at the park to a formal wedding.