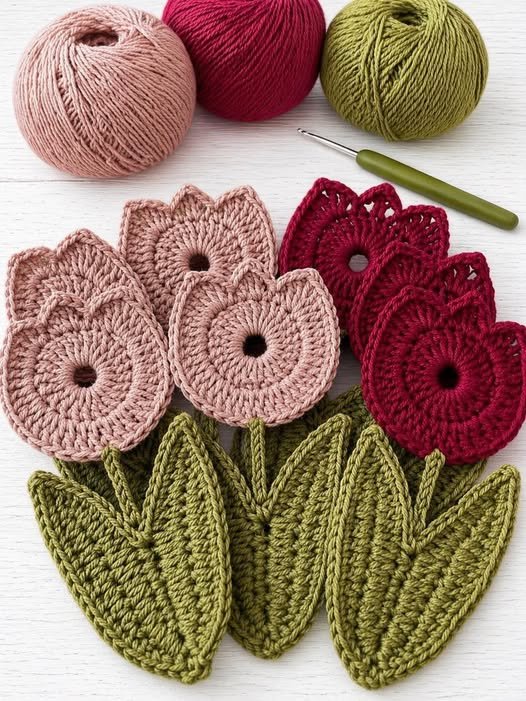
Crochet Flower Appliques – Tutorial is the perfect way to breathe new life into your wardrobe or home decor by adding a touch of handmade elegance to everyday items. These small, decorative elements are incredibly versatile, allowing you to customize everything from plain denim jackets and winter beanies to decorative pillows and baby blankets. Whether you are a seasoned fiber artist or a curious beginner, mastering the art of the Crochet Flower Appliques – Tutorial will provide you with an endless supply of creative possibilities to enhance your crafting projects.
The beauty of a Crochet Flower Appliques – Tutorial lies in its simplicity and the speed at which you can see results, making it a highly satisfying endeavor for those with limited time. Unlike large-scale projects like afghans or sweaters, these floral embellishments can be completed in just a few minutes, using up those colorful yarn scraps you’ve been saving. By learning the foundational techniques of creating flat, sewable flowers, you gain a vital skill that bridges the gap between basic utility and artistic expression in the world of modern crochet.
In this comprehensive Crochet Flower Appliques – Tutorial, we will explore the essential materials, the step-by-step stitch mechanics, and the best practices for attaching your finished pieces to various surfaces. We will focus on creating designs that are not only beautiful but also durable enough to withstand regular wear and tear. Grab your favorite colorful yarns and a matching hook, and let’s dive into this guide that is designed to help you flourish as a creator of handmade crochet accents.
1. Selecting the Right Materials for Your Crochet Flower Appliques – Tutorial
The first step in any successful Crochet Flower Appliques – Tutorial is choosing a yarn that matches the weight and texture of the item you plan to decorate. For most appliques, a mercerized cotton yarn is the gold standard because it offers excellent stitch definition and a subtle sheen that makes the petals pop. Cotton is also less likely to pill or lose its shape over time, which is crucial when the applique is destined for a garment that requires frequent washing.
When following this Crochet Flower Appliques – Tutorial, your choice of crochet hook size will significantly impact the final look of your flower. To ensure the applique remains flat and detailed, it is often best to use a hook that is half a millimeter smaller than what is recommended on the yarn label. This creates tighter, more defined crochet stitches that prevent the base fabric from showing through, giving your flower a professional, high-end finish.
Beyond yarn and hooks, you will need a few basic tools to round out your Crochet Flower Appliques – Tutorial toolkit. Sharp fabric scissors are a must for clean yarn ends, and a sturdy tapestry needle is essential for weaving in tails and eventually sewing the applique onto your project. Having a few rust-proof pins on hand is also helpful for positioning the flower perfectly before you begin the final attachment process.
Consider the color theory behind your Crochet Flower Appliques – Tutorial choices to maximize visual impact. Using high-contrast colors can make a bold statement, while monochromatic shades offer a sophisticated, subtle texture. Many artisans like to use variegated yarn for appliques, as it naturally mimics the multi-tonal beauty of real flowers without requiring frequent yarn changes, making the process much faster and more enjoyable.
Another material to consider in this Crochet Flower Appliques – Tutorial is the addition of small embellishments like seed beads or buttons for the flower’s center. Adding a “pistil” made of a contrasting material can add a 3D effect and a touch of sparkle. If you are making these for a baby item, however, ensure all added parts are securely sewn or stick to purely crochet centers to avoid any potential choking hazards.
Lastly, preparation involves creating a clean workspace with plenty of natural light. Since Crochet Flower Appliques – Tutorial work can be quite small and detailed, being able to see each individual loop is vital for maintaining symmetry. Once you have gathered your cotton yarn, your preferred hook, and your finishing tools, you are ready to move on to the actual construction of your first crochet blossom.
2. Mastering the Foundation Ring and Petal Construction
Every classic design in a Crochet Flower Appliques – Tutorial begins with a solid center, usually created using the Magic Ring technique or a small chain loop. The Magic Ring is highly recommended for appliques because it allows you to pull the center tight, leaving no visible hole—a detail that makes your handmade flower look much more polished. This center serves as the anchor point for all the petals that will follow.
Once your foundation is set, the Crochet Flower Appliques – Tutorial moves into the first round of stitches, which usually consists of a specific number of single crochet or half double crochet stitches worked into the ring. The number of stitches you place here will determine the number of petals your flower has; for example, twelve stitches are perfect for a flower with six petals, allowing two stitches for each petal base.
The most exciting part of this Crochet Flower Appliques – Tutorial is watching the petals emerge during the second or third round. Most patterns use a combination of stitch heights to create the curved edge of a petal. By working a slip stitch, then a double crochet, a treble crochet, and another double crochet all into the same space, you create a beautiful, rounded shape that captures the essence of a real bloom.
To ensure your work stays flat—which is the primary goal of any Crochet Flower Appliques – Tutorial—you must be careful not to add too many stitches in a single space, which can cause the flower to ruff or “bowl” upward. If you notice your flower is curling, try loosening your yarn tension or using a slightly larger hook for the final round. A flat applique is much easier to sew onto fabric later on.
Variation is key to becoming an expert in the Crochet Flower Appliques – Tutorial method. You can experiment with “pointed” petals by adding a picot stitch at the very top of each petal arc. This simple addition transforms a standard daisy-like flower into something more closely resembling a lily or a star, providing you with a library of different floral motifs to choose from for your various projects.
As you finish the last petal in this Crochet Flower Appliques – Tutorial, it is important to join the round with an invisible slip stitch. This technique hides the seam where the round ends, ensuring that the flower looks perfect from every angle. Leave a long yarn tail—at least ten inches—because you can use this same tail to sew the applique onto your target fabric, reducing the number of knots in your work.
3. Techniques for Attaching Appliques to Different Surfaces
Once you have completed the crochet portion of the Crochet Flower Appliques – Tutorial, the next challenge is attaching the piece securely and invisibly. For knit or crochet backgrounds, such as a sweater or a blanket, using the whip stitch with the leftover yarn tail is the most effective method. This creates a flexible bond that moves with the fabric, preventing the applique from pulling or distorting the base material.
If you are following this Crochet Flower Appliques – Tutorial to decorate non-stretch fabrics like denim or canvas, you might prefer using a matching sewing thread instead of yarn. A fine needle and thread allow you to make smaller, more discrete stitches that are nearly impossible to see. Focus on sewing around the outer perimeter of the flower’s center and the midpoint of each petal to keep the edges from flipping up.
For those who want a temporary or interchangeable look, this Crochet Flower Appliques – Tutorial suggests attaching your flowers to brooch pins or hair clips instead of sewing them directly onto a garment. This allows you to move your floral accents from a hat to a bag or even a lapel depending on your outfit for the day. It’s a great way to get more mileage out of a single crochet project.
Positioning is a critical step that many people skip in a Crochet Flower Appliques – Tutorial. Always lay your base garment flat on a hard surface and pin the appliques in place first. Try the garment on or hang the item up to see how the flowers sit with gravity. What looks centered on a table might look off-center once the fabric is being worn, so this “test fit” is essential for a professional look.
For heavy-duty items like backpacks or outdoor cushions, you can use a bit of fabric glue in the center of the applique to hold it in place while you sew. However, in this Crochet Flower Appliques – Tutorial, we always recommend backstitching for extra security. Glue alone often fails with the porous texture of yarn, especially after a few cycles in the washing machine, so the needle and thread remain your best friends.
Finally, consider the “cluster” technique often used by professional designers who master the Crochet Flower Appliques – Tutorial. Instead of a single lonely flower, try grouping three flowers of different sizes and slightly overlapping them. This creates a more organic, artistic arrangement that mimics how flowers grow in nature, turning a simple crochet applique into a sophisticated piece of textile art.
4. Care, Maintenance, and Advanced Customization Tips
After putting so much effort into your Crochet Flower Appliques – Tutorial creations, you want them to last as long as the items they decorate. If your appliques are made of cotton, they are generally quite hardy, but it is always best to wash the embellished item inside a mesh laundry bag. This prevents the delicate petals from snagging on zippers or buttons from other clothes in the wash, preserving your hard work.
If the petals of your crochet flower start to curl after washing, a quick shot of steam from an iron can do wonders. In this Crochet Flower Appliques – Tutorial, we suggest “blocking” your appliques if they look a bit wonky. Simply pin them into the desired shape on a foam mat, mist them with water, and let them dry completely. This sets the fibers and ensures they stay flat and beautiful for their next outing.
Advanced crafters can take this Crochet Flower Appliques – Tutorial to the next level by incorporating bead crochet. By pre-stringing small glass beads onto your yarn before you start, you can drop a bead into the edge of each petal as you work. This adds weight, sparkle, and a level of detail that is often seen in high-end boutique fashion, making your DIY crochet flowers truly stand out.
Another customization involves “layering” your flowers. You can follow the Crochet Flower Appliques – Tutorial to make one large flower and one smaller flower in a contrasting color. By stacking the smaller one on top of the larger one and sewing them together through the center, you create a double-layered bloom with incredible depth and texture, perfect for statement pieces like headband accents.
Don’t be afraid to experiment with different yarn weights within the same Crochet Flower Appliques – Tutorial. Using a bulky yarn with a large hook will result in a bold, chunky flower that works well on winter coats, while using fine embroidery floss will create a dainty, lace-like applique for delicate handkerchiefs or bridal accessories. The logic of the stitches remains the same regardless of the scale.
Ultimately, the goal of mastering the Crochet Flower Appliques – Tutorial is to express your unique style. Whether you prefer a bohemian look with earth tones and frayed edges or a modern aesthetic with bright neons and clean lines, these appliques are your canvas. Keep practicing, keep experimenting with different fiber types, and soon you will be able to transform any plain surface into a blooming work of art.
FAQ – Frequently Asked Questions
1. Can a total beginner follow this Crochet Flower Appliques – Tutorial?
Absolutely! Appliques are some of the best projects for beginners because they are small and use basic stitches like the chain, single crochet, and double crochet. If you can make a circle, you can make a flower. It’s a great way to practice stitch consistency without the commitment of a large project.
2. What is the best way to hide the yarn ends in a Crochet Flower Appliques – Tutorial?
The best way is to weave the ends into the back of the flower using a tapestry needle. Follow the path of the existing stitches for about an inch, then reverse direction for another half inch. This “locking” method ensures the ends won’t pop out even with heavy use or washing.
3. Why is my flower curling up instead of lying flat?
This usually happens due to high tension or having too many stitches in one round. In any Crochet Flower Appliques – Tutorial, if the petals are crowded, they will push against each other and lift. Try using a slightly larger hook for the petal round or ensure you aren’t pulling the yarn too tight as you work.
4. Can I use these appliques on leather or thick denim?
Yes, but you will likely need an awl or a heavy-duty leather needle to pre-pierce the holes before sewing. Once the holes are made, you can sew the crochet applique on as usual. For denim, a sharp “denim needle” in your sewing machine or a strong thimble for hand-sewing is recommended.
5. How do I make the center of the flower a different color?
To change colors in a Crochet Flower Appliques – Tutorial, finish the center round and join with a slip stitch. Cut the first color, leaving a tail. Join the new color for the petal round by pulling a loop through any stitch of the center. This creates a clean, two-tone effect that makes the flower look more realistic.
Conclusion
This Crochet Flower Appliques – Tutorial has guided you through the entire process of creating, attaching, and maintaining beautiful floral embellishments.
We started by selecting the perfect mercerized cotton yarn, moved through the mechanics of the Magic Ring and petal heights, and concluded with professional tips for sewing your art onto various fabrics. By mastering these simple yet effective techniques, you have unlocked a new level of personalization for your handmade wardrobe and home decor.