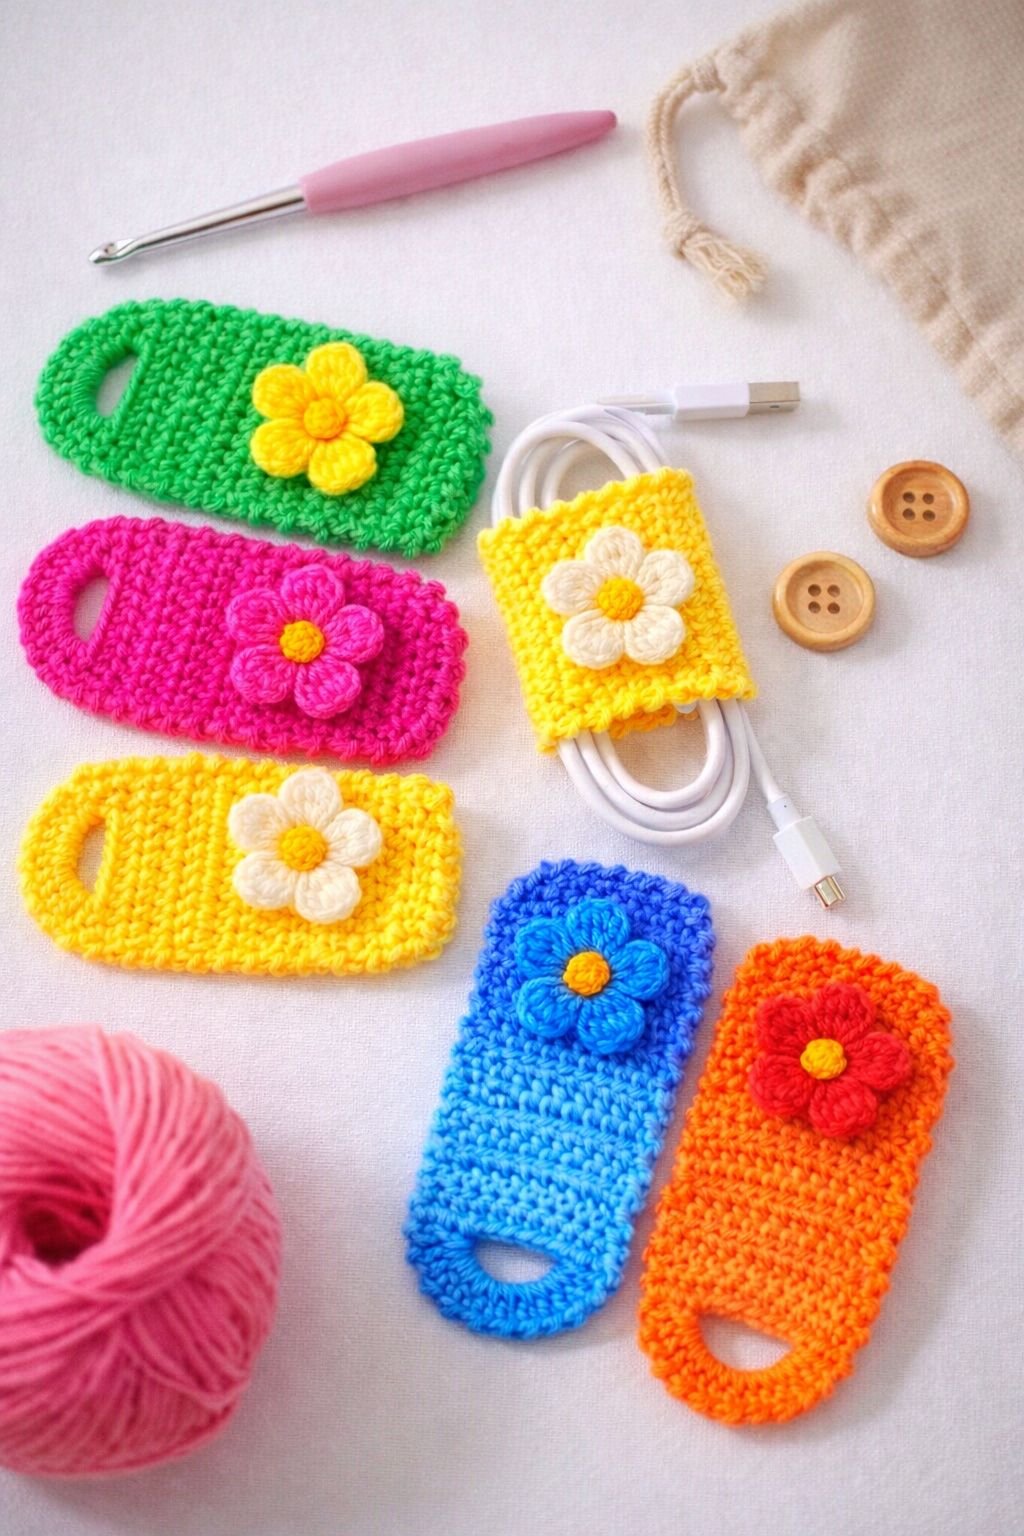
Flower Crochet Cable Organizer – Tutorial is your ultimate guide to blending functionality with aesthetic charm, ensuring your workspace remains tidy and stylish. If you are tired of the tangled mess of charging cables, headphones, and USB cords cluttering your desk or bag, this crochet project is the perfect solution for you. By combining the timeless art of yarn crafting with a practical modern need, you can create a handmade accessory that is as beautiful as it is useful.
In this comprehensive Flower Crochet Cable Organizer – Tutorial, we will explore how a few simple stitches can transform basic materials into a high-quality organizational tool. Whether you are a seasoned pro or a beginner looking for a rewarding weekend project, this guide provides all the necessary steps to succeed. Using breathable cotton yarn and a few decorative buttons, you can customize your organizers to match your office decor or personal style, making them excellent gifts for friends and family who value sustainable handmade items.
The beauty of following this Flower Crochet Cable Organizer – Tutorial lies in its versatility and the low cost of entry. You don’t need expensive machinery or complex tools; just a crochet hook, some colorful scrap yarn, and a bit of creativity. This article is optimized to give you the best DIY crochet tips, ensuring that your final product is durable, functional, and visually stunning. Let’s dive into the details and start organizing your digital life with a touch of floral elegance.
1. Essential Materials and Preparation for Your Project
To begin your journey with this Flower Crochet Cable Organizer – Tutorial, you must first gather the right supplies to ensure a smooth crafting experience. The choice of yarn weight is crucial; we recommend using a mercerized cotton yarn (size 4 or worsted) because it offers the structural integrity needed to hold cables firmly without stretching over time. Cotton is also less likely to pill, keeping your handmade cable holder looking fresh even after heavy use in your laptop bag.
Selecting the correct crochet hook size is the next step in preparing for your Flower Crochet Cable Organizer – Tutorial. Usually, a 3.5mm (E) or 4.0mm (G) hook works best with worsted cotton, creating a tight tension that prevents the cord from slipping through the stitches. If your tension is naturally loose, consider dropping down half a millimeter to maintain a stiff, professional finish that mimics high-end crochet accessories.
Don’t forget the small but vital notions that complete the look and function of your organizer. You will need a set of sharp embroidery scissors, a tapestry needle for weaving in ends, and most importantly, decorative buttons or wooden toggles. The button serves as the center of your flower or the fastening point, so choosing a sturdy option ensures your cable management solution stays securely closed during travel.
Before making your first loop, it is helpful to understand the stitch vocabulary used in this Flower Crochet Cable Organizer – Tutorial. We will primarily use the Magic Ring (MR), Single Crochet (SC), Half Double Crochet (HDC), and the Slip Stitch (SL ST). Familiarizing yourself with these basic techniques will make the process much faster and more enjoyable, especially if you are aiming for a seamless finish.
Lighting and ergonomics also play a significant role in your DIY crafting success. Ensure you are working in a well-lit area to avoid eye strain while working on the intricate flower petals. Since this project involves repetitive motions, taking short breaks will help you maintain consistent stitch tension, which is vital for the symmetry of your Flower Crochet Cable Organizer – Tutorial final result.
Finally, consider the color palette you want to use for your floral crochet design. You can opt for vibrant, contrasting colors to make the flower pop, or soft pastels for a more minimalist, Boho-chic aesthetic. Planning your colors in advance ensures that your Flower Crochet Cable Organizer – Tutorial results in a cohesive set of organizers that reflect your unique personality and creative vision.
2. Step-by-Step Guide to Creating the Floral Base
The core of our Flower Crochet Cable Organizer – Tutorial starts with the floral element, which acts as the “face” of your organizer. Begin by creating a Magic Ring, which allows you to pull the center tight, leaving no hole in the middle of your flower. Chain one and work 6 single crochets into the ring, then pull the tail to close it, forming a solid foundation for your decorative crochet flower.
In the second round of this Flower Crochet Cable Organizer – Tutorial, you will increase the stitch count to provide a wider base for the petals. Work 2 single crochets into each stitch from the previous round, giving you a total of 12 stitches. This crochet expansion technique ensures that your flower remains flat and doesn’t curl at the edges, which is essential for a functional cable strap.
Now it is time to create the petals, which give the Flower Crochet Cable Organizer – Tutorial its signature look. In the next stitch, work a sequence of (1 Slip Stitch, 1 Half Double Crochet, 2 Double Crochets, 1 Half Double Crochet, 1 Slip Stitch) all into the same stitch. This creates a rounded, lush petal; repeat this process around the circle until you have a beautiful, five or six-petaled crochet blossom.
Consistency is key when working on the floral aesthetics of this project. Make sure each petal has the same height and width by maintaining a steady pull on your yarn. If one petal looks smaller than the others, it might be due to a change in hook grip, so take your time to ensure every stitch is uniform. This attention to detail is what elevates a simple DIY project into a professional-grade tech accessory.
Once the petals are complete, fasten off the yarn but leave a long tail for sewing. This tail will be used later in the Flower Crochet Cable Organizer – Tutorial to attach the flower to the organizer’s strap. Using a tapestry needle, weave the starting tail into the back of the flower to hide it completely, ensuring your handmade gift looks perfect from every angle.
The flower you have just created serves as the primary visual interest for your cable management tool. You can experiment with different yarn textures, such as velvet or bamboo silk, to create different tactile experiences. However, for the most durable results in this Flower Crochet Cable Organizer – Tutorial, sticking to high-quality cotton remains the top recommendation for long-term organization efficiency.
3. Crafting the Functional Connector Strap
The second major component of this Flower Crochet Cable Organizer – Tutorial is the strap, which wraps around your cords to keep them secure. To start, create a slip knot and chain a length of approximately 15 to 20 stitches. The exact length depends on the thickness of the cables you intend to organize—for example, a laptop power brick will require a longer crochet strap than a pair of thin earbuds.
After achieving the desired length, turn your work and perform a Single Crochet in the second chain from the hook. Continue to work one SC in each chain across. This creates a sturdy, ribbon-like base that is resistant to stretching. In this Flower Crochet Cable Organizer – Tutorial, we emphasize the Single Crochet stitch because it provides the most “grip” for your cables, preventing them from sliding around.
To add durability to your cable tie, work a second row of Single Crochets back across the first. At the end of this row, we will create the buttonhole loop. Chain 5 (or enough to fit your chosen button) and slip stitch back into the last SC of the strap. This loop is a critical functional element of the Flower Crochet Cable Organizer – Tutorial, as it allows the organizer to lock in place.
Reinforcing the buttonhole is a professional tip often skipped in basic guides. In this Flower Crochet Cable Organizer – Tutorial, we recommend working 7 or 8 Slip Stitches around the chain loop you just created. This adds thickness and prevents the loop from fraying or snapping after repeated use, making your crochet organizer a truly long-lasting eco-friendly product.
Once the strap is finished, you should have a flat, sturdy piece of crochet fabric with a loop on one end. Fasten off and weave in the ends securely. This part of the Flower Crochet Cable Organizer – Tutorial is where the structural integrity of your project is finalized. A well-made strap ensures that even the heaviest cables remain neatly bundled in your travel gear.
Before moving to the assembly phase, give your strap a gentle tug to test its elasticity. If it feels too flimsy, you can add a border of Slip Stitches all the way around the perimeter. This advanced crochet technique adds a finished “frame” to the strap, giving it a more modern and polished look that aligns with the high standards of this Flower Crochet Cable Organizer – Tutorial.
4. Assembly and Final Customization Tips
The final phase of the Flower Crochet Cable Organizer – Tutorial is where the magic happens as you assemble the pieces. Take your finished flower and place it on the opposite end of the strap from the buttonhole loop. Using the long yarn tail you saved earlier and a tapestry needle, sew the flower firmly onto the strap using a whip stitch. Make sure the attachment is centered for a balanced floral design.
Now it is time to attach the button, which is the “locking mechanism” of your Flower Crochet Cable Organizer – Tutorial. Sew the button directly onto the center of the flower. This serves two purposes: it secures the button to the strap through the flower, and it acts as a decorative “stamen” for your crochet bloom. Use a strong polyester thread if your yarn is too thick to pass through the button holes.
One of the best parts of this Flower Crochet Cable Organizer – Tutorial is the ability to customize. You can add small crochet leaves in a contrasting green yarn to the sides of the flower for more detail. Simply chain 6, work a Slip Stitch, SC, HDC, DC, and another Slip Stitch back down the chain to create a quick leaf that adds an organic touch to your cable management kit.
For those who want to take their crochet skills further, consider making a set of these organizers in varying sizes. You can create a “Small” version for phone chargers and a “Large” version for heavy-duty extension cords. This Flower Crochet Cable Organizer – Tutorial is scalable, meaning you only need to adjust the starting chain count of the strap to accommodate different cable diameters.
To keep your organizers clean, remember that cotton crochet items are generally machine washable. However, to preserve the shape of the petals and the integrity of the button, we recommend hand washing in cool water and laying them flat to dry. This maintenance tip ensures that the hard work you put into this Flower Crochet Cable Organizer – Tutorial stays beautiful for years to come.
Finally, think about how you can package these for sale or gifting. Wrapping a set of three handmade cable organizers in recycled brown paper with a twine bow makes for an irresistible artisan product. By following this Flower Crochet Cable Organizer – Tutorial, you have mastered a blend of art and utility, proving that even the most mundane household problems can be solved with a bit of yarn and a creative spirit.
FAQ – Frequently Asked Questions
1. What is the best yarn for a Flower Crochet Cable Organizer?
The best yarn is 100% cotton. It is durable, does not stretch excessively, and holds the shape of the flower petals much better than acrylic or wool.
2. How long does it take to complete this Flower Crochet Cable Organizer – Tutorial?
A single organizer typically takes between 20 to 40 minutes, depending on your crochet speed. It is a fantastic “stash-buster” project for using up leftover yarn.
3. Can beginners follow this Flower Crochet Cable Organizer – Tutorial?
Absolutely! This project uses basic stitches like the Single Crochet and Double Crochet. It is an excellent way for beginners to practice working in the round and creating flat straps.
4. Will the crochet strap stretch out over time?
While all yarn has some give, using cotton and maintaining a tight tension will minimize stretching. If it does stretch, you can simply move the button slightly to keep the fit snug.
5. Are these organizers safe for all types of cables?
Yes, they are perfect for USB cables, laptop chargers, and even kitchen appliance cords. Since they are made of soft yarn, they won’t scratch or damage the plastic casing of your electronics.
6. Can I sell items made from this Flower Crochet Cable Organizer – Tutorial?
Yes, handmade organizers are very popular at craft fairs and on platforms like Etsy. They are low-cost to produce and offer high value to customers looking for eco-friendly organization.
Conclusion
This Flower Crochet Cable Organizer – Tutorial has provided you with a complete roadmap to creating a beautiful and practical accessory. We have covered everything from selecting the right cotton yarn and hook size to crafting the floral base, the functional strap, and the final assembly.
By following these steps, you now have the skills to turn a messy drawer of tangled cords into a neatly organized collection of handmade crochet treasures.