FABRIC HAT – Tutorial is your go-to guide for creating a stylish and functional accessory that never goes out of style. Whether you are looking to shield yourself from the sun or simply want to add a handmade touch to your wardrobe, crafting a custom headpiece is a rewarding project for any sewing enthusiast. This comprehensive guide will walk you through every step of the process, ensuring that your finished product looks professional and fits perfectly.
Learning how to work with a FABRIC HAT – Tutorial allows you to experiment with different textiles, patterns, and structures. From sturdy canvases to breathable cottons, the choice of material can completely change the vibe of your creation. In this article, we will focus on the essential techniques required to master the art of hat-making, including sewing tips, pattern cutting, and fabric selection to ensure durability and comfort for daily wear.
By following this FABRIC HAT – Tutorial, you are not just making an item of clothing; you are developing a skill that combines precision with creativity. We have optimized this guide to be beginner-friendly while providing enough detail for experienced crafters to refine their work. Get your sewing machine, thread, and fabric scissors ready as we dive into the wonderful world of DIY fashion and explore the construction of the perfect fabric hat.
1. Selecting the Best Materials for Your Project
The foundation of any successful FABRIC HAT – Tutorial begins with choosing the right weight of cloth. For a structured look, heavyweight cotton, denim, or canvas are excellent choices because they hold their shape well without needing excessive stiffening.
If you prefer a softer, more packable design, medium-weight linen or poplin works beautifully. These materials are breathable, making them ideal for summer accessories, and they are generally easier to manipulate under a sewing machine foot during tight curves.
Don’t forget the importance of interfacing in your FABRIC HAT – Tutorial. Using a fusible stiffener on the brim is a crucial step to prevent the hat from flopping over your eyes and provides that crisp, store-bought finish.
Lining is another essential component to consider for a high-quality result. A silk or satin lining can add a touch of luxury and protect your hair, while a matching cotton lining keeps the project consistent and easy to wash.
When gathering your supplies, ensure you have high-quality polyester thread that matches your fabric color. Using a denim needle or a size 90/14 needle is recommended if you are working with thicker layers to avoid skipped stitches or needle breakage.
Lastly, consider the color palette and prints. Bold florals, classic stripes, or solid neutrals can all be used in this FABRIC HAT – Tutorial to reflect your personal style, making each piece you sew a unique statement of your craft.
2. Preparing the Pattern and Cutting the Fabric
The next phase of our FABRIC HAT – Tutorial involves the precise preparation of your templates. Accuracy at this stage is vital because even a small deviation in size can lead to a hat that is either too tight or too loose for the wearer.
Measure the circumference of the head accurately before you begin. You should generally add about 1 to 2 centimeters of ease to your measurements to ensure the FABRIC HAT – Tutorial results in a comfortable fit that doesn’t feel restrictive.
Lay your fabric out flat on a cutting mat and ensure there are no wrinkles. Use sewing weights or pins to secure your paper pattern pieces, paying close attention to the grainline of the fabric to ensure the hat stretches and sits correctly.
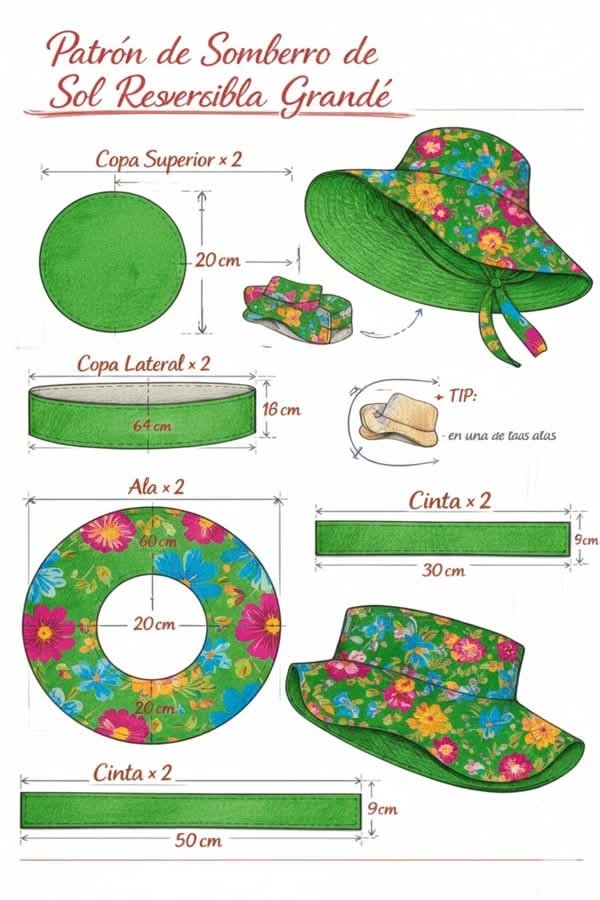
In this FABRIC HAT – Tutorial, you will typically need to cut pieces for the crown, the side band (also known as the wall), and the brim. Remember to cut duplicate pieces if you are adding a lining or using double layers for extra thickness.
Marking your seam allowances clearly is a professional technique that helps during the assembly phase. Use tailor’s chalk or a disappearing ink pen to transfer all notches and center points from the pattern onto the back of the cloth.
Carefully cut along the lines using sharp fabric shears. Avoid “chewing” the fabric with dull blades, as clean edges are much easier to align and sew, which is a fundamental rule in any FABRIC HAT – Tutorial for achieving a polished look.
3. Assembling the Crown and Side Panels
Now that your pieces are ready, the assembly part of the FABRIC HAT – Tutorial begins. Start by pinning the side panels together, right sides facing, and sew the short ends to create a continuous circle that will form the body of the hat.
Press your seams open using a steam iron. This is a “pro-tip” in every FABRIC HAT – Tutorial because flat seams reduce bulk and make the final product look much more professional and less like a “home-made” craft project.
Attaching the top circle (the crown) to the side band requires patience. Use plenty of sewing clips or pins to ease the curve of the circle into the straight edge of the band, ensuring the fabric is distributed evenly without puckering.
Sew slowly around the circumference, checking frequently to make sure the bottom layer isn’t folding underneath the needle. Mastering these curved seams is often the most challenging but rewarding part of a FABRIC HAT – Tutorial.
Once the crown is attached, it is helpful to topstitch the seam allowance toward the side band. This not only reinforces the structure but also adds a decorative element that defines the shape of your FABRIC HAT – Tutorial creation.
Repeat these steps for the lining fabric if you are including one. Having a separate lining ensures that all the raw edges are hidden inside the “sandwich” of the two layers, providing a clean and comfortable interior for the wearer.
4. Attaching the Brim and Final Finishing Touches
The brim is what gives the project its character, and in this FABRIC HAT – Tutorial, we focus on creating a sturdy, well-shaped edge. Sew your two brim pieces together along the outer edge, right sides facing each other.
Trim the seam allowance and clip the curves before turning the brim right side out. Use a point turner or a blunt tool to push the seam out fully, then press it flat with an iron to create a sharp, clean edge.
Topstitching the brim is a signature move in a FABRIC HAT – Tutorial. Sew several concentric circles around the brim, spaced about 0.5cm apart. This adds incredible rigidity and texture, giving the hat a classic “bucket” or “sun hat” appearance.
Align the raw edges of the brim with the bottom of the side band. Pin them carefully, matching the center marks you made earlier, and sew them together using a strong lockstitch to ensure the brim is securely attached to the crown.
To finish the inside, insert your lining and hand-sew or machine-stitch the bottom edge. You can also add a grosgrain ribbon or a sweatband inside the inner rim to provide extra comfort and absorb moisture during warm weather.
Finally, give your project one last press with the iron. Check for any loose threads and trim them away. Your FABRIC HAT – Tutorial is now complete, and you have a beautiful, handcrafted accessory ready to be worn or given as a thoughtful gift.
FAQ – Frequently Asked Questions
What is the best fabric for a sun hat?
For a sun hat, breathable natural fibers like cotton, linen, or hemp are best. These materials allow air to circulate, keeping your head cool. If you need more sun protection, look for fabrics with a tight weave or those specifically rated for UPF (Ultraviolet Protection Factor).
How do I know what size to make the hat?
You should measure the circumference of your head just above the ears and across the forehead. Most FABRIC HAT – Tutorial patterns offer sizes ranging from small (54cm) to extra-large (62cm). Always include a small amount of “wiggle room” so the hat is comfortable.
Do I really need interfacing for the brim?
Yes, interfacing is highly recommended. Without it, the brim will likely sag and lose its shape after just a few wears. For a very stiff brim, use “heavyweight” or “peltex” interfacing; for a softer look, use “medium-weight” fusible fleece.
Can I wash my handmade fabric hat?
Most fabric hats can be hand-washed in cool water with a mild detergent. However, if you used fusible interfacing, machine washing might cause it to bubble or detach. It is always safest to spot clean or hand wash and let the hat air dry over a bowl to maintain its shape.
How can I make the hat reversible?
To make a reversible version of this FABRIC HAT – Tutorial, simply use two different but coordinating fabrics for the main body and the lining. Ensure all internal seams are finished perfectly, and skip the sweatband so both sides look equally finished.
What if I don’t have a sewing machine?
While a machine is faster, you can absolutely complete a FABRIC HAT – Tutorial using hand-sewing techniques like the backstitch for strength. It will take more time, but the result can be just as durable and beautiful.
Conclusion
In this FABRIC HAT – Tutorial, we have covered everything from selecting the right durable fabrics and interfacing to the intricate steps of sewing curves and finishing the brim with topstitching.
We explored how to prepare a pattern, the importance of pressing seams, and how to add a lining for a professional-grade result. Creating your own headwear is a fantastic way to practice your sewing skills while producing something uniquely yours. We hope this guide inspires you to start your next DIY fashion project today.