Fabric Storage Basket – Tutorial Organizing your home doesn’t have to be a chore when you can infuse it with personal style and creativity. Whether you are looking to declutter your craft room, tidy up a nursery, or simply find a stylish home for your remote controls, learning how to create a handmade container is a game-changer. This Fabric Storage Basket – Tutorial is designed to guide you through the process of making a durable, beautiful, and functional basket that rivals anything you would find in a high-end boutique. By choosing your own patterns and textures, you transform a simple organizational tool into a piece of home decor that reflects your unique personality.
The beauty of a DIY project like this lies in its versatility and the satisfaction of “I made it myself.” Many people find that store-bought plastic bins feel cold and clinical, whereas a soft, quilted, or reinforced fabric storage bin adds warmth to a room. In this Fabric Storage Basket – Tutorial, we will focus on using high-quality materials to ensure your basket stands tall and holds its shape over time. You don’t need to be an expert seamstress to achieve professional results; all you need is a bit of patience, a sewing machine, and the right guidance to master the art of DIY home organization.
As we dive into the specifics of this sewing project, keep in mind that the skills you learn here can be applied to various sizes and shapes of containers. From small trinket trays to large laundry hampers, the fundamental techniques of measuring, interfacing, and boxing corners remain the same. This Fabric Storage Basket – Tutorial aims to simplify these concepts, making the sewing experience enjoyable rather than intimidating. Prepare your workspace, gather your favorite textiles, and let’s begin crafting a storage solution that is as sturdy as it is stunning.
1 Understanding the Fabric Storage Basket – Tutorial Fundamentals
When you begin a Fabric Storage Basket – Tutorial, the first thing to understand is the importance of fabric selection. For a basket that maintains its structure, you should look for heavier weights such as canvas, denim, or upholstery fabric. If you fall in love with a lighter quilting cotton, do not worry; you can still use it as long as you provide the necessary internal support. The interaction between the outer shell and the lining is what defines the final look and feel of your project.
The secret ingredient to any successful fabric bin is interfacing. Without it, your basket will likely slouch or collapse under its own weight. For this Fabric Storage Basket – Tutorial, we highly recommend using fusible fleece or a heavyweight stabilizer like Pellon 71F. These materials are ironed onto the wrong side of your fabric, providing the rigidity needed to keep the walls upright while still allowing the needle to pass through easily during the sewing process.
Precision in cutting and measuring is the backbone of SEO-friendly DIY guides. Before you touch your scissors, ensure you have a rotary cutter, a cutting mat, and a clear acrylic ruler. For a standard medium-sized basket, you will generally need two rectangular pieces for the exterior and two for the lining. Accurate measurements ensure that when you reach the assembly stage, all the edges line up perfectly, preventing lopsided results that can occur with “eyeballing” the dimensions.
Another core concept in this Fabric Storage Basket – Tutorial is the technique known as boxing corners. This is what transforms a flat pouch into a three-dimensional box with a flat bottom. By cutting small squares out of the bottom corners of your fabric or folding them in a specific way, you create depth. Mastering this step is essential for anyone interested in beginner sewing patterns because it is a foundational skill for bag making and home decor projects alike.
You must also consider the seam allowance, which is the distance between the edge of the fabric and the line of stitching. In most sewing tutorials, a standard seam allowance of 1/4 inch or 3/8 inch is used. Consistency is key here; if your seam allowance fluctuates, the lining might end up being larger than the exterior, causing unsightly bunching inside your basket. Keeping a steady hand and using the markings on your sewing machine’s throat plate will help you maintain professional standards.
Finally, the Fabric Storage Basket – Tutorial wouldn’t be complete without mentioning finishing touches. This includes topstitching around the upper rim, which not only gives a crisp look but also secures the lining in place so it doesn’t roll outward. You might also choose to add webbing handles or fabric tabs at this stage. These small details are what elevate a simple craft into a high-quality handmade gift or a functional piece of furniture for your own home.
2 Gathering Your Materials and Preparing the Workspace
The success of your Fabric Storage Basket – Tutorial depends heavily on having the right tools at your fingertips. Start by selecting two contrasting fabrics: one for the exterior fabric and one for the interior lining. Mixing a bold print with a solid color often yields the most visually appealing results. Additionally, ensure you have a high-quality all-purpose polyester thread that matches your fabric color, as this will provide the strength needed to hold the weight of items stored inside the basket.
Next, you need to focus on the stabilization materials. As mentioned previously, fusible interfacing is non-negotiable for a stand-alone basket. You will also need an iron and an ironing board to bond the interfacing to the fabric. This step is crucial because it adds “body” to the textile. If you prefer a softer, more “shabby chic” look, a lighter batting can be used, but for a crisp, modern storage cube, stick with firm, iron-on stabilizers that offer maximum support.
In any Fabric Storage Basket – Tutorial, your sewing machine is your best friend. Ensure it is fitted with a fresh universal needle (size 80/12 or 90/14 works best for multiple layers). If you are using particularly thick fabrics like canvas or multiple layers of fleece, a walking foot can be incredibly helpful. This attachment helps feed the top and bottom layers of fabric through the machine at the same rate, preventing the layers from shifting or puckering while you sew.
Don’t overlook the importance of marking tools. Whether you use a fabric chalk, a disappearing ink pen, or even a simple pencil, you will need to mark your “box corners” and any handle placements. Accurate markings lead to symmetrical baskets. It is also wise to have a good supply of sewing clips or pins. Clips are often preferred over pins when working with thick layers or interfacing, as they hold the material firmly without bending or leaving permanent holes in delicate fabrics.
Organization of your workspace is a key part of efficient crafting. Clear a large enough area on your table so that the fabric can lie flat without hanging off the edge, which can cause stretching. Have your seam ripper nearby—even experts make mistakes, and having it handy reduces frustration. Lighting is also vital; make sure your sewing area is well-lit so you can see your stitches clearly, especially when working with dark-colored fabrics or intricate patterns.
Lastly, for this Fabric Storage Basket – Tutorial, consider the decorative elements. Do you want to add leather handles, twill tape, or perhaps some embroidery? If you plan to add a label or a decorative patch, it is much easier to sew these onto the exterior panel before you assemble the basket into its final 3D shape. Planning these details during the preparation phase ensures a cohesive design and a smoother workflow once the actual sewing begins.
3 Step-by-Step Assembly and Sewing Techniques
Now we move into the heart of the Fabric Storage Basket – Tutorial: the construction. Begin by ironing your fusible interfacing to the wrong side of your exterior fabric pieces. Once cooled, place your two exterior pieces right sides together. Sew along the sides and the bottom, leaving the top edge open. Repeat this exact process for the lining fabric, but with one critical difference: leave a 3-4 inch gap in the bottom seam of the lining to allow for turning the basket right side out later.
The most transformative part of this Fabric Storage Basket – Tutorial is creating the base. To box the corners, take one of the bottom corners of your sewn exterior pouch and pull the front and back fabrics apart so that the side seam aligns perfectly with the bottom seam. This will create a triangle shape. Measure in from the point of the triangle (for example, 2 inches) and draw a straight line across. Sew along this line, then trim the excess fabric. Repeat this for all four corners (two on the exterior, two on the lining).
Once the corners are boxed, your fabric pieces will actually look like baskets. Turn the exterior basket right side out, so the beautiful pattern is showing. Keep the lining basket wrong side out. Now, insert the exterior basket into the lining basket. This means the “right sides” of both the exterior and the lining should be touching each other. This “bag-in-a-bag” method is a staple technique in professional bag making and ensures all your raw seams are hidden inside the finished product.
Align the side seams of both the exterior and lining baskets and secure them with sewing clips. Sew all the way around the top circular edge of the basket. Take your time during this step, as sewing in a circle can be tricky. Ensure that the layers stay flat and that you aren’t catching any extra fabric in your stitches. This seam is what joins the two halves of your Fabric Storage Basket – Tutorial project together, so make sure it is strong and even.
Now comes the “magic” moment. Reach through the opening you left in the bottom of the lining and carefully pull the exterior fabric through. This process, often called “birthing the bag,” will result in the basket being right side out with the lining inside. Tuck the lining into the exterior and use your fingers or a point turner to crisp up the corners. Then, take the basket back to your sewing machine and sew the opening in the lining closed, either by machine or with a ladder stitch by hand.
The final touch in our Fabric Storage Basket – Tutorial is the topstitch. Push the lining down so it sits neatly inside the exterior and press the top edge with an iron. Sew a decorative and functional line of stitching about 1/8 inch from the top edge. This gives the basket a high-end, finished look and prevents the lining from “peeking” out. Your basket is now complete! It should be sturdy, square, and ready to hold everything from yarn to toys, proving that DIY home decor can be both beautiful and practical.
4 Customization Tips and Troubleshooting Common Issues
One of the best parts of following a Fabric Storage Basket – Tutorial is the ability to customize the size. To make a larger or smaller bin, simply adjust the initial dimensions of your fabric rectangles. A good rule of thumb for the boxed corners is that the width of the bottom of your basket will be double the distance you measure from the corner point. For example, if you sew 3 inches from the point, your basket will have a 6-inch deep base. Experimenting with these ratios allows you to create custom storage solutions.
If you find that your basket is still too “floppy” despite using interfacing, don’t panic. You can add a layer of plastic canvas or heavy cardboard to the bottom of the basket between the lining and the exterior. Alternatively, using a stiffening spray can provide a temporary boost in rigidity. In future projects, you might consider “quilting” the exterior fabric to the foam stabilizer, which creates an incredibly stiff and professional-looking wall that is perfect for heavy-duty storage.
Adding handles is another way to personalize your Fabric Storage Basket – Tutorial result. You can use heavy cotton webbing, strips of leather, or even braided rope for a nautical look. If you choose to sew fabric handles, remember to reinforce the attachment points with a “box X” stitch pattern. This ensures that even if the basket is filled with heavy items, the handles won’t rip away from the main body. Handles are best attached to the exterior fabric before the lining is joined.
Troubleshooting is a part of the learning process. If your sewing machine is skipping stitches, it’s likely because the layers are too thick for the current needle. Switch to a denim needle or a topstitching needle, which has a sharper point and a larger eye. Also, check your tension settings. When sewing through multiple layers of canvas and fleece, you may need to slightly increase the tension to ensure the stitches are locked firmly in place on both sides of the fabric.
For those interested in sustainable crafting, this Fabric Storage Basket – Tutorial is perfect for upcycling. You can use old jeans, curtains, or even sturdy tote bags as your base material. Not only is this eco-friendly, but the pre-worn texture of denim or vintage canvas adds a unique character that new fabric can’t replicate. Mixing and matching scraps for a “patchwork” exterior is another great way to use up your fabric stash while creating something functional.
Finally, remember that practice makes perfect. Your first basket might have a slightly wonky seam or a corner that isn’t perfectly square, but it will still be a functional organizational tool. Each time you complete a Fabric Storage Basket – Tutorial, your confidence and technique will improve. Share your creations on social media or with friends; handmade baskets make excellent housewarming gifts and are a wonderful way to showcase your growing skills in the world of DIY sewing and crafts.
FAQ – Frequently Asked Questions
1. What is the best fabric for a storage basket?
The best fabrics are those with a natural stiffness, such as cotton canvas, duck cloth, or home decor weight fabrics. These hold their shape better than standard quilting cotton. If you use lighter fabrics, always pair them with a heavyweight fusible interfacing or fusible fleece.
2. Do I really need to use interfacing?
Yes! Interfacing is the “skeleton” of your basket. Without it, the fabric will just collapse into a pile. For this Fabric Storage Basket – Tutorial, interfacing is what provides the structural integrity that makes the container useful for holding items.
3. How do I clean my fabric storage basket?
This depends on the materials used. If you used 100% cotton and fusible fleece, you can usually machine wash it on a gentle cycle and air dry. However, if you added leather handles or stiff cardboard inserts, it is best to spot clean with a damp cloth and mild detergent.
4. Can I make these baskets in different sizes?
Absolutely. You can scale the pattern up or down. Just remember that as the basket gets larger, it needs even stronger stabilization. For very large baskets, consider using Peltex or a similar ultra-firm stabilizer to prevent the sides from bowing outward.
5. My sewing machine is struggling with the thick layers. What should I do?
First, ensure you are using a heavy-duty needle (size 90/14 or 100/16). Slow down your sewing speed and use the handwheel to manually guide the needle through particularly thick junctions, such as where multiple seams meet. Using a walking foot is also highly recommended.
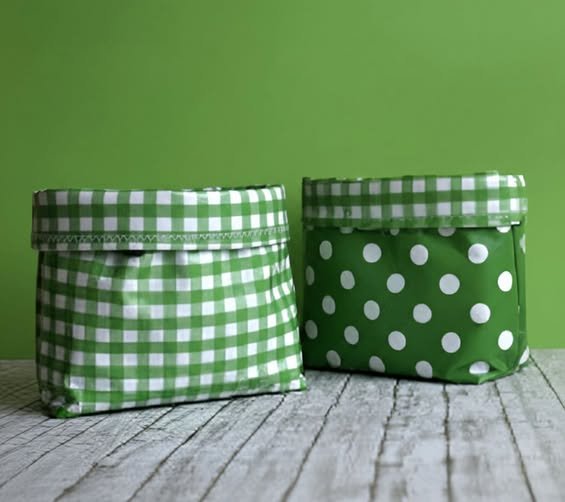
6. How do I make the basket waterproof?
To make a waterproof version, you can use laminated cotton or oilcloth for the lining. This is particularly useful for baskets intended for the bathroom or for holding damp items. Note that these fabrics require a Teflon foot or a bit of tissue paper over the fabric to prevent sticking while sewing.
Conclusion
In this Fabric Storage Basket – Tutorial, we have covered everything from selecting the right heavy-duty fabrics and interfacing to the technical steps of boxing corners and topstitching. Organizing your home doesn’t have to be expensive or boring; with just a few supplies and a bit of creativity, you can create custom containers that fit your space perfectly. We hope this guide has inspired you to dust off your sewing machine and start your journey into DIY home organization.
The skills you’ve learned here—measuring accurately, applying stabilizers, and assembling 3D structures—are the building blocks for many other sewing projects. Whether you’re making a small bin for your desk or a large one for laundry, the process remains a rewarding blend of art and utility. Remember, the most important part of any craft is the joy of creation and the personal touch you add to every stitch.