The Two-Color Spiral Crochet Circle – Tutorial is your ultimate guide to mastering one of the most visually captivating techniques in the fiber arts world. Creating a Two-Color Spiral Crochet Circle allows you to break away from the traditional “joined rounds” look, eliminating that visible seam where one row ends and another begins. Instead, you create a fluid, hypnotic movement of colors that dance around each other in a seamless continuous spiral. This technique is perfect for making vibrant coasters, unique pot holders, or even the base of a whimsical beanie, providing a professional finish that will make your crochet projects stand out.
Whether you are a seasoned crafter or a beginner looking to expand your skills, this Two-Color Spiral Crochet Circle – Tutorial focuses on the logic of color transitions and geometric increases. Many crocheters struggle with the “jog” or the “step” that occurs when changing yarn, but the spiral method solves this by working with two active loops simultaneously. This means you aren’t just alternating colors; you are literally weaving two paths of yarn into a singular, harmonious disc. By the end of this guide, you will understand the rhythm of spiral crochet and how to manage multiple strands without getting into a tangled mess.
The beauty of a Two-Color Spiral Crochet Circle lies in its versatility and the way it highlights the texture of your stitches. To get started with this tutorial, you will need two contrasting colors of yarn—ideally in the same weight—and a hook that matches your yarn choice. We will be using basic crochet stitches like the magic ring, single crochet, and increases to build our circle. By paying close attention to your stitch markers and the tension of your yarn, you can ensure your spiral remains flat and perfectly symmetrical. Let’s dive into the step-by-step process of creating this mesmerizing pattern.
1. Understanding the Two-Color Spiral Crochet Circle – Tutorial Fundamentals
The core concept of a Two-Color Spiral Crochet Circle is that you are working two separate rounds at the exact same time. Unlike standard crochet where you finish one color and then join the next, here you work halfway around the circle with Color A, leave the loop live, and then pick up Color B to “chase” the first color. This creates the iconic swirl effect that defines the spiral pattern.
To begin your Two-Color Spiral Crochet Circle – Tutorial, you must master the magic ring (or magic circle). This is the best foundation for any circular work because it allows you to pull the center tight, leaving no hole in the middle of your work. In a two-color spiral, you will actually start both colors within this same ring, which can feel a bit crowded at first but becomes easier as the circle expands.
One of the most important SEO keywords for this project is stitch consistency. Because you are juggling two balls of yarn, your tension needs to remain even so that one “arm” of the spiral doesn’t look bulkier than the other. If you pull too tightly on Color A but work loosely with Color B, your crochet circle will begin to warp or lean, losing its perfectly flat profile.
Managing your yarn is the biggest challenge for beginners in this Two-Color Spiral Crochet Circle – Tutorial. A pro tip is to keep one ball of yarn on your left and the other on your right. As you work the spiral, try not to flip your work over; instead, rotate the piece. This prevents the two strands from twisting around each other, which is the number one cause of frustration in multi-color crochet.
In this tutorial, we primarily use the single crochet (sc) stitch. It provides a dense, sturdy fabric that shows off the color definition clearly. However, as you gain confidence with the Two-Color Spiral Crochet Circle, you can experiment with half-double crochet or even double crochet to create larger, lacier spirals, though the “gap” where the colors meet becomes slightly more pronounced.
Finally, always use stitch markers. In a continuous spiral, there is no slip stitch to tell you where a round ends. You will need to mark the first stitch of each color’s “leg” to keep track of your increases. Without markers, it is incredibly easy to lose your place, resulting in a lopsided circle that doesn’t lay flat on a surface.
2. Essential Tools and Materials for Your Crochet Project
Before starting the Two-Color Spiral Crochet Circle – Tutorial, you need to gather high-quality materials. I recommend using mercerized cotton yarn for this specific project. Cotton has excellent stitch definition, which makes the spiral swirl pop visually. It also doesn’t stretch as much as acrylic or wool, helping your crochet circle maintain its shape over time.
Choosing the right crochet hook size is equally vital for a successful Two-Color Spiral Crochet Circle. If your hook is too large, the stitches will be floppy and the spiral won’t look crisp. If it’s too small, the fabric will be stiff and might curl up into a bowl. Check your yarn label for the recommended hook size, but don’t be afraid to go down a half-millimeter to get tighter, cleaner stitch work.
In addition to yarn and hooks, you will need two locking stitch markers in different colors. Assign one color marker to “Color A” and the other to “Color B.” This helps you identify which side of the spiral you are working on at a glance. In the world of advanced crochet, organization is just as important as the actual stitching technique.
A sharp pair of embroidery scissors and a tapestry needle are also necessary. Since you are working with two colors, you will eventually have to weave in multiple ends. Doing this correctly ensures your Two-Color Spiral Crochet Circle is reversible and neat. Weaving in ends as you go, or “working over” your tails, can save you a lot of time during the finishing stages of this tutorial.
Let’s talk about color theory for a moment. To get the best results from this Two-Color Spiral Crochet Circle – Tutorial, choose colors with high contrast. A dark navy paired with a bright white, or a deep purple with a sunny yellow, will make the spiral effect much more dramatic. Subtle color changes (like light blue and medium blue) can look beautiful but may appear more like a blur from a distance.
Lastly, having a flat surface to check your work is a hidden “tool.” As you follow this Two-Color Spiral Crochet Circle – Tutorial, lay your work down every few rounds. If it starts to ripple (like a ruffle), you have too many increases. If it starts to cup (like a bowl), you have too few. Checking frequently allows you to fix mistakes early without having to frog (undo) hours of work.
3. Step-by-Step Instructions for the Spiral Swirl
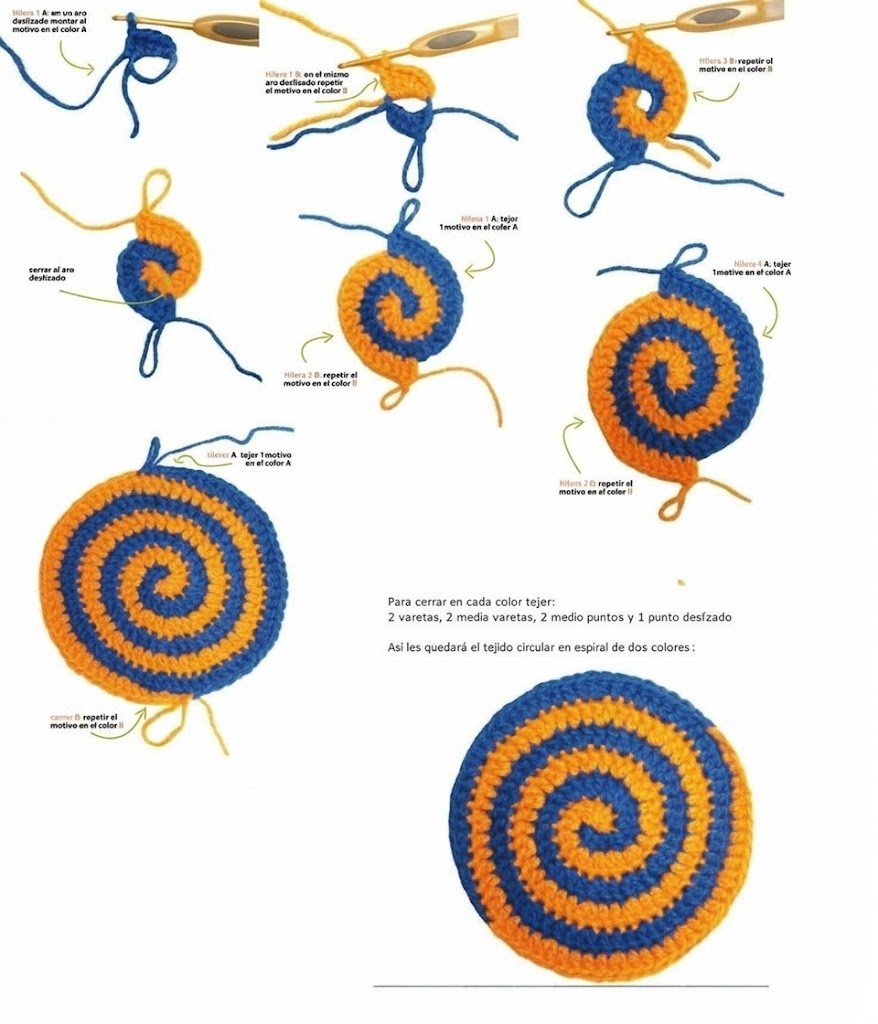
To start the Two-Color Spiral Crochet Circle – Tutorial, create a magic ring with Color A. Chain one and work 3 single crochets into the ring. Do not close the ring yet. Drop the loop of Color A (place a marker in it so it doesn’t unravel) and join Color B into the same magic ring. Work 3 single crochets with Color B. Now, pull the tail of the magic ring tight. You now have 6 stitches total, 3 of each color.
Now the spiral begins. Pick up the loop of Color A. You will now work into the stitches made by Color B. This is the “chase.” Work 2 single crochets (an increase) into each of the 3 stitches of Color B. You now have 6 stitches of Color A. Drop Color A, pick up Color B, and work 2 single crochets into each of the 3 stitches of Color A. At the end of this round, you have 12 stitches total.
The pattern of increases follows the standard circle rule: $Round \times StartStitches$. In the next round of our Two-Color Spiral Crochet Circle – Tutorial, you will work a pattern of (1 sc, 1 inc) across each color’s section. This means Color A will work over the 6 stitches of Color B, and vice versa. Always ensure you are finishing the “leg” of one color before switching to the next to keep the symmetry of the spiral.
As the circle grows, the number of stitches between increases increases. For example, in the following round, you will work (2 sc, 1 inc). The Two-Color Spiral Crochet Circle requires focus because you aren’t just counting total stitches; you are counting how many stitches of one color are being placed into the previous round’s color. This interlocking technique is what creates the seamless transition.
If you want a larger crochet spiral, simply continue the increase pattern (3 sc, 1 inc; 4 sc, 1 inc; and so on). The Two-Color Spiral Crochet Circle – Tutorial is mathematically consistent. A helpful tip for SEO and for your sanity: if you notice the “corners” starting to form (making the circle look like a hexagon), stagger your increases so they don’t always land on top of the increase from the previous row.
To finish your Two-Color Spiral Crochet Circle, you need to “taper” the ends so there isn’t a blunt “step” at the edge. When you’ve reached your desired size, work the last few stitches of each color as follows: one half-double crochet, one single crochet, and finally a slip stitch. This gradually reduces the height of the stitches, allowing the spiral to blend smoothly into the edge of the circle for a clean, professional finish.
4. Tips for Perfection and Troubleshooting Common Issues
One common issue in a Two-Color Spiral Crochet Circle is the center looking messy. If your magic ring feels bulky, ensure you are not crocheting over too many yarn tails at once. Keep the tails to the back and weave them in later with a yarn needle. Precision in the first two rounds is what determines the visual quality of the entire spiral tutorial.
If your Two-Color Spiral Crochet Circle is curling upward, your tension is likely too tight. This often happens because we tend to pull on the “inactive” yarn strand. To fix this, try using a hook one size larger or consciously relaxing your grip. A flat crochet circle should sit perfectly still on a table without the edges lifting.
Conversely, if the edges are wavy, you might have accidentally added extra increases. In this Two-Color Spiral Crochet Circle – Tutorial, it’s easy to lose track when switching colors. Count your stitches at the end of every color segment. If you have 24 stitches for Color A, you should have exactly 24 for Color B. Balance is the key to a perfect spiral.
Another frequent question involves yarn tangles. When working a Two-Color Spiral Crochet Circle, the two yarns will naturally want to cross. To avoid a “yarn barf” situation, always move Color A to the front and Color B to the back when switching. Developing a consistent habit of how you drop and pick up your loops will save you from spending half your time untangling knots.
For those looking to add more flair, you can actually adapt this Two-Color Spiral Crochet Circle – Tutorial into a three or four-color spiral! The logic remains the same: you divide the starting magic ring by the number of colors. However, for your first few attempts, sticking to two colors is best to master the tension and the increase logic without getting overwhelmed.
Finally, blocking your finished Two-Color Spiral Crochet Circle can make a world of difference. Even the most expert crocheters deal with minor stitch irregularities. By pinning your circle to a blocking mat and lightly steaming it (or dampening it), you can set the stitches in their perfect place, ensuring your spiral crochet project looks like it came straight from a high-end boutique.
FAQ – Frequently Asked Questions
1. Can I use different yarn weights for the Two-Color Spiral Crochet Circle?
It is highly recommended to use the same yarn weight and brand for both colors. Different weights will cause the spiral to become uneven, as one color’s “leg” will be thicker or taller than the other, leading to warping.
2. How do I prevent a hole in the center of my spiral?
Using the magic ring technique is the best way to prevent a center hole. After you have completed the first round of both colors, pull the yarn tail firmly to close the gap completely before moving on to the second round.
3. Why does my circle look more like a hexagon?
This happens when increases are stacked directly on top of each other in every round. To keep the crochet circle perfectly round, try “staggering” your increases so they fall in different spots each round.
4. Is this tutorial suitable for absolute beginners?
While a basic understanding of single crochet and the magic ring is helpful, this Two-Color Spiral Crochet Circle – Tutorial is designed to be accessible. If you can count your stitches and use markers, you can definitely master this technique.
5. How do I change colors if I run out of yarn?
If you run out of one color, join the new ball using a Russian join or a secure knot hidden within a stitch. Try to avoid changing yarn right at the point where the two colors meet in the spiral to keep the transition seamless.
6. Can I make this spiral into a square?
Yes! Once you have reached the desired size for your Two-Color Spiral Crochet Circle, you can use “squaring off” techniques—using different stitch heights like trebles in the corners and singles in the centers of the sides—to transform the circle into a spiral granny square.
Conclusion
Mastering the Two-Color Spiral Crochet Circle – Tutorial is a rewarding milestone for any fiber artist. We have covered everything from the initial magic ring setup to the complexities of managing two active yarn strands and maintaining a flat, symmetrical shape.
By understanding the rhythm of the spiral increase and using tools like stitch markers and mercerized cotton, you can create stunning, professional-grade pieces that defy the standard look of traditional crochet. Remember that patience is key; the first few rounds are the most technical, but once the pattern establishes itself, the process becomes a meditative and enjoyable flow.