Finding the perfect Sun Hat with Bow Fabric – Tutorial is a game-changer for anyone looking to combine practical sun protection with a touch of personalized flair. There is something incredibly rewarding about creating your own accessories, especially when they serve a dual purpose of keeping you cool and making a fashion statement. This project is designed to be accessible for beginners while offering enough detail to satisfy experienced sewists who want a professional finish.
The beauty of a Sun Hat with Bow Fabric – Tutorial lies in its versatility, as you can choose patterns and textures that reflect your unique personality. Whether you are heading to a tropical beach, spending an afternoon in the garden, or attending an outdoor brunch, a custom-made hat ensures you stand out from the crowd. By using high-quality cotton or linen, you can ensure the final product is breathable, durable, and easy to maintain.
In this comprehensive Sun Hat with Bow Fabric – Tutorial, we will explore the essential steps to drafting, cutting, and assembling your headwear. We will focus on structural integrity—ensuring the brim has the right amount of stiffness—while keeping the aesthetic soft and feminine with a signature fabric bow. This guide follows all the best practices for garment construction to ensure your finished piece looks like it came straight from a high-end boutique.
1. Choosing the Best Materials for Your Sun Hat with Bow Fabric – Tutorial
Selecting the right materials is the most critical step in ensuring your Sun Hat with Bow Fabric – Tutorial results in a functional piece. For the main body, natural fibers like medium-weight cotton, canvas, or linen are ideal because they allow air circulation. You want a fabric that feels soft against the skin but is sturdy enough to hold its shape under the sun.
The internal structure of the hat relies heavily on interfacing. For a wide-brimmed look, a firm, fusible interfacing is necessary to prevent the fabric from flopping over your eyes. If you prefer a more relaxed, “boho” style, a mid-weight stabilizer will provide just enough body without making the hat feel rigid or uncomfortable during long hours of wear.
Don’t forget the importance of the lining fabric. While the exterior showcases your style, the interior should be smooth and moisture-wicking. Using a lightweight cotton voile or poplin in a coordinating color can elevate the professional feel of your Sun Hat with Bow Fabric – Tutorial. It also hides the raw seams, making the inside of the hat look as clean as the outside.
The star of the show is the fabric bow, which requires a contrasting or matching fabric strip. Since the bow adds a bit of weight to the back or side of the hat, ensure you have enough scrap material to create a double-layered ribbon. This ensures the bow stays perky and doesn’t lose its form after being folded or stored in a travel bag.
In terms of tools, you will need sharp fabric shears, a reliable sewing machine, and high-quality polyester thread. Using a fresh needle (size 80/12 or 90/14) is recommended to handle the multiple layers of fabric and interfacing without skipping stitches. A tailor’s ham or a rolled-up towel can also be very helpful when pressing the curved seams of the crown.
Finally, consider the color palette and patterns. While floral prints are a classic choice for summer, solid pastels or bold geometric shapes can offer a more modern vibe. If you plan on wearing your hat frequently, neutral tones like beige, navy, or cream are excellent choices that will match almost any outfit in your seasonal wardrobe.
2. Drafting and Cutting the Sun Hat with Bow Fabric – Tutorial Patterns
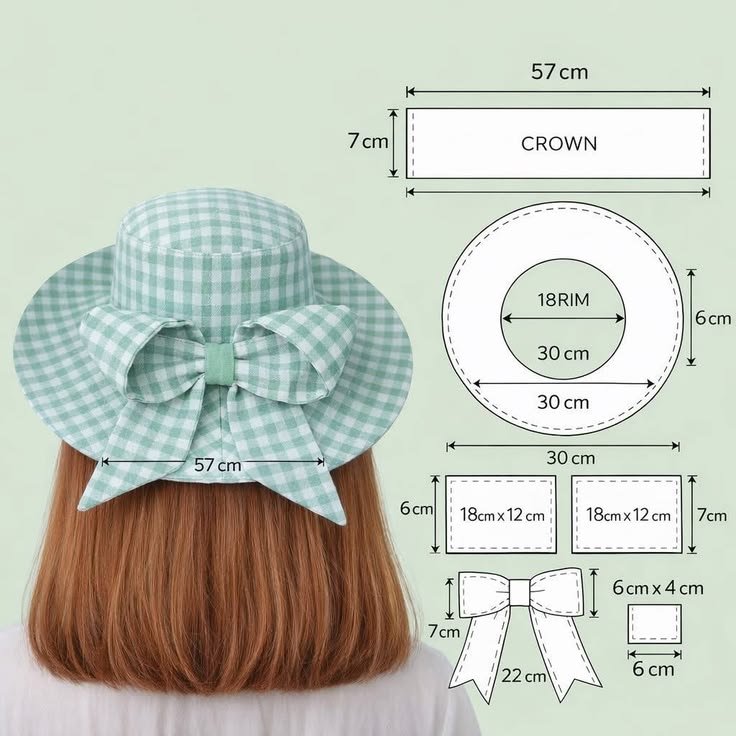
Before you start sewing, you must prepare your pattern pieces according to the Sun Hat with Bow Fabric – Tutorial specifications. A standard sun hat consists of three main parts: the top crown (a circle), the side crown (a long rectangle or slightly curved band), and the brim (a donut shape). Measuring your head circumference accurately is the key to a perfect fit.
When cutting your outer fabric, remember to include a consistent seam allowance—usually 5/8 inch or 1 cm. Accuracy at this stage prevents the hat from being too tight or lopsided. Use fabric chalk or a vanishing ink pen to mark your notches, which will help you align the pieces perfectly during the assembly phase of the project.
Cutting the interfacing is just as important as cutting the fabric. For this Sun Hat with Bow Fabric – Tutorial, you should apply the interfacing to the brim pieces and the side crown. This provides the “bones” of the hat. Always follow the manufacturer’s instructions for ironing on fusible interfacing to avoid bubbles or fabric warping.
The brim construction often requires two fabric pieces (top and bottom) and at least one layer of interfacing. If you want an extra-sturdy brim that holds its shape even in the wind, you can quilt the brim by sewing concentric circles. This not only adds strength but also creates a beautiful decorative texture that characterizes high-quality sun hats.
For the bow component, cut a long strip of fabric roughly 40 inches in length and 5 inches wide. This allows for a generous, floppy bow that can be tied around the base of the crown. If you prefer a pre-sewn “fixed” bow, you will need to cut smaller rectangles and a center “knot” piece to assemble separately and attach later.
Safety and precision go hand in hand, so always use pattern weights or fine pins to keep the fabric from shifting. Once everything is cut, stay-stitch the curved edges of the crown. This simple step prevents the fabric from stretching out of shape while you handle it, ensuring the Sun Hat with Bow Fabric – Tutorial remains true to your measurements.
3. Assembling the Crown and Attaching the Decorative Bow
The assembly begins with the crown construction. Start by sewing the short ends of the side crown together to form a loop. Then, pin the circular top crown to the upper edge of the side crown. Sewing curves can be tricky, so go slowly and use plenty of pins to distribute the fabric evenly, avoiding any unsightly puckering.
Once the crown is assembled, press the seams toward the side band. This creates a crisp edge that defines the shape of the hat. If you are adding a lining, repeat the same process with your lining fabric. You will eventually nest the lining inside the outer shell, wrong sides together, to create a comfortable and finished interior for your sun hat.
Now, let’s focus on the brim attachment. This is often the most satisfying part of the Sun Hat with Bow Fabric – Tutorial. Sew the two brim pieces together along the outer edge, clip the curves, and turn it right side out. Topstitch the edge for a clean look, then pin the inner circle of the brim to the bottom of the crown.
The bow installation is what gives this project its charm. If you chose a tie-on bow, you can create small fabric belt loops around the crown to keep the ribbon in place. This allows you to swap out the bow for different colors or patterns whenever you like, effectively giving you multiple hats in one.
For a permanent bow, sew the ribbon ends into the back seam where the crown meets the brim. This ensures the bow is centered and secure. A Sun Hat with Bow Fabric – Tutorial often emphasizes the “feminine” drop of the ribbon, so let the tails hang slightly over the brim for a classic, elegant aesthetic that catches the breeze.
The final step in assembly is the sweatband or inner ribbon. Sewing a grosgrain ribbon to the inside seam where the brim meets the crown provides extra comfort and prevents the hat from stretching over time. It also covers the final raw edges, making your DIY project look like a professional, store-bought accessory.
4. Finishing Touches and Styling Your Sun Hat with Bow Fabric – Tutorial
The finishing touches are what separate a homemade hat from a handcrafted masterpiece. Use a pressing cloth and a hot steam iron to flatten all your seams. This “sets” the stitches and gives the fabric a polished sheen. Pay special attention to the area where the bow is attached, ensuring it sits flush against the crown.
If you find that your brim is still a bit too soft, you can add a plastic millinery wire to the outer edge. This is a pro-tip often included in an advanced Sun Hat with Bow Fabric – Tutorial. The wire is hidden inside the seam allowance and allows you to “sculpt” the brim into a wavy or perfectly flat shape depending on your mood.
When it comes to styling, your new hat is incredibly versatile. A wide-brimmed version looks stunning with a flowy maxi dress and sandals for a summer wedding. A smaller, more structured version pairs perfectly with denim shorts and a simple white linen shirt for a casual day of running errands or visiting a local farmer’s market.
Maintenance is key to longevity. Since you used fabric, your hat is likely washable. However, to preserve the interfacing’s stiffness, it is best to spot clean with a damp cloth or hand wash gently in cool water. Always air dry your hat over a bowl or a dedicated hat form to maintain its circular crown shape.
You can also experiment with embellishments. Beyond the fabric bow, consider adding a small vintage brooch to the center of the knot or even some embroidery along the brim. This Sun Hat with Bow Fabric – Tutorial is just the foundation; your creativity is what will make the final product truly shine as a one-of-a-kind treasure.
Lastly, remember that the most important part of wearing your hat is the UV protection it provides. By choosing a tight-weave fabric and a wide brim, you are actively protecting your face and neck from sun damage. You’ve successfully combined health, hobby, and high fashion into one rewarding sewing project!
FAQ: Frequently Asked Questions
What is the best fabric for a sun hat?
For this specific Sun Hat with Bow Fabric – Tutorial, 100% cotton or linen is highly recommended. These materials are breathable and easy to sew. Avoid very stretchy fabrics like jersey, as they won’t provide the structural support needed for a wide brim.
How much fabric do I need for this project?
Generally, one yard (or one meter) of 45-inch wide fabric is enough to cover the outer hat, the lining, and the bow. If you are making an extra-wide “diva” brim, you may want to get 1.5 yards to be safe.
Do I really need interfacing?
Yes! Interfacing is the “secret ingredient” in any Sun Hat with Bow Fabric – Tutorial. Without it, the brim will simply hang down over your face. Use a heavy-duty fusible interfacing for the best results.
Can I make this hat without a sewing machine?
While it is possible to sew a hat by hand using a backstitch, it is very time-consuming and difficult to get through the multiple layers of fabric and interfacing. A sewing machine is strongly recommended for durability and a professional finish.
How do I choose the right size?
Measure the circumference of your head just above your ears. Most adult patterns range from 21 to 23 inches. Always choose the size slightly larger than your measurement if you are in between, as you can always add a drawstring to tighten it.
Is this project suitable for beginners?
Absolutely. If you can sew a straight line and manage a slight curve, you can complete this Sun Hat with Bow Fabric – Tutorial. The bow is a great way to hide any small imperfections in the back seam!
Conclusion
Creating your own headwear through this Sun Hat with Bow Fabric – Tutorial is a wonderful way to develop your sewing skills while producing something truly useful.
We have covered everything from selecting breathable natural fabrics and the essential role of interfacing to the step-by-step assembly of the crown and the final addition of a stylish fabric bow. By following these SEO-optimized steps and focusing on quality construction, you now have a durable accessory that offers both sun protection and timeless style.