Crochet Linked Heart – Tutorial is one of the most charming projects you can undertake today, blending the timeless art of yarn work with a modern, symbolic design that represents connection and affection. This technique involves creating two or more hearts that are physically intertwined during the construction process, rather than being sewn together afterward, which results in a seamless and professional finish. Whether you are looking to create a thoughtful handmade gift, a romantic bunting for a special occasion, or a unique embellishment for a larger project, mastering this specific pattern will elevate your repertoire of stitches and creative concepts.
The beauty of the Crochet Linked Heart – Tutorial lies in its versatility and the profound message it carries through its interconnected loops. In a world where mass-produced items are everywhere, a handmade crochet piece that visually depicts a bond is incredibly special and highly sought after by collectors and craft enthusiasts alike. By focusing on the structural integrity of the interlocking stitches, you can ensure that your hearts remain perfectly shaped and durable, making them ideal for everyday use as keychains, coasters, or even motifs for a cozy crochet blanket.
As we dive into this comprehensive Crochet Linked Heart – Tutorial, it is essential to understand that while the finished product looks complex, it is actually built on fundamental crochet techniques like the magic ring, double crochet, and slip stitches. The secret to success is all in the placement of your hook when joining the second heart to the first, a step we will explore in detail to ensure your DIY craft journey is smooth and rewarding. By following these steps and paying close attention to your yarn tension, you will soon be able to produce stunning linked hearts that look like professional-grade textile art.
1. Understanding the Materials and Preparation
Before starting your Crochet Linked Heart – Tutorial, you must select the right crochet hook size and yarn weight to achieve the desired look. For a crisp, defined shape, a mercerized cotton yarn is often recommended because it offers excellent stitch definition and does not pill over time. Most crafters prefer using a 3.5mm or 4.0mm hook (Size E or G) with medium-weight yarn to ensure the hearts are sturdy enough to hold their shape without needing extra stiffening agents.
Having a pair of sharp embroidery scissors and a reliable tapestry needle is crucial for finishing your work professionally. The tapestry needle will be used for weaving in ends, a step that is vital in the Crochet Linked Heart – Tutorial because there are multiple points where yarn tails can peek through if not secured correctly. If you are planning to make these as gifts, consider having some small stitch markers nearby to help you identify the center points where the hearts will eventually link together.
Preparation also involves understanding the crochet terminology used in this guide, specifically the difference between US and UK terms. This Crochet Linked Heart – Tutorial utilizes US crochet terms, which are standard for many online patterns and digital content creators. Familiarizing yourself with the chain stitch (ch), single crochet (sc), and treble crochet (tr) will make the following steps much faster and more intuitive as you build the foundation of your first heart.
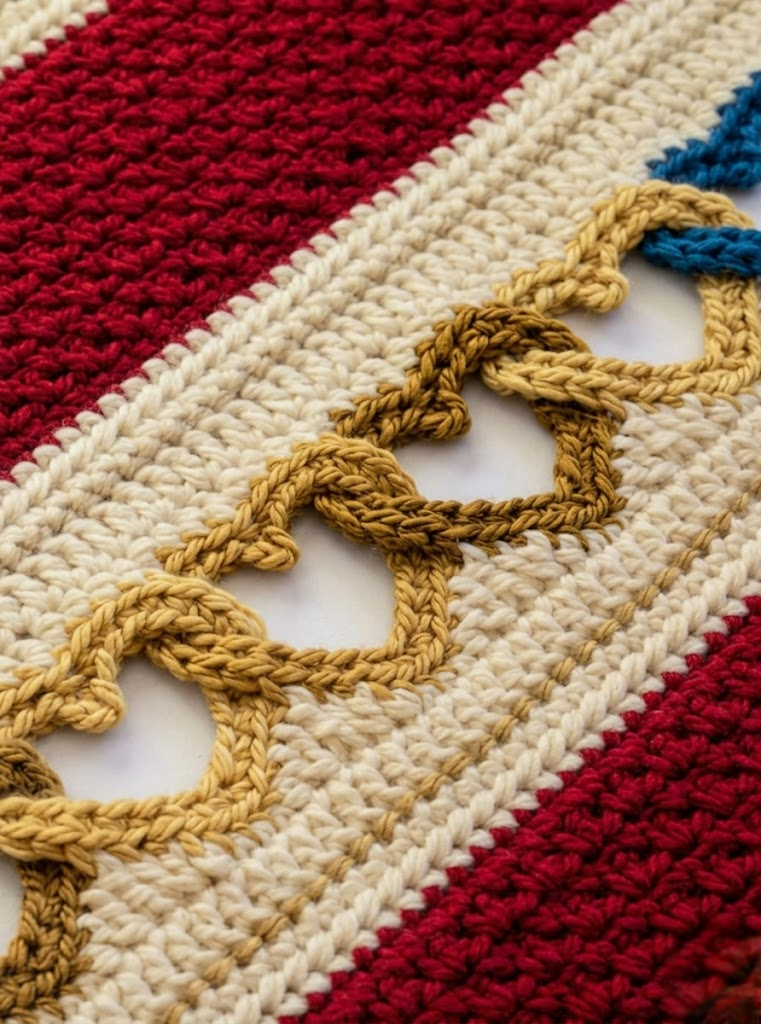
In addition to tools, consider the color palette you wish to use for your project. While traditional red and pink are popular for a Valentine’s Day crochet theme, using contrasting colors like teal and cream can make the “linked” aspect of the Crochet Linked Heart – Tutorial stand out even more. The visual contrast highlights the path of the yarn and emphasizes the technical skill involved in the intertwining process, making the final piece a true conversation starter in any setting.
Workspace organization is another factor that shouldn’t be overlooked when following a crochet guide. Ensure you have adequate lighting, as working into the small loops of a linked heart can be straining on the eyes if the room is too dark. A comfortable chair and a clear table space will help you maintain consistent stitch tension, which is the primary factor in ensuring that both hearts in your Crochet Linked Heart – Tutorial are identical in size and proportion.
Lastly, remember that patience is a key ingredient in any textile art project. If this is your first time attempting a linked motif, you might find the joining step a bit tricky at first, but don’t get discouraged. This Crochet Linked Heart – Tutorial is designed to break down the barriers of complex construction, allowing you to focus on the joy of creating something meaningful. Take your time with the initial foundation chain, and the rest of the heart will follow suit beautifully.
2. Step-by-Step Construction of the First Heart
The journey of the Crochet Linked Heart – Tutorial begins with the creation of the primary heart, which serves as the “anchor” for the entire piece. Start by making a magic ring (or magic circle), as this allows you to pull the center tight, leaving no visible hole in the middle of your work. Inside this ring, you will work a series of long stitches—specifically trebles and double crochets—to create the rounded tops and the pointed bottom that give the heart its iconic silhouette.
Once the first round of your crochet heart is complete, you will notice the shape beginning to take form. It is important at this stage of the Crochet Linked Heart – Tutorial to count your stitches carefully; an extra stitch or a missed one can make the heart look lopsided. A standard small heart pattern usually consists of 3 trebles, 3 double crochets, a chain one, one treble for the point, and then repeating the sequence in reverse to finish the other side of the motif.
After completing the stitches, pull the yarn tail of the magic circle firmly to close the gap. Secure the round with a slip stitch into the very first chain you made. In this Crochet Linked Heart – Tutorial, we recommend not cutting the yarn yet if you are making a single-color linked set, but for the most dramatic effect, you might choose to fasten off and weave in the ends now so the first heart is “clean” before the second one is introduced.
The texture of your heart depends on the yarn ply you chose earlier. A thicker yarn will result in a puffier, more 3D effect, while a thinner thread will create a delicate, lace-like appearance. Regardless of the size, the Crochet Linked Heart – Tutorial emphasizes that the first heart must be structurally sound because it will be manipulated and moved around quite a bit while you work the second heart through its center to create the linked effect.
One common mistake for beginners following a Crochet Linked Heart – Tutorial is making the stitches too tight. If the stitches are overly constricted, it becomes difficult to pass the hook or the yarn through the center during the linking phase. Aim for a “Goldilocks” tension—not too loose that the heart loses its shape, and not too tight that it becomes rigid. This balance is what defines a high-quality handmade crochet project and ensures a professional result every time.
To finish the first heart, you should have a clearly defined “V” shape at the bottom and two soft curves at the top. If you are satisfied with the look, give it a light tug to straighten the fibers. In the context of this Crochet Linked Heart – Tutorial, the first heart is now ready to be joined by its partner. This is the moment where the “linked” part of the name comes into play, transforming two separate shapes into a singular, interlocked design.
3. Mastering the Linking Technique
The most critical part of the Crochet Linked Heart – Tutorial is the actual linking process, which happens as you begin the second heart. To do this, you will create a new foundation chain for the second heart, but before you join it into a circle or start the stitches, you must pass the loop of yarn through the center of the first heart. This physical interlocking of yarn ensures that the hearts are inseparable without cutting the thread.
Once the yarn is pulled through the first heart, you proceed to work your stitches exactly as you did for the first one, but you must work around the first heart. This requires a bit of manual dexterity, as you’ll be holding the completed heart in one hand while maneuvering your crochet hook in the other. This Crochet Linked Heart – Tutorial technique is often called “join-as-you-go” and is a favorite among advanced crochet designers for its efficiency and aesthetic appeal.
As you build the second heart, make sure it doesn’t get tangled with the first one. It helps to keep the first heart “hanging” below your current work. As you complete the double crochet and treble crochet stitches of the second heart, you will see the link becoming more defined. The Crochet Linked Heart – Tutorial proves that you don’t need complex sewing skills to create intricate designs; you simply need to understand the path of the yarn through the existing fabric.
A professional tip for this Crochet Linked Heart – Tutorial is to check the “right side” and “wrong side” of your work. In crochet, the stitches have a distinct front and back. When linking the hearts, try to ensure that both hearts are facing the same direction. This attention to detail is what separates a beginner crochet project from a piece of expert-level craftwork. It ensures that the light hits the yarn consistently, giving the project a polished, uniform look.
If you find that the second heart feels “crowded” by the first one, simply pause and adjust the position of the first heart within the loop of the second. The beauty of the Crochet Linked Heart – Tutorial is that the yarn is flexible. You can slide the first heart around the foundation ring of the second until you have enough space to finish your stitches comfortably. Once the second heart is closed with a slip stitch, the link is permanent and secure.
Completing the link is a milestone in the Crochet Linked Heart – Tutorial. At this point, you should have two beautiful hearts that move freely within each other but cannot be pulled apart. This interlocked motif is now ready for any finishing touches you’d like to add, such as a border of picot stitches or a simple chain loop if you intend to hang them. The technical challenge is over, and now the creative customization can truly begin.
4. Finishing Touches and Creative Applications
Now that you have successfully followed the Crochet Linked Heart – Tutorial to create the linked pair, it is time to focus on the finishing details. Use your tapestry needle to weave the remaining yarn tails into the back of the stitches. For a truly invisible finish, weave the yarn in one direction, then double back in the opposite direction; this “locking” method ensures that the ends won’t pop out even after multiple washes or heavy use of your crochet accessory.
If your hearts look a bit wrinkled or the edges are curling, you can use a technique called blocking. For cotton yarn, lightly mist the hearts with water and pin them into the desired shape on a foam mat. Let them dry completely. This simple step, often mentioned in advanced Crochet Linked Heart – Tutorials, will give your project a professional, flat appearance and emphasize the crispness of the linked design and the symmetry of the hearts.
There are countless ways to use the results of this Crochet Linked Heart – Tutorial. You can attach them to a metal ring to create a handmade keychain, or sew them onto a plain throw pillow for a touch of boho-chic decor. If you make several linked pairs, you can connect them into a long chain to create a unique crochet garland for weddings, anniversaries, or nurseries, adding a heartfelt touch to any celebration or room.
For those interested in monetizing their crafts, these linked hearts are perfect for selling at craft fairs or on digital platforms. Because they are relatively quick to make and require minimal materials, they offer a high return on investment. You can market them as “Unity Hearts” or “Friendship Links.” By providing a link back to this Crochet Linked Heart – Tutorial, you can also help build a community of crafters who appreciate the technical beauty of interlinked crochet motifs.
You can also experiment with yarn textures to change the vibe of the project. Using a fuzzy mohair yarn will create a soft, romantic look, while using a metallic thread can transform the Crochet Linked Heart – Tutorial results into elegant holiday ornaments. Don’t be afraid to add beads or sequins to the edges for a bit of sparkle. The foundation you have learned here is just the beginning of what your imagination can produce with a simple hook and some string.
Finally, consider the educational value of what you’ve learned. Sharing your progress on social media using hashtags like #CrochetLinkedHeart or #AmigurumiTutorial can inspire others to pick up a hook. This Crochet Linked Heart – Tutorial isn’t just about making an object; it’s about mastering a concept that can be applied to other shapes, like linked circles or stars. The skills you’ve gained today are a stepping stone to even more complex three-dimensional crochet projects in the future.
FAQ – Frequently Asked Questions
What is the best yarn for a Crochet Linked Heart – Tutorial?
The best yarn is generally a category 3 (light) or category 4 (medium) cotton yarn. Cotton provides the stitch definition needed to show off the “linked” part of the design and keeps the heart shape crisp.
Is this pattern suitable for absolute beginners?
While it helps to know basic stitches, this Crochet Linked Heart – Tutorial is written to be accessible. If you can make a chain and a double crochet, the only new skill is learning how to work the second heart through the first one.
How do I prevent the hearts from curling?
Curling usually happens due to tight tension or the natural twist of the yarn. You can fix this by using a slightly larger hook or by “blocking” your finished hearts with a bit of steam or water.
Can I link more than two hearts together?
Absolutely! You can continue the process by linking a third heart into the second, a fourth into the third, and so on. This creates a beautiful crochet chain of hearts that works great as a decorative banner.
How long does it take to finish one linked pair?
For an intermediate crafter, a Crochet Linked Heart – Tutorial project can be completed in about 20 to 30 minutes, including weaving in the ends. It is a fantastic “stash-buster” project for using up small amounts of leftover yarn.
What size hook should I use?
A 3.5mm (E) or 4.0mm (G) hook is standard for most medium-weight yarns used in this tutorial. If you want tiny hearts, you can use embroidery floss and a 1.5mm steel hook.
Conclusion
In this Crochet Linked Heart – Tutorial, we have explored the intricate and rewarding process of creating two intertwined hearts that symbolize connection and love.
We covered everything from selecting the right cotton yarn and crochet hook, to the step-by-step construction of the first motif, and finally, the specialized technique of linking the second heart during the assembly process. This project is a perfect blend of technical skill and creative expression, offering a versatile result that can be used in home decor, fashion accessories, or as a meaningful gift for someone special.