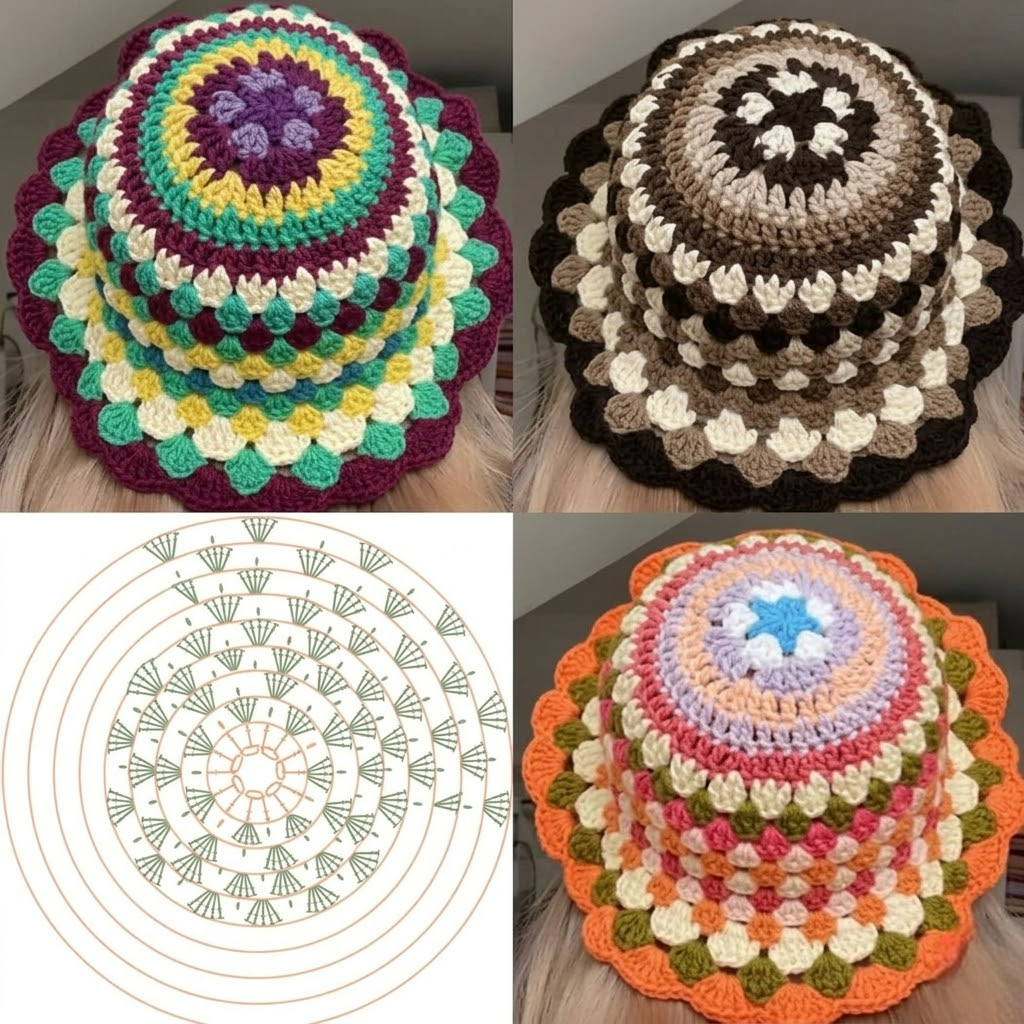
The Granny Flower Crochet Bucket – Tutorial is your ultimate guide to creating a stylish, vintage-inspired accessory that has taken the fashion world by storm. Whether you are a seasoned crafter or a beginner looking for a rewarding project, this crochet pattern offers the perfect blend of nostalgia and modern flair. By the end of this guide, you will have a beautiful, handmade crochet bucket hat that showcases the timeless charm of the granny square technique.
This specific Granny Flower Crochet Bucket – Tutorial focuses on the “African Flower” and traditional floral crochet motifs to build a structured yet breathable hat. Crochet has seen a massive resurgence in recent years, with handmade fashion becoming a staple on runways and social media feeds alike. Using a mix of cotton yarn and basic stitches, you can customize your colors to match any season or outfit perfectly.
Creating a Granny Flower Crochet Bucket – Tutorial project is more than just making a hat; it is about mastering the art of joining crochet motifs and understanding hat construction. In the following sections, we will break down the materials, the step-by-step stitching process, and the assembly required to finish your masterpiece. Let’s dive into the world of fiber arts and start stitching your new favorite accessory.
1. Essential Materials for the Granny Flower Crochet Bucket – Tutorial
To begin your journey with this Granny Flower Crochet Bucket – Tutorial, you first need to gather high-quality crochet supplies. The most important element is your choice of yarn. For a summer-ready bucket hat, I highly recommend using 100% mercerized cotton yarn. Cotton provides the necessary stiffness to hold the “bucket” shape while remaining cool and comfortable against the skin.
Next, you will need a crochet hook that matches your yarn weight. Typically, a 3.5mm (E) or 4.0mm (G) hook works best for medium-weight cotton to ensure your crochet stitches are tight enough to maintain the hat’s structure. If your tension is naturally loose, consider sizing down your hook to prevent the flower motifs from becoming too floppy or oversized.
Don’t forget the smaller but equally vital crochet accessories. You will need a pair of sharp embroidery scissors, a tapestry needle for weaving in those many ends, and several stitch markers. Since this Granny Flower Crochet Bucket – Tutorial involves joining multiple pieces, markers will help you align the flower squares perfectly before you start the final assembly.
The color palette is where your creativity truly shines in this Granny Flower Crochet Bucket – Tutorial. Most enthusiasts choose at least three colors: one for the flower center, one for the petals, and a contrasting “background” color that frames the square. Using a neutral cream or beige for the outer edge often helps the vibrant floral colors pop, giving it that classic retro crochet look.
Understanding yarn weight is crucial for the success of your project. This tutorial is designed for worsted weight (Level 4) or DK weight (Level 3) yarn. If you use a yarn that is too thin, the hat will be too small for an adult head; if it’s too thick, the Granny Flower Crochet Bucket might turn out more like a helmet than a stylish sun hat!
Lastly, prepare a comfortable workspace with good lighting. Working on a Granny Flower Crochet Bucket – Tutorial involves intricate details within the flower petals, so being able to see your stitch definition clearly will prevent mistakes. Once you have your yarn, hook, and notions ready, you are officially prepared to start the first round of your crochet flower squares.
2. Crafting the Iconic Floral Squares and Motifs
The heart of the Granny Flower Crochet Bucket – Tutorial lies in the individual granny squares. You will need to crochet five or six squares depending on your head circumference. Each square begins with a magic ring or a small chain loop, into which you will work your first round of double crochet stitches to form the heart of the flower.
As you move to the second round, you will create the flower petals using cluster stitches or puff stitches. This adds a beautiful 3D texture to your Granny Flower Crochet Bucket – Tutorial project. These stitches are essentially several unfinished stitches worked into the same space and closed together, creating a rounded, petal-like appearance that defines the floral crochet style.
The third round usually involves changing colors to create the “frame” of the square. This transition is vital because it turns your circular flower into a workable crochet square. By adding corner stitches (usually a combination of stitches and chains), you provide the geometric structure needed to join the pieces together seamlessly later in the Granny Flower Crochet Bucket – Tutorial.
Consistency is key when making these crochet motifs. You must ensure that every square has the exact same number of stitches on each side. If one square is slightly larger than the others, your bucket hat will look lopsided. Use a measuring tape to check that each finished granny square is approximately 4 to 5 inches wide for a standard adult fit.
Blocking your squares is a professional tip often skipped by beginners but highly recommended in this Granny Flower Crochet Bucket – Tutorial. By pinning your finished squares to a blocking board and lightly steaming them, you relax the fibers. This ensures every crochet flower is perfectly flat and square, making the “join-as-you-go” or sewing process much smoother.
While working through this Granny Flower Crochet Bucket – Tutorial, remember to weave in your ends as you go. There is nothing more daunting than finishing all your squares only to realize you have dozens of yarn tails to hide! A clean crochet project starts with good habits, so keep that tapestry needle handy and secure your yarn after every color change.
3. Assembling the Crown and Body of the Hat
Once your squares are ready, the next phase of the Granny Flower Crochet Bucket – Tutorial is the assembly. You will first create the hat crown, which is the flat circular piece that sits on top of your head. This is typically worked in continuous rounds of half-double crochet or double crochet until the circle reaches a diameter of about 6 to 6.5 inches.
After the crown is complete, you will attach your flower squares to form the “walls” or the body of the hat. In this Granny Flower Crochet Bucket – Tutorial, you have two choices for joining: the invisible mattress stitch or a slip stitch join. The mattress stitch creates a flat, hidden seam, while the slip stitch join adds a decorative ridge that emphasizes the handmade crochet aesthetic.
Align the squares in a long strip first, joining them side-to-side to create a ring. Once you have a ring of granny flowers, you will attach the top edge of this ring to the outer edge of the crown you made earlier. This is the moment your Granny Flower Crochet Bucket – Tutorial project truly starts looking like a hat, which is always the most exciting part of the process!
Pay close attention to the stitch count when joining the body to the crown. You may need to use crochet decreases or increases to make the circumferences match perfectly. If the crown is too large, the hat will be baggy; if the flower ring is too tight, it won’t sit comfortably. Slow down during this stage of the Granny Flower Crochet Bucket – Tutorial to ensure a perfect fit.
Strength is important during assembly. Since a bucket hat is handled frequently, make sure your joining stitches are firm. Using the same cotton yarn for the seams ensures that the hat maintains a uniform look and that the seams don’t stretch out over time, preserving the structural integrity of your Granny Flower Crochet Bucket.
As you finish the assembly, try the hat on! This is the beauty of a Granny Flower Crochet Bucket – Tutorial—you can adjust it as you go. If it feels a bit deep, you can work fewer rounds on the brim. If it’s too shallow, you can add a row of single crochet between the crown and the squares to give it more height before moving on to the final step.
4. Crocheting the Brim for a Perfect Finish
The final step in our Granny Flower Crochet Bucket – Tutorial is the brim. This is what gives the hat its signature “bucket” look. To start the brim, you will work into the bottom edge of your flower squares. The secret to a good brim is a steady rate of increases to ensure the fabric flares outward rather than hanging straight down.
For a classic crochet bucket hat shape, you will typically increase in every 5th or 6th stitch during the first round of the brim. In this Granny Flower Crochet Bucket – Tutorial, we use single crochet stitches for the brim because they create a denser, sturdier fabric. This prevents the brim from flopping into your eyes and helps it maintain its “sun hat” functionality.
Continue working in rounds, adding more crochet increases as needed. You can choose how wide you want your brim to be. A shorter brim gives a modern, “streetwear” vibe, while a wider brim offers more sun protection and a boho-chic aesthetic. Most people find that 5 to 7 rounds of crochet provide the perfect balance for this Granny Flower Crochet Bucket.
To give the edge a professional look, the Granny Flower Crochet Bucket – Tutorial suggests finishing with a crab stitch (reverse single crochet) or a simple slip stitch edge. This creates a firm, rounded border that prevents the brim from curling. It also adds a nice weight to the bottom of the hat, helping it keep its shape even after multiple wears.
If you want your Granny Flower Crochet Bucket to be extra stiff, you can crochet over a thin piece of millinery wire or plastic “fishing line” in the final round. This is a common trick in professional millinery and high-end crochet patterns to ensure the brim stays exactly where you want it, regardless of wind or humidity.
Finally, give your completed hat a light steam once more. This final “blocking” sets the stitches of the brim and allows the flower motifs to sit perfectly against the head. Congratulations, you have successfully followed the Granny Flower Crochet Bucket – Tutorial! You now possess a unique, eco-friendly accessory that is as functional as it is beautiful.
Frequently Asked Questions (FAQ)
What is the best yarn for a Granny Flower Crochet Bucket – Tutorial?
The best choice is 100% cotton yarn or a cotton-acrylic blend. Cotton is breathable and holds its shape well, which is essential for the structured look of a bucket hat. Avoid 100% wool as it may be too hot and lose shape over time.
How many granny squares do I need for this hat?
Most adult sizes require 5 to 6 squares for the body of the hat. If you are making a hat for a child, you might only need 4 squares, or you may need to reduce the number of rounds in each flower motif.
Is this project suitable for absolute beginners?
Yes, but it helps if you already know basic stitches like chain, single crochet, and double crochet. The Granny Flower Crochet Bucket – Tutorial is a great “next step” project for beginners because it teaches motif joining and shaping in a manageable way.
How do I wash my crochet bucket hat?
Since it is made of cotton, it is best to hand wash your hat in cool water with a mild detergent. Lay it flat to dry on a towel, shaping it while damp to ensure the flower squares and brim dry in the correct position.
Can I make the hat larger or smaller?
Absolutely! To make it smaller, use a smaller hook (like 3.0mm) or thinner yarn. To make it larger, add an extra round to each granny square or add more rounds to the crown before attaching the squares.
How long does it take to complete the Granny Flower Crochet Bucket – Tutorial?
An intermediate crocheter can usually finish this project in 4 to 6 hours. Beginners might take a bit longer, especially when learning how to join the crochet motifs for the first time.
Conclusion
The Granny Flower Crochet Bucket – Tutorial is a wonderful journey into the world of functional art. Through this guide, we have explored the selection of the right cotton yarns, the creation of intricate floral motifs, and the technical assembly of the crown, body, and brim. This project doesn’t just result in a piece of clothing; it results in a handcrafted heirloom that reflects your personal style and dedication to the craft of crochet.
By mastering these techniques, you now have the skills to experiment with different colors and patterns, perhaps even creating matching bags or scarves. We hope this tutorial has been clear, inspiring, and helpful for your crafting journey. Handmade fashion is a beautiful way to express yourself and reduce waste in the textile industry.