Fabric Chef Hats – Tutorial: crafting your own professional-grade headwear is an accessible and rewarding project for anyone who loves the culinary arts. Whether you are a professional cook looking to personalize your kitchen gear or a hobbyist baker wanting to look the part, a Fabric Chef Hats – Tutorial provides the perfect roadmap to creating a functional and stylish accessory. High-quality fabric chef hats are essential for maintaining hygiene in the kitchen by keeping hair tucked away while allowing for breathability during intense cooking sessions.
When you dive into this Fabric Chef Hats – Tutorial, you will discover that the traditional “toque” style is not just for show; the height and pleats historically represented a chef’s rank and experience. Today, making your own chef hat allows you to choose breathable cotton fabrics, vibrant patterns, or classic crisp white linens that match your personality. This guide is designed to be a comprehensive sewing tutorial that simplifies the complex appearance of the pleated crown into manageable, easy-to-follow steps.
Understanding the mechanics of a Fabric Chef Hats – Tutorial involves mastering two main components: the headband (or brim) and the crown (the floppy top). By focusing on these DIY sewing techniques, you can ensure a custom fit that is far more comfortable than the disposable paper versions found in commercial kitchens. Throughout this article, we will explore the materials needed, the cutting process, and the assembly methods required to produce a durable, washable, and professional-looking piece of culinary apparel.
1. Essential Materials and Tools for Your Fabric Chef Hats – Tutorial
To begin your journey with this Fabric Chef Hats – Tutorial, you first need to gather high-quality sewing supplies. The most critical component is the fabric selection, where we highly recommend using 100% cotton twill or poplin. These materials are preferred because they are durable enough to withstand frequent washing and rigid enough to hold the iconic shape of the chef hat crown.
In addition to your primary textile, you will need a medium-weight fusible interfacing. This is a hidden but vital part of the Fabric Chef Hats – Tutorial, as it provides the necessary stiffness to the headband, preventing it from flopping over your eyes while you work. Without interfacing, the base of the hat would lack the structural integrity required for a professional aesthetic.
Your sewing kit should also include standard items like sharp fabric shears, a measuring tape, and tailor’s chalk for marking your pleats. Precision is key in this Fabric Chef Hats – Tutorial, so having a clear ruler will help you maintain consistent measurements for the folds. Don’t forget high-quality polyester thread that matches your fabric color for strong, lasting seams.
A reliable sewing machine is necessary for this project, although a simple straight stitch and a zigzag stitch (or a serger) will suffice. If you are following this Fabric Chef Hats – Tutorial as a beginner, ensure you have plenty of sewing pins or fabric clips to hold the numerous pleats in place before you head to the machine. Proper pinning is the secret to a symmetrical toque.
For the closure, you have several options: Velcro, buttons, or a simple elastic band. Most modern Fabric Chef Hats – Tutorials suggest using hook-and-loop fasteners (Velcro) because they allow the hat to be adjustable for different head sizes. This flexibility makes your handmade chef hat a great gift for friends and family who enjoy cooking.
Lastly, an iron and ironing board are non-negotiable tools for this Fabric Chef Hats – Tutorial. Pressing your seams and pleats as you go is what separates a homemade-looking project from a professional-grade culinary garment. Crisp edges on your pleated hat are achieved through steam and heat, ensuring the final product looks sharp and stands tall.
2. Measuring and Cutting Your Chef Hat Pattern
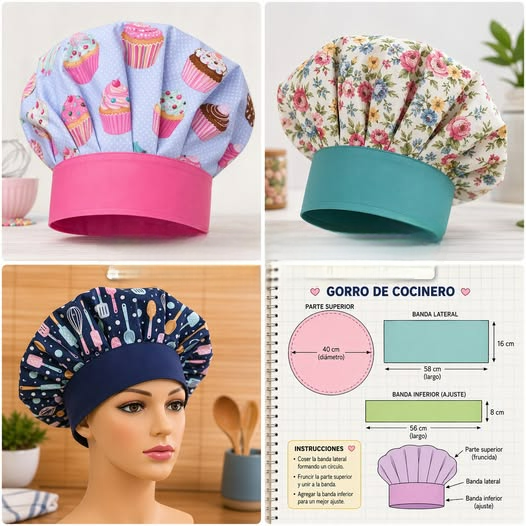
The first technical step in our Fabric Chef Hats – Tutorial is creating the pattern pieces. You will need to cut two main shapes: a long rectangle for the headband and a large circle for the crown. For the headband, measure the circumference of the head and add two inches for the overlap and seam allowances to ensure a comfortable adjustable fit.
The height of your headband in this Fabric Chef Hats – Tutorial is usually around 3 to 4 inches when finished. Therefore, you should cut a strip of fabric that is double that height (plus seam allowances), usually around 7 to 9 inches wide. This allows you to fold the fabric over, creating a clean, finished edge at the top and bottom of the hat brim.
Moving to the crown, the diameter of your circle determines how “puffy” your chef hat will be. A standard Fabric Chef Hats – Tutorial usually calls for a circle with a diameter between 18 and 22 inches. If you want a more dramatic, traditional toque look, go for the larger size; for a more modern, streamlined baker’s hat, the smaller diameter works best.
When cutting your interfacing, make it the exact same size as half of your headband strip. Since you will be folding the headband in half, the interfacing only needs to support one side to provide the necessary structure. This step in the Fabric Chef Hats – Tutorial ensures the hat stays upright without being uncomfortably stiff against the forehead.
Marking the center points of both the circle and the headband is a crucial SEO-friendly sewing tip. Use your tailor’s chalk to mark the “north, south, east, and west” points of the circle. This will help you distribute the pleats evenly when you begin the assembly phase of the Fabric Chef Hats – Tutorial, preventing the hat from looking lopsided.
Remember to wash and dry your fabric before cutting. This pre-shrinking process is a vital part of any Fabric Chef Hats – Tutorial, as it prevents the hat from warping or becoming too small after its first trip through the laundry. Since kitchen apparel requires frequent cleaning at high temperatures, this step ensures your custom chef hat lasts for years.
3. Creating the Pleats and Assembling the Crown
The most iconic feature of the Fabric Chef Hats – Tutorial is the series of pleats around the crown. To achieve this, you will take the large fabric circle and create small, even folds along the outer edge. The goal is to “shrink” the circumference of the 22-inch circle until it matches the length of your headband strip exactly.
In this Fabric Chef Hats – Tutorial, we recommend making pleats that are approximately 1 inch wide. You can choose to have them all facing one direction or meet in the middle for a box-pleat style. Use your pins generously here; the more pins you use, the more control you will have over the fabric folds as you sew them into place.
Once the pleats are pinned, sew a “basting stitch” (a long, loose stitch) around the edge of the circle. This holds the pleats together and makes the final assembly of the Fabric Chef Hats – Tutorial much easier. This step is a common tailoring technique that ensures the folds don’t shift when you attach the crown to the structured headband.
Now, it is time to join the two pieces. Align the right side of your pleated circle with the right side of the interfaced headband. Following the Fabric Chef Hats – Tutorial guidelines, match up the center marks you made earlier. This ensures that the bulk of the hat’s volume is distributed evenly around the wearer’s head for a balanced look.
Sew slowly through the layers. You are dealing with several layers of fabric at once due to the pleats, so using a heavy-duty needle (like a size 90/14) can prevent needle breakage. This part of the Fabric Chef Hats – Tutorial requires patience, but it is where the recognizable shape of the professional toque finally comes to life.
After sewing the crown to one side of the headband, fold the headband over the raw edges of the pleats. This “encases” the messy edges inside the headband for a clean finish inside and out. This finishing technique is a hallmark of a high-quality Fabric Chef Hats – Tutorial, ensuring there are no itchy seams touching the chef’s skin during a long shift.
4. Finishing Touches and Customization Tips
The final stage of the Fabric Chef Hats – Tutorial involves closing the headband and adding your chosen fastener. If you are using Velcro, sew the hook side to one end of the headband and the loop side to the other. This allows for a couple of inches of adjustability, which is perfect if you are following this Fabric Chef Hats – Tutorial to make hats for a team.
To give your hat a truly professional finish, perform a topstitch along the edges of the headband. Topstitching involves sewing a straight line about 1/8 inch from the edge. In our Fabric Chef Hats – Tutorial, this not only adds a decorative touch but also helps the headband lay flat and maintain its shape through many wash cycles.
For those who want to take their Fabric Chef Hats – Tutorial a step further, consider embroidery. Adding a name or a restaurant logo to the front of the headband is a fantastic way to personalize the gear. It transforms a simple sewing project into a piece of professional branding or a deeply personal gift for a culinary student.
Care and maintenance are also important. Because you used quality cotton and interfacing in this Fabric Chef Hats – Tutorial, your hat should be machine washable. We recommend washing on a gentle cycle and air drying to maintain the crispness of the pleats. A quick touch-up with a steam iron will make it look brand new before every use.
If you find the hat is too tall for your liking, you can easily adjust this Fabric Chef Hats – Tutorial by reducing the diameter of the initial circle. A smaller circle results in a “skull cap” style, while a very large circle creates the classic, floppy French toque. The beauty of a DIY tutorial is the ability to customize the dimensions to your specific needs.
Congratulations! You have completed the Fabric Chef Hats – Tutorial. By following these steps, you’ve mastered the art of creating culinary headwear that combines tradition with personal style. Whether you’re flipping burgers or plating fine dining, your handmade chef hat stands as a testament to your craft and your attention to detail in every aspect of the kitchen.
FAQ – Frequently Asked Questions
What is the best fabric for a chef hat?
The best fabric is 100% cotton or a cotton-polyester blend. Cotton is breathable, which is essential in a hot kitchen, while a blend might offer more wrinkle resistance. Cotton twill is particularly popular for its durability and weight.
How do I make the chef hat stand up?
The “stand” comes from the fusible interfacing used in the headband and the stiffness of the fabric. For a very tall, stiff toque, you can use a heavy-weight interfacing or even starch the pleats after washing.
Can I make this hat without a sewing machine?
While possible to sew by hand, a sewing machine is highly recommended for a Fabric Chef Hats – Tutorial. The multiple layers of fabric in the pleated sections are quite thick and difficult to stitch evenly by hand.
What size circle should I cut for a child’s chef hat?
For a child, you should reduce the circle diameter to approximately 14 to 16 inches and shorten the headband length based on their head circumference measurements.
Why does a chef hat have 100 pleats?
Tradition says a chef’s hat has 100 pleats to represent the 100 ways a master chef can prepare an egg. While our Fabric Chef Hats – Tutorial doesn’t require exactly 100, the pleats remain a symbol of culinary skill.
How do I clean my handmade chef hat?
Since you used cotton, you can wash it in the machine with like colors. To keep it looking professional, iron it while it is still slightly damp to set the pleats back into place.
Conclusion
In this Fabric Chef Hats – Tutorial, we have covered everything from selecting the right breathable fabrics and essential tools to the intricate process of creating uniform pleats and assembling a structured headband.
We learned that the secret to a professional-looking toque lies in the use of interfacing and the precision of the sewing techniques. By following this guide, you now have the skills to create custom culinary headwear that is both functional for the kitchen and a reflection of your personal style.