The Crochet Chicken Coaster – Tutorial is the perfect project for anyone looking to add a touch of handmade charm and farmhouse whimsy to their home decor. These adorable kitchen accessories are not only functional, protecting your wooden surfaces from heat and moisture, but they also serve as delightful conversation starters during morning coffee or afternoon tea. Whether you are a seasoned artisan or a curious beginner, learning how to create a Crochet Chicken Coaster – Tutorial provides a relaxing way to practice essential stitches while producing a high-quality, professional result.
In the world of fiber arts, the Crochet Chicken Coaster – Tutorial stands out because of its versatility and the minimal amount of yarn required to complete a set. You can easily use up your yarn scraps to create a colorful flock of coasters, making this an eco-friendly choice for the conscious crafter. By following this Crochet Chicken Coaster – Tutorial, you will master the art of working in rounds and adding character through small, detailed embellishments like the comb and beak, which bring these little hens to life.
Crafting a Crochet Chicken Coaster – Tutorial is also an excellent strategy for those who sell their work at craft fairs or online shops, as these items are quick to make and highly giftable. To ensure your project meets professional standards, it is vital to focus on stitch consistency, yarn weight, and color selection. This guide is designed to walk you through every step of the process, ensuring that your Crochet Chicken Coaster – Tutorial results in a flat, durable, and absolutely charming kitchen accessory that will last for years to come.
1. Essential Materials for Your Crochet Chicken Coaster – Tutorial
Selecting the right supplies is the foundational step of any successful Crochet Chicken Coaster – Tutorial. For this project, 100% cotton yarn is highly recommended because it is heat-resistant and absorbent, making it far superior to acrylic for coaster use. You will want a medium weight (worsted) yarn to ensure the coaster has enough body and stability to sit flat on your table.
Regarding tools, a 4.0mm (G) crochet hook is generally the standard size for this weight of yarn, providing a tight enough tension so that liquids don’t seep through the stitches easily. You will also need a tapestry needle for weaving in ends and a pair of sharp embroidery scissors. These small tools are essential for achieving a polished look in your Crochet Chicken Coaster – Tutorial.
Don’t forget the decorative details that make the chicken recognizable. You will need small amounts of red yarn for the chicken’s comb and yellow or orange yarn for the beak. Some crafters prefer using safety eyes, but for a coaster that needs to stay flat, embroidered eyes using black thread are often a safer and more practical choice for this Crochet Chicken Coaster – Tutorial.
Preparation is key when you begin your Crochet Chicken Coaster – Tutorial. Make sure you have a comfortable workspace with good lighting, as working with darker yarn colors can sometimes make it difficult to see where to insert your hook. Having all your crochet accessories organized beforehand will make the crafting process much more enjoyable and efficient.
The beauty of the Crochet Chicken Coaster – Tutorial lies in the customization. You can choose classic white and red for a traditional farmhouse look, or experiment with variegated yarns for a more modern, eclectic vibe. High-quality natural fibers will always give your finished product a more premium feel, which is important if you are looking to monetize your hobby.
Finally, keep a stitch marker handy. Since this Crochet Chicken Coaster – Tutorial involves working in a circle, it is very easy to lose track of where a round begins and ends. Using a marker ensures that your stitch count remains accurate, preventing the edges from ruffling or curling, which is a common challenge for many beginners.
2. Step-by-Step Stitching Guide for the Chicken Body
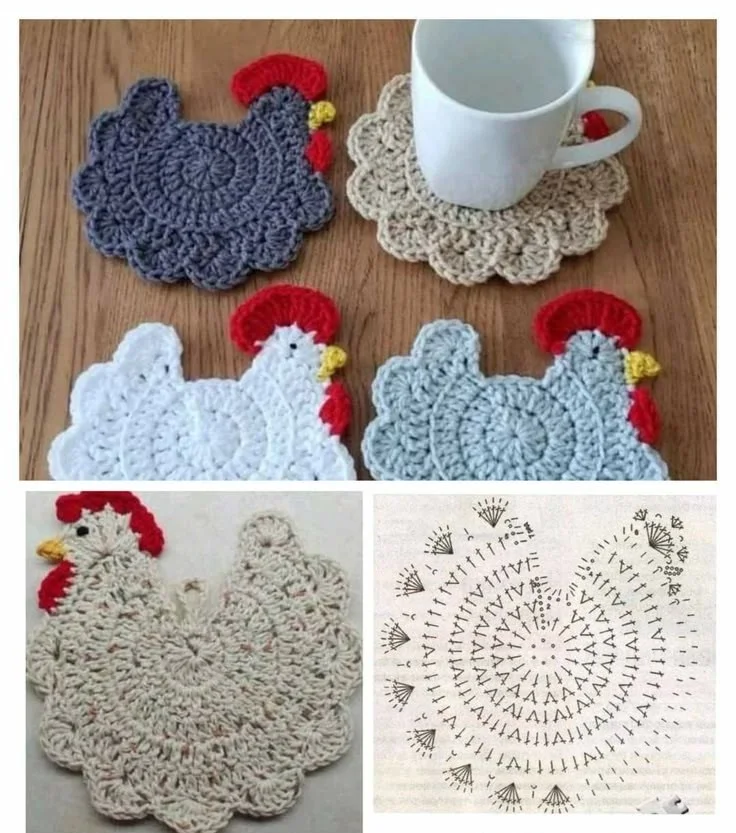
The main body of your Crochet Chicken Coaster – Tutorial starts with a magic ring. This technique is preferred over a chain loop because it allows you to pull the center tight, leaving no hole in the middle of your coaster. Once the ring is formed, you will work a series of double crochet stitches into the center to create the first solid round of the bird’s body.
As you progress through the Crochet Chicken Coaster – Tutorial, you will use increments to expand the circle. This means placing two stitches into a single stitch from the previous row. Following a specific mathematical increase pattern is vital to ensuring the coaster remains a perfect flat circle, which is the most important functional aspect of any Crochet Chicken Coaster – Tutorial.
The texture of the body can be enhanced by using the half-double crochet stitch, which offers a balance between the height of a double crochet and the density of a single crochet. This creates a sturdy fabric that can withstand the weight of heavy mugs. Every round of your Crochet Chicken Coaster – Tutorial should be counted carefully to maintain the symmetry required for the chicken’s silhouette.
Once the main circle reaches about 4 inches in diameter, you will shift the stitch height to create the “tail” and “head” sections. This is done by grouping treble crochet stitches in one area to form the tail feathers and using slip stitches to taper the shape. This transition is a key highlight of the Crochet Chicken Coaster – Tutorial, turning a simple circle into a bird shape.
Pay close attention to your tension during this part of the Crochet Chicken Coaster – Tutorial. If you pull the yarn too tight, the coaster will “bowl” up; if it is too loose, the edges will look wavy. Finding that “sweet spot” comes with practice, but taking your time during the body construction will save you from having to frog your work later.
Finish the body by performing a ghost join or an invisible finish. This technique, often taught in advanced Crochet Chicken Coaster – Tutorial lessons, ensures that there is no visible knot or bump where you fasten off. A smooth edge is not just about aesthetics; it ensures the coaster sits perfectly level on a flat surface, fulfilling its primary purpose.
3. Adding the Comb Beak and Character Details
Character is what truly defines the Crochet Chicken Coaster – Tutorial. To create the comb, you will join your red yarn to the top of the “head” section. Using a series of picot stitches or small shells, you can create that iconic ruffled look that makes the chicken so recognizable. This is the moment where your Crochet Chicken Coaster – Tutorial truly begins to take shape.
The beak is a small but mighty detail. By using a simple triangle stitch or a small puff stitch in yellow, you add a three-dimensional element to the project. It is important to secure the beak firmly with a yarn needle, as coasters go through a lot of handling and occasional washing. This Crochet Chicken Coaster – Tutorial focuses on durability as much as style.
For the eyes, I recommend using a simple French knot with black embroidery floss. While plastic beads are an option, they can make the coaster uneven if a glass is placed too close to the edge. Simple embroidery keeps the Crochet Chicken Coaster – Tutorial practical for daily use while maintaining that “handmade with love” aesthetic that buyers and gift-recipients adore.
Adding a small wing is an optional but encouraged step in this Crochet Chicken Coaster – Tutorial. A small heart-shaped or leaf-shaped piece sewn onto the side of the body adds depth and a professional layer to the design. You can use a contrasting color for the wing to make it pop, or keep it monochromatic for a sophisticated, subtle appearance.
Weaving in the ends is perhaps the least favorite part of any crafter, but in a Crochet Chicken Coaster – Tutorial, it is non-negotiable. Because both sides of the coaster might be visible, you must weave the yarn tails through the back of the stitches so they are completely hidden. A clean finish is the hallmark of a master crafter and an expert-level tutorial result.
If you find that your chicken looks a bit limp after assembly, don’t worry. The final step of the Crochet Chicken Coaster – Tutorial involves blocking. By pinning the coaster to a foam board and lightly steaming it, you “set” the stitches in place. This ensures that the chicken keeps its shape and looks crisp, professional, and ready for use.
4. Tips for Scaling and Monetizing Your Craft
Once you have mastered the Crochet Chicken Coaster – Tutorial, you might want to think about making them in bulk. Creating sets of four or six is a great way to package these for sale. You can use recycled cardboard to create a cute “nest” packaging, which adds value to your finished Crochet Chicken Coaster – Tutorial project and appeals to eco-conscious shoppers.
For those looking to improve their speed, practice the continental style of crochet. This can significantly reduce the time it takes to finish a single Crochet Chicken Coaster – Tutorial. The faster you can produce high-quality items, the higher your profit margin will be if you decide to list them on platforms like Etsy or at local markets.
Marketing your Crochet Chicken Coaster – Tutorial results requires good photography. Use natural light and place the coasters in a kitchen setting with a mug and maybe some cookies. This “lifestyle photography” helps potential customers visualize how the handcrafted items will look in their own homes, making them much more likely to purchase.
You can also adapt this Crochet Chicken Coaster – Tutorial for different seasons. Use pastel colors for Easter chickens or browns and oranges for a harvest-themed Thanksgiving set. The basic pattern remains the same, but the color psychology you apply can make the project relevant all year round, increasing your sales potential.
Consider writing your own variations of the Crochet Chicken Coaster – Tutorial. Perhaps you want to make a “Rooster” version with longer tail feathers or a “Chick” version that is smaller and simpler. Diversifying your pattern portfolio based on one successful tutorial is a smart way to grow your digital presence in the craft niche.
Lastly, always encourage feedback from those who use your Crochet Chicken Coaster – Tutorial. Whether you are sharing the pattern on a blog or selling the finished product, knowing what people love or what they find challenging helps you refine your skills. The journey of a fiber artist is one of constant learning and community engagement.
FAQ
What is the best yarn for a Crochet Chicken Coaster – Tutorial?
The gold standard is 100% cotton yarn. Cotton is durable, handles heat from mugs perfectly, and is easy to wash. Avoid wool or high-percentage acrylic, as they may lose their shape or even melt slightly under high heat.
How long does it take to complete one coaster?
For an intermediate crocheter, one coaster usually takes between 20 to 30 minutes. Beginners might take an hour as they get used to the increases and the shaping of the head and tail.
Are these coasters machine washable?
Yes, if made with cotton! We recommend washing them in a mesh laundry bag on a delicate cycle and laying them flat to dry to maintain the bird’s shape.
Can I use a different hook size than the one recommended?
You can, but it will change the size of your coaster. A larger hook will result in a bigger, looser coaster, while a smaller hook will make it tighter and smaller. Stick to the G/4.0mm hook for the best results.
How do I prevent my coaster from curling at the edges?
Curling usually happens due to incorrect stitch counts in the increase rounds. Ensure you are following the pattern exactly. If it still curls, “blocking” the finished piece with steam will usually flatten it out.
Conclusion
In this Crochet Chicken Coaster – Tutorial, we have covered everything from selecting the best cotton yarns to the intricate details of stitching the comb and beak. We learned that the secret to a professional-looking coaster lies in the magic ring start, consistent tension, and the final blocking process.
These charming chickens are more than just coasters; they are a testament to your creativity and skill as a crafter. Whether you are making these for your own kitchen, as gifts for friends, or to build your small business, the techniques shared here provide a solid foundation for success.