Creating your own Patchwork Slippers is a delightful way to blend comfort with creativity, and this tutorial will guide you through every step of the process. There is something incredibly satisfying about transforming small fabric scraps into a functional piece of footwear that keeps your feet warm and stylish. Whether you are an experienced quilter or a beginner looking for a weekend project, making Patchwork Slippers allows you to express your personal aesthetic while practicing essential sewing techniques.
The beauty of a Patchwork Slippers tutorial lies in its versatility, as you can mix and match various colors, textures, and patterns to suit your mood or home decor. Using leftover high-quality cotton or even upcycled denim ensures that your project is both eco-friendly and durable. By focusing on precision and thoughtful fabric selection, you will create a professional-looking pair of slippers that feel like a luxury spa treat for your tired feet.
In this comprehensive guide, we will explore the best materials, assembly methods, and finishing touches to ensure your Patchwork Slippers are top-tier. We have structured this tutorial to be easy to follow, ensuring that your final product is sturdy enough for daily use. Let’s dive into the art of patchwork and discover how simple it is to craft personalized comfort from the ground up using our proven Patchwork Slippers tutorial methods.
1. Selecting the Best Fabrics for Your Patchwork Slippers
When starting your Patchwork Slippers tutorial, the first step is gathering the right materials to ensure longevity and comfort. Cotton quilting fabric is the most popular choice for the exterior patchwork because it is easy to handle and comes in endless prints. You want to select scraps that share a similar weight so the slipper surface remains even and smooth throughout the assembly process.
For the interior lining, comfort is the priority, so consider using flannel, fleece, or faux fur. These materials provide the soft, cozy feel that makes high-quality Patchwork Slippers so enjoyable to wear during colder months. Ensure your lining fabric is pre-washed to prevent any future shrinkage that could distort the shape of your finished footwear.
The sole of the slipper requires a more robust material than the upper sections. Non-slip fabric, suede, or heavy-duty canvas are excellent choices for the bottom of your Patchwork Slippers. If you plan on wearing them on hardwood or tile floors, adding a “grippy” texture is a vital safety feature that shouldn’t be overlooked in any tutorial.
Interfacing and batting play a silent but crucial role in providing structure to your project. Use a fusible fleece or low-loft batting to give the patchwork sections a quilted look and extra cushioning. This layer sits between the patchwork exterior and the soft lining, providing the “squish” factor that distinguishes handmade slippers from store-bought ones.
Don’t forget the importance of high-quality polyester thread. Since slippers endure constant movement and stretching, you need a thread that can withstand tension without snapping. Coordinating the thread color with your primary fabric choice adds a professional finish to the Patchwork Slippers you are creating in this tutorial.
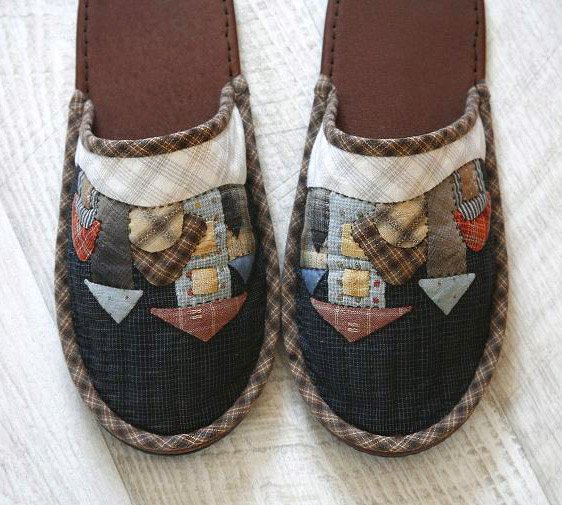
Lastly, consider the color palette for your Patchwork Slippers. Choosing a mix of warm tones and cool accents can make the patchwork design pop. Since you are using small pieces, this is the perfect opportunity to use those “fussy cut” details from your favorite fabrics to create a focal point on the toe of each slipper.
2. Preparing the Pattern and Cutting Your Scraps
To begin the physical construction of your Patchwork Slippers, you first need a reliable pattern template. You can trace an existing pair of comfortable shoes or download a standard slipper template to act as your base. In this Patchwork Slippers tutorial, we recommend adding a half-inch seam allowance around all edges to ensure the fit isn’t too tight once the pieces are sewn together.
Once your template is ready, it is time to prepare the patchwork blocks that will form the upper part of the slipper. You can use traditional designs like Log Cabin or Flying Geese, or simply sew random strips together for a modern “crazy quilt” look. The goal is to create a piece of “new fabric” large enough to cut your pattern pieces from.
When cutting your fabrics, always use a rotary cutter and a cutting mat for the most precise edges. Precision is key in any Patchwork Slippers tutorial because even a small misalignment can lead to a lopsided slipper. Make sure you cut a “left” and “right” side by flipping your pattern piece over to create a mirrored set for your feet.
After your patchwork sheets are assembled, quilt them to your fusible fleece. This step stabilizes the fabric and prevents the small scraps from shifting during the final assembly. Straight-line quilting or free-motion stitching adds a beautiful texture to the Patchwork Slippers, making the hand-crafted nature of the project truly shine.
Carefully pin your pattern to the quilted fabric and cut out the upper and sole pieces. You should have two mirrored uppers and two mirrored soles for the exterior, and the same amount for the lining. Organization is helpful here; keep your left and right components in separate piles to avoid confusion during the sewing phase of the tutorial.
Double-check the thickness of your stacked layers before moving to the sewing machine. If your Patchwork Slippers are becoming very thick, you may need a denim needle or a walking foot to feed the fabric through evenly. Having the right tools prepared during the cutting phase will save you time and frustration as you move forward.
3. Assembling the Upper and Lining Sections
The assembly phase of this Patchwork Slippers tutorial starts with joining the exterior patchwork uppers. With right sides together, sew the heel seams and the center front seams if your pattern requires them. Press your seams open to reduce bulk, which is essential for making the slippers comfortable against your skin.
Repeat this process for the lining pieces, but leave a small three-inch opening in one of the lining seams. This “turning gap” is necessary for flipping the slipper right side out later in the process. Using a shorter stitch length on the lining will ensure that these hidden seams remain durable under the weight of your feet.
Now, it is time to nest the exterior and the lining together. Slide the patchwork exterior into the lining so that the right sides are touching. Align the top edges (where your foot enters the slipper) and pin them generously. This ensures that the two layers don’t slide while you are sewing the circular opening of your Patchwork Slippers.
Sew around the top circumference with a consistent quarter-inch seam. Take your time around the curves, as this is the most visible part of the tutorial once the project is finished. After sewing, clip the curves slightly with sharp scissors to help the fabric lay flat and prevent bunching inside the Patchwork Slippers.
Turn the assembly through the opening you left in the lining. Use a turning tool or a blunt chopstick to push out the seams around the top edge. Once flipped, give the top edge a good press with an iron to create a crisp, professional look. This is a great moment to topstitch around the opening for extra durability and style.
Finally, sew the turning gap in the lining closed. You can use a ladder stitch for an invisible finish or a quick machine stitch since it will be inside the slipper. At this point in our Patchwork Slippers tutorial, you should have a soft, fabric “sock” that is ready to be attached to the durable sole.
4. Attaching the Sole and Finishing Your Project
Attaching the sole is the final major hurdle in our Patchwork Slippers tutorial. Start by pinning the center toe and center heel of your upper section to the corresponding points on the non-slip sole. Working from the centers out to the sides ensures that the fabric is distributed evenly and the slipper doesn’t twist.
Use plenty of wonder clips or heavy-duty pins to hold the layers together, as the sole material can be slippery or thick. If you are using a very thick sole, you might find it easier to baste the pieces together by hand first. This prevents the machine needle from pushing the layers out of alignment during the final stitch.
Sew slowly around the entire perimeter of the sole. Because you are sewing through multiple layers of patchwork, batting, lining, and sole material, your machine might struggle. Use a slow and steady pace, and manually turn the handwheel if you encounter particularly thick sections of the Patchwork Slippers.
Once the sole is attached, you may want to finish the raw edges inside with a zigzag stitch or a serger. Alternatively, if you are following a “turn-through” method, you would have sewn the sole to the upper with right sides together and flipped it. Regardless of the method, ensure the seams are reinforced at the stress points near the ball of the foot.
For a professional touch, consider adding a decorative ribbon or a custom label to the heel of your Patchwork Slippers. This identifies them as a handmade creation and adds a bit of flair. Many enthusiasts of this tutorial also like to add a layer of memory foam between the sole and the lining for an extra-cushioned walking experience.
Take a moment to trim any loose threads and give your slippers a final steam press. You have now completed the Patchwork Slippers tutorial! Slip them on and enjoy the warmth and satisfaction of wearing something you built with your own hands. These also make incredible gifts for friends and family who appreciate unique, artisan-made items.
FAQ – Frequently Asked Questions
1. What is the best size of fabric scraps for patchwork slippers?
For a Patchwork Slippers tutorial, it is best to use scraps that are at least 2.5 inches square. This gives you enough room for seam allowances while still allowing for a varied and colorful design.
2. Can I wash my handmade patchwork slippers in a machine?
Yes, provided you used washable cottons and synthetic batting. We recommend washing them on a delicate cycle in a mesh bag and air-drying them to maintain the shape of the Patchwork Slippers.
3. Do I need a special sewing machine for this tutorial?
A standard home sewing machine is usually sufficient. However, using a walking foot and a sharp 90/14 or 100/16 needle will help you sew through the thick layers of the sole and patchwork more easily.
4. How do I make the slippers non-slip?
You can purchase specific non-slip gripper fabric, use genuine suede, or even apply small dots of puffy fabric paint or silicone sealant to the bottom of the soles once the Patchwork Slippers are finished.
5. Is this project suitable for absolute beginners?
While it involves sewing curves and multiple layers, this Patchwork Slippers tutorial is very beginner-friendly if you take your time. It’s a great way to learn how to manage bulk and practice basic quilting.
Conclusion
This Patchwork Slippers tutorial has covered everything from selecting cozy fabrics and durable soles to the intricate process of assembling quilted layers.
We have explored how to use patchwork blocks to create a unique aesthetic and how to ensure your footwear is safe and comfortable for daily use. By following these steps, you’ve learned to turn simple fabric remnants into a functional piece of art that provides warmth and personalized style.