Learning how to create a Crochet Heart Square- Tutorial is one of the most rewarding projects for crafters of all skill levels, offering a perfect blend of technical practice and creative expression. Whether you are looking to assemble a romantic baby blanket, a cozy throw pillow, or a trendy tote bag, mastering the heart motif within a granny square framework is a fundamental skill. This guide is designed to walk you through every loop and stitch, ensuring your finished piece looks professional and heartfelt.
The beauty of a Crochet Heart Square- Tutorial lies in its versatility and the way it utilizes basic crochet stitches to create a complex-looking design. By combining double crochets, half double crochets, and chain spaces, you can transform a simple ball of yarn into a beautiful piece of handmade art. We will focus on maintaining consistent tension and choosing the right color palette to make your crochet hearts truly pop against their square backgrounds.
In this comprehensive Crochet Heart Square- Tutorial, we will explore the essential materials, the step-by-step stitching process, and the best ways to join squares for larger projects. Following a structured crochet pattern ensures that your squares remain uniform in size, which is crucial for the final assembly of any crochet project. Get your hooks ready and let’s dive into the world of fiber arts as we create something beautiful together.
1. Essential Materials and Preparation for your Crochet Heart Square- Tutorial
Before starting your Crochet Heart Square- Tutorial, you must select the right yarn weight and hook size. For most beginners, a medium weight (worsted) yarn and a 5.0mm (H) crochet hook provide the best visibility for your stitches. Using a cotton blend can offer great definition, while acrylic yarn provides softness and a bit of stretch for blankets.
Proper preparation involves more than just picking colors; you also need a pair of sharp scissors and a tapestry needle for weaving in ends. Since a Crochet Heart Square- Tutorial often involves changing colors between the heart and the border, having these tools handy will save you time. Don’t forget a few stitch markers to help identify the corners of your square as you work.
The first step in any crochet tutorial is checking your gauge. While the exact size might not matter for a single square, it is vital if you plan to join multiple heart squares later. Make sure your stitches aren’t too tight, or the heart shape might become distorted and lose its rounded definition.
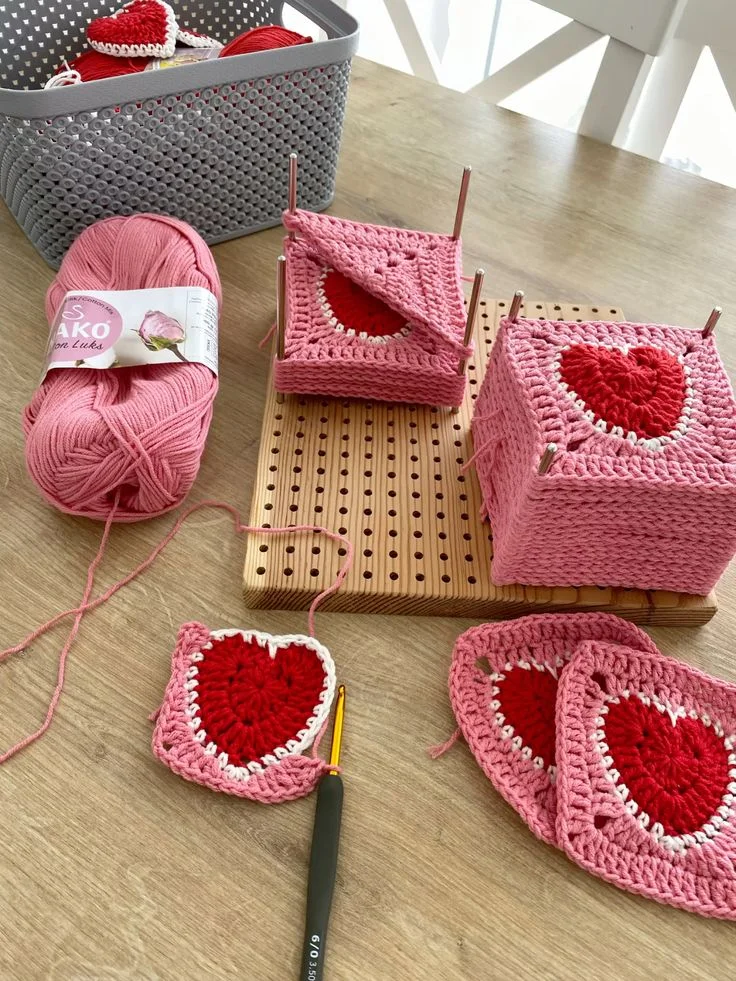
When choosing colors for your Crochet Heart Square- Tutorial, consider high-contrast options. A vibrant red or soft pink for the inner heart paired with a cream or white border makes the heart motif stand out beautifully. This contrast is what makes the granny square style so visually appealing in home decor.
Organizing your workspace is a key part of the crochet process. Ensure you have plenty of light so you can clearly see the stitch anatomy, specifically the “V” at the top of each double crochet. This clarity is essential for placing your stitches accurately during the increase rounds of the Crochet Heart Square- Tutorial.
Lastly, take a moment to familiarize yourself with the abbreviations used in this Crochet Heart Square- Tutorial. Terms like sc (single crochet), dc (double crochet), and sl st (slip stitch) are the building blocks of the pattern. Understanding these basics will make the following steps much more fluid and enjoyable as you work.
2. Shaping the Center: How to Crochet the Heart Motif
The core of our Crochet Heart Square- Tutorial begins with a magic ring or a small chain loop. This central point allows you to work several treble crochets and double crochets into a single space, creating the rounded “lobes” of the heart. This technique is often referred to as working in the round even though we are creating a specific shape.
To get the iconic heart shape, you will vary the height of your stitches. By using taller treble stitches at the top and shorter single crochets toward the bottom point, the silhouette naturally emerges. This Crochet Heart Square- Tutorial relies on this mathematical graduation of stitch height to ensure the heart looks symmetrical.
Once the initial round of the heart is complete, you will likely work a second round to smooth out the edges. This is where you focus on the stitch definition. Using half double crochets around the curves helps provide a transition that looks organic and soft, which is the hallmark of a well-executed crochet heart.
A crucial tip in this Crochet Heart Square- Tutorial is the use of the slip stitch at the cleavage of the heart. By pulling this stitch tight, you create a deep “V” shape at the top, which clearly distinguishes the heart from a standard circle. It’s these small details that elevate your handmade crochet work.
As you finish the heart portion, do not fasten off if you are using the same color for the first part of the square. However, most Crochet Heart Square- Tutorial enthusiasts prefer to change colors here. To do this cleanly, use a standing stitch or a join-with-a-slip-stitch method to minimize the appearance of a seam.
Consistency is everything when shaping the center. If one lobe of your heart looks larger than the other, check your stitch count. In this Crochet Heart Square- Tutorial, symmetry is achieved by mirroring the stitches on the left and right sides of the central axis, ensuring a balanced and professional look.
3. Squaring the Circle: Turning a Heart into a Square
The most technical part of the Crochet Heart Square- Tutorial is “squaring off.” This involves filling in the gaps around the irregular heart shape to create a perfect four-sided granny square. To do this, you will use taller stitches in the valleys and shorter stitches on the peaks of the heart.
In the corners of your Crochet Heart Square- Tutorial, you will typically work a cluster of double crochets, chains, and more double crochets. This creates a 90-degree angle, pushing the fabric outward into a square shape. These corners are the foundation for any modular crochet project you might want to build later.
Along the sides of the heart, you will use single crochets or half double crochets. Because the heart is wider at the top than at the bottom, the number of stitches used to fill the space will vary. Following the Crochet Heart Square- Tutorial instructions closely here ensures your square lies flat rather than curling.
One common issue beginners face is “ruffling,” which happens when there are too many stitches. If your Crochet Heart Square- Tutorial project looks wavy, you may need to adjust your tension or check that you haven’t added extra stitches in the side gaps. A flat square is the goal for easy seaming.
As you move into the outer rounds of the Crochet Heart Square- Tutorial, the work becomes much easier. Once the initial “squaring” round is established, you simply follow a standard granny square pattern, working into the chain spaces or the tops of the previous row’s stitches to grow the square to your desired size.
The final round of your Crochet Heart Square- Tutorial should ideally be a round of single crochet. This provides a sturdy, clean edge that makes joining squares much simpler. It also gives the piece a finished, polished look that highlights the intricate heart nestled in the center.
4. Finishing Touches and Blocking your Crochet Heart Square
No Crochet Heart Square- Tutorial is complete without discussing blocking. Blocking is the process of wetting your finished crochet and pinning it to a specific shape. This is especially important for heart squares because it opens up the stitches and ensures every square in your project is the exact same size.
To block your work from this Crochet Heart Square- Tutorial, you can use foam blocking boards and T-pins. Gently spray the squares with water or steam them with an iron (careful not to touch the yarn if it’s acrylic!). Let them dry completely before unpinning to set the square shape permanently.
Weaving in ends is often the least favorite part of a crochet project, but it’s vital for durability. Use your tapestry needle to thread the yarn tails through the back of the stitches. In this Crochet Heart Square- Tutorial, try to hide the ends within stitches of the same color to keep the back looking as neat as the front.
If you have completed several pieces using this Crochet Heart Square- Tutorial, you’ll need to decide on a joining method. The invisible seam (mattress stitch) is great for a flat look, while a slip stitch join creates a decorative ridge that adds texture to crochet blankets and pillows.
Consider adding a border to your final assembled piece. A simple scalloped edge or a ribbed border can frame your heart squares beautifully. This Crochet Heart Square- Tutorial provides the building block, but the final arrangement and edging are where your personal style truly shines.
Finally, take pride in your work! Completing a Crochet Heart Square- Tutorial is a sign of progressing skill. These squares make wonderful gifts and are a great way to use up scrap yarn. Keep practicing, and soon you’ll be able to whip up these charming heart motifs in no time at all.
FAQ – Frequently Asked Questions
What is the best yarn for a Crochet Heart Square- Tutorial?
For the best results, use a Level 4 Worsted Weight yarn. Cotton is excellent for dishcloths or bags because it has great stitch definition, while acrylic or wool blends are perfect for blankets due to their warmth and softness.
How do I stop my heart square from curling at the corners?
Curling usually happens due to tight tension or missing a chain stitch in the corner clusters. Ensure you are adding the correct number of chain spaces in each corner as instructed in the Crochet Heart Square- Tutorial to allow the fabric to lie flat.
Can I make the heart in a different color than the square?
Yes! In fact, this Crochet Heart Square- Tutorial recommends using a contrasting color for the heart to make the motif stand out. Simply fasten off the heart color and join the new color for the “squaring” rounds.
Is this pattern suitable for absolute beginners?
This Crochet Heart Square- Tutorial is perfect for “advanced beginners.” You should already know how to do a slip knot, chain, and double crochet. The shaping of the heart is a great way to learn how to manipulate stitch heights.
How many squares do I need for a full-sized blanket?
This depends on the size of your square and your desired blanket dimensions. Typically, for a standard throw blanket, you might need anywhere from 42 to 64 squares created using this Crochet Heart Square- Tutorial.
Conclusion
In this Crochet Heart Square- Tutorial, we have covered everything from selecting the right yarn and hook to the delicate process of shaping the heart and squaring the edges. We’ve learned that blocking is a secret weapon for professional results and that color choice can completely transform the mood of your project. This versatile crochet pattern is more than just a square; it’s a building block for countless creative endeavors, from fashion accessories to home decor.
We hope this Crochet Heart Square- Tutorial has inspired you to pick up your hook and start creating. Whether you are making a single square as a coaster or a hundred for a quilt, the love put into every stitch is what makes handmade items so special.