The Zig-Zag Crochet Stitch – Tutorial is your gateway to creating vibrant, textured, and visually striking projects that stand out from the crowd. Whether you are a seasoned pro or a curious beginner, mastering this specific pattern allows you to play with colors and dimensions in a way that standard rows simply cannot match. By the end of this guide, you will understand why this technique remains a timeless favorite in the crafting community.
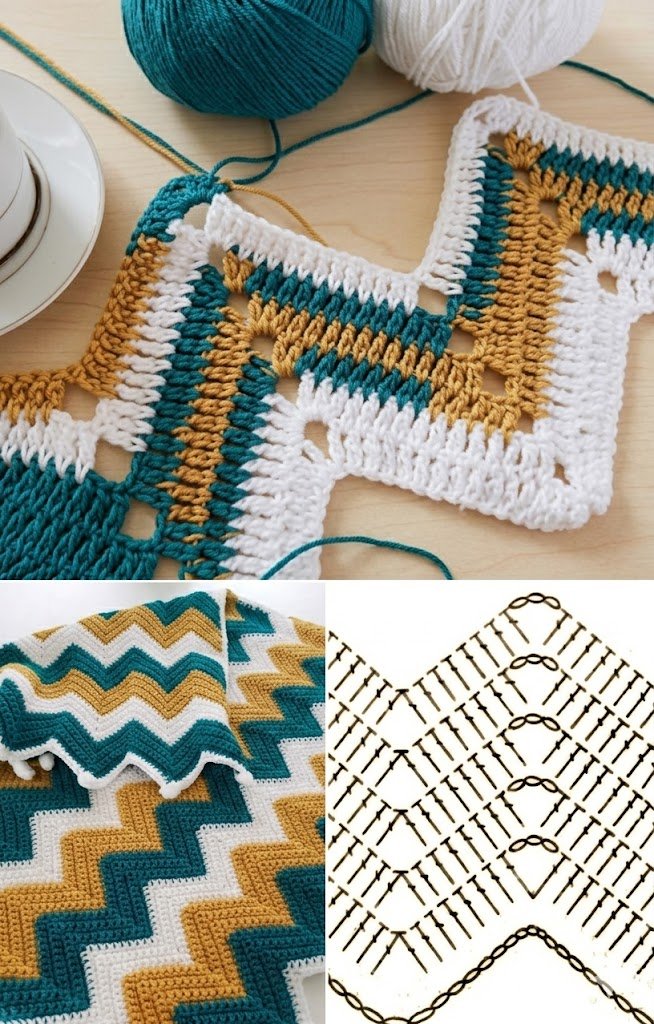
Crochet is more than just a hobby; it is a form of rhythmic art that provides both relaxation and a sense of accomplishment. The Zig-Zag Crochet Stitch is particularly famous for its “ripple” or “chevron” effect, which is achieved by a clever combination of increases and decreases. This mathematical dance of yarn creates peaks and valleys that look professional but are surprisingly easy to execute once you find your flow.
In this comprehensive Zig-Zag Crochet Stitch – Tutorial, we are going to break down every single step to ensure your edges stay straight and your waves stay consistent. We will cover the essential materials, the foundational techniques, and the common pitfalls to avoid. Prepare your favorite yarn and a comfortable hook, because we are about to dive deep into the world of geometric crochet patterns that will elevate your blankets, scarves, and home decor.
1 Understanding the Zig-Zag Crochet Stitch – Tutorial Basics
To begin this Zig-Zag Crochet Stitch – Tutorial, you must first understand the concept of a “stitch repeat.” The ripple effect is created by working multiple stitches into one space to create a peak (increase) and skipping stitches or joining them together to create a valley (decrease). This balance ensures that your row length remains constant even though the fabric is curving up and down.
Choosing the right yarn weight and hook size is crucial for your first attempt. For beginners, a medium-weight (worsted) acrylic or cotton yarn is recommended because it offers great stitch definition. Pair this with a 5.0mm (H) hook to ensure your tension isn’t too tight, which can make the “valleys” of your zig-zag look bunched up or distorted.
The term foundation chain refers to the very first row of loops you create. For a zig-zag pattern, the number of chains must usually be a multiple of a specific number (like 12 or 14) plus a few extra for the turning chain. Getting this math right at the start is the “secret sauce” to ensuring your pattern doesn’t end abruptly in the middle of a wave.
In our Zig-Zag Crochet Stitch – Tutorial, we focus on the double crochet (dc) as the primary building block. Double crochet provides the height needed to make the peaks look sharp and the valleys look deep. It also works up faster than single crochet, allowing you to see the beautiful chevron pattern emerge after just three or four rows of work.
Another key term is stitch anatomy. You need to be comfortable identifying the “V” at the top of each stitch. To get a clean look, you will usually insert your hook under both loops. However, some advanced versions of this tutorial might suggest working in the back loop only (BLO) to create a ribbed texture that adds even more depth to your project.
Finally, let’s talk about color changes. The zig-zag pattern truly shines when you swap colors every two or four rows. This highlights the “Z” shape and creates a high-contrast look. Mastering the invisible join when changing colors will make your finished piece look like it came from a high-end boutique rather than a DIY basket.
2 Step-by-Step Execution of the Ripple Pattern
The first step in our Zig-Zag Crochet Stitch – Tutorial execution is creating your starting chain. For a standard sample, chain a multiple of 14 plus 3. The “plus 3” acts as your first double crochet. Count carefully; a single missing chain at this stage will cause the entire geometric alignment to fail several rows later, which can be quite frustrating.
Once your chain is ready, work your first double crochet into the fourth chain from the hook. To create the first “slope,” you will work several dc stitches in a row. Then, to create a peak, work 3 dc into the same chain. This expansion pushes the fabric upward, forming the highest point of your zig-zag wave.
To descend into the valley, you will work a corresponding number of dc stitches and then skip two chains. Skipping these chains pulls the fabric downward without adding bulk. This “skip” is the most common place where beginners lose their way, so keep a close eye on your spacing to maintain the Zig-Zag Crochet Stitch integrity.
As you reach the end of the row, it is vital to finish with a “half-peak” or a specific number of stitches to keep the edges straight. This is often achieved by working two dc into the very last chain. Without this adjustment, your blanket will start to grow wider or narrower with every row, resulting in a trapezoid instead of a rectangle.
Turning your work is the next phase. Chain 3 (which counts as your first stitch) and turn the fabric over. You will now work back across, placing your increases (3 dc in one stitch) directly into the center stitch of the previous row’s peak, and your decreases (skipping stitches) directly over the previous row’s valley.
Consistency is the hallmark of a great Zig-Zag Crochet Stitch – Tutorial result. Try to maintain a uniform tension. If you pull too hard on the yarn during the valleys, the fabric will pucker. If you are too loose at the peaks, they will look floppy. Practice a rhythmic “hook and pull” motion to keep your stitches looking identical throughout the piece.
3 Troubleshooting Common Zig-Zag Mistakes
One of the most frequent issues encountered during a Zig-Zag Crochet Stitch – Tutorial is the “shrinking edge.” This happens when you forget to work into the top of the turning chain from the row below. Always count your stitches for the first five rows until you can visually recognize where each row should end. Using stitch markers on the edges can be a lifesaver.
If your work is “curling,” it usually means your foundation chain was too tight. The zig-zag shape requires more “give” than a straight row. A pro tip is to use a crochet hook one size larger than your project hook just for the starting chain. This ensures the bottom of your blanket is as flexible as the rest of the fabric.
“Gaps” in the valleys are another common complaint. If the skipped stitches look like holes, you might be skipping too many or your yarn might be too thin for the hook size. To fix this, you can try a dc3tog (double crochet three together) decrease instead of skipping chains. This fills the gap while still pulling the fabric into that essential “V” shape.
Misaligned peaks occur when the increase isn’t placed exactly in the center of the previous row’s peak. This causes the zig-zag to “drift” to the left or right. If you notice your waves are leaning like a sinking ship, stop immediately and frog (unravel) back to where the alignment shifted. Precision is key in geometric crochet.
Color bleeding or messy transitions can ruin the aesthetic of a Zig-Zag Crochet Stitch. Always change your color on the final pull-through of the last stitch of the row. This ensures the new color is ready on your hook for the turning chain, giving you a sharp, crisp line between your zig-zag stripes.
Finally, keep an eye on your yarn supply. The zig-zag pattern uses roughly 10% to 15% more yarn than a flat stitch pattern because of the undulating rows. If you are making a large afghan, ensure you have enough yarn of the same dye lot to avoid subtle color shifts that become very obvious in a structured pattern like this.
4 Creative Variations and Project Ideas
Now that you have mastered the basics of this Zig-Zag Crochet Stitch – Tutorial, it’s time to get creative. You can experiment with textured stitches like the “Front Post Double Crochet” to create a 3D effect on the peaks. This adds a wonderful tactile element to baby blankets and throw pillows, making the zig-zags pop off the fabric.
The Chevron Lace variation is another popular choice. By adding “chain 1” spaces between your double crochets, you create a lighter, more breathable fabric. This is perfect for summer shawls or lightweight scarves. It keeps the iconic zig-zag shape but feels much more delicate and elegant than the solid version.
You can also vary the “sharpness” of the waves. A shallow zig-zag is created by doing more stitches between the peaks and valleys, while a sharp zig-zag has very few stitches between them. Choosing the right “frequency” of waves can change the entire mood of your garment, from subtle ripples to energetic lightning bolts.
For a modern look, try an ombre effect. Use five shades of the same color, moving from darkest to lightest. The zig-zag pattern naturally blends these colors as the peaks of one row nestle into the valleys of the next. This creates a sophisticated “waterfall” look that is very popular in contemporary interior design.
Don’t limit yourself to blankets! The Zig-Zag Crochet Stitch is excellent for making crochet tote bags. Because the stitch is dense and structural, it holds its shape well. You can even work the pattern in the round to create a seamless bag where the zig-zags wrap continuously around the body of the tote.
Lastly, consider the scrap-ghans approach. If you have leftover yarn from various projects, the zig-zag stitch is the ultimate “stash buster.” Since the pattern thrives on color changes, you can use random colors for each row. The consistent geometric shape will tie all the different colors together into a cohesive, bohemian masterpiece.
FAQ – Frequently Asked Questions
Is the Zig-Zag Crochet Stitch suitable for absolute beginners?
Yes! While it looks complex, it only requires knowledge of the double crochet and basic counting. If you can make a scarf, you can make a zig-zag blanket.
How many chains do I need to start a zig-zag blanket?
It depends on the specific pattern, but most involve a multiple of 12 or 14. Always add the “turning chain” count (usually 2 or 3) to your total number of chains.
Why is my crochet zig-zag curling at the ends?
This is usually caused by tension issues. Ensure your starting chain is loose and that you are correctly increasing at the edges to keep the sides vertical.
Can I use any type of yarn for this stitch?
Virtually any yarn works, but variegated (multi-colored) yarn can sometimes hide the zig-zag shape. Solid colors or distinct stripes usually look best.
How do I calculate how much yarn I need?
Since the ripple uses more yarn than flat rows, a good rule of thumb is to buy one extra skein for every five you would normally use for a standard stitch.
What is the difference between “Chevron” and “Zig-Zag” stitches?
In the world of crochet, these terms are often used interchangeably. Both refer to the V-shaped undulating rows created by increases and decreases.
Conclusion
Mastering the Zig-Zag Crochet Stitch – Tutorial is a rewarding milestone for any crafter. We have explored the foundational math of peaks and valleys, the importance of consistent tension, and how to troubleshoot the common errors that often trip up beginners. From selecting the right hook to executing perfect color transitions, you now have the tools to create stunning, professional-grade crochet pieces that feature the iconic ripple effect.
This stitch is a testament to how simple techniques can combine to create intricate, beautiful patterns. As you continue your journey, remember that patience is just as important as your crochet hook. Your first few rows might feel slow, but once the rhythm of the zig-zag sets in, you will find yourself flying through your projects with ease and confidence.