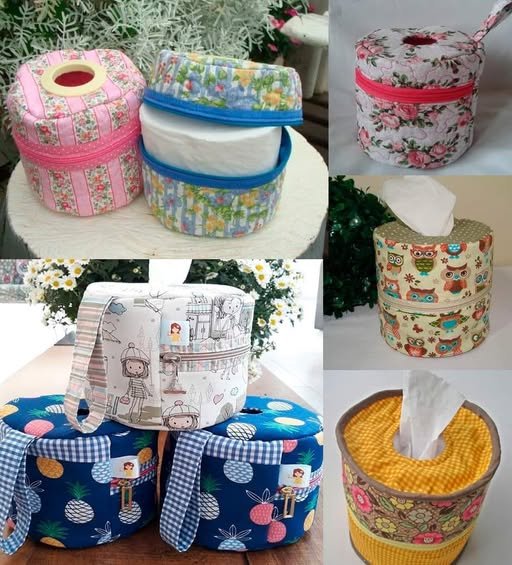
A Fabric Toilet Paper Holder – Tutorial is the perfect way to combine functionality with home decor, allowing you to personalize one of the most overlooked spaces in your house. Whether you are looking to declutter your bathroom surfaces or simply want to add a touch of handmade charm to your environment, creating your own DIY fabric organizer is an accessible and rewarding project. Using high-quality cotton fabric and basic sewing skills, you can transform a simple roll of paper into a stylish accessory that keeps your essentials within arm’s reach while maintaining a clean, organized aesthetic.
Crafting a fabric toilet paper holder is not just about aesthetics; it is a sustainable choice for those looking to reduce their reliance on plastic storage solutions. By following this step-by-step sewing guide, you will learn how to select the right materials, measure accurately, and assemble a piece that is both durable and beautiful. This project is ideal for using up fabric scraps from previous quilting or upholstery tasks, making it an eco-friendly addition to your crafting repertoire that helps minimize waste while maximizing utility in your bathroom.
This Fabric Toilet Paper Holder – Tutorial is designed to be beginner-friendly, providing clear instructions that ensure a professional finish even if you are relatively new to the world of sewing. We will focus on creating a hanging roll dispenser that can easily be attached to a tank, a door handle, or a wall hook. By the end of this guide, you will have a functional piece of handmade bathroom decor that showcases your creativity and attention to detail, proving that even the most practical items can be elevated through thoughtful design and craftsmanship.
1. Selecting the Best Materials for Your Project
Choosing the right textiles is the foundation of a successful Fabric Toilet Paper Holder – Tutorial. Since bathrooms are often humid environments, it is best to opt for breathable and washable materials like 100% cotton or a sturdy linen blend. These fabrics are easy to manipulate under a sewing machine and hold their shape well over time.
To ensure your bathroom organizer has enough structure to hold the weight of multiple rolls, consider using a medium-weight interfacing. This hidden layer provides the necessary stiffness to prevent the holder from sagging or stretching. Adding this reinforcement is a professional trick that makes your sewing project look store-bought rather than homemade.
Don’t forget about the aesthetic appeal of your fabric choice. Since this item will be a visible part of your decor, select colors or patterns that complement your current bathroom tiles or towels. Floral prints, geometric patterns, or even upcycled denim can create vastly different vibes, ranging from vintage farmhouse to modern industrial.
In addition to the main fabric, you will need high-quality polyester thread that matches your design. Using a durable thread ensures that the seams remain intact even with frequent use and laundering. It is always a good idea to test your stitch tension on a scrap piece of your chosen fabric before starting the actual assembly.
Hardware also plays a role in your Fabric Toilet Paper Holder – Tutorial. Depending on your preferred hanging method, you might need a wooden dowel, a plastic ring, or a fabric loop. These elements help distribute the weight of the toilet paper evenly, ensuring the holder hangs straight and remains accessible at all times.
Lastly, gather your essential sewing notions including sharp fabric shears, a rotary cutter, a cutting mat, and a reliable measuring tape. Precision is key when cutting your rectangles, as even a small discrepancy can cause the rolls to fit too tightly. Having the right tools prepared will make the creative process much smoother and more enjoyable.
2. Precise Cutting and Preparation Steps
The next phase of our Fabric Toilet Paper Holder – Tutorial involves preparing the fabric pieces according to specific measurements. For a standard two-roll holder, you will typically need a long rectangular piece of outer fabric and a matching piece of lining fabric. Standard measurements often hover around 20 inches in length and 6 inches in width, plus seam allowances.
Once your pieces are cut, it is time to apply the fusible interfacing to the wrong side of the outer fabric. Use a hot iron to bond the materials together, following the manufacturer’s instructions. This step is vital for the structural integrity of your fabric toilet paper holder, ensuring it stays crisp and professional throughout its lifespan.
After interfacing, align your outer fabric and lining with the right sides together. Secure the edges with pins or sewing clips to prevent shifting during the sewing process. Keeping the edges perfectly flush is a hallmark of expert sewing techniques, leading to a much cleaner final product that you will be proud to display.
Before you head to the machine, mark any areas that need to remain unsewn, such as a small gap for turning the fabric right side out. Using a water-soluble marking pen is a great way to keep your work tidy. These preparations are what turn a basic DIY tutorial into a high-quality finished piece of functional art.
It is also beneficial to pre-wash your fabrics before cutting. Natural fibers like cotton can shrink during their first wash, which could distort the shape of your bathroom accessory later on. By pre-shrinking the material, you ensure that the fabric toilet paper holder maintains its dimensions even after being cleaned in a washing machine.
Finally, double-check your measurements against the actual size of the rolls you use at home. “Mega rolls” are increasingly popular and may require an extra inch of width or length to fit comfortably. Customizing your Fabric Toilet Paper Holder – Tutorial to your specific needs is one of the greatest advantages of making your own home essentials.
3. Sewing the Structure and Creating Pockets
Now we reach the heart of the Fabric Toilet Paper Holder – Tutorial: the actual construction. Begin by sewing around the perimeter of your pinned fabric, leaving that small opening you marked earlier. Use a consistent 1/4-inch seam allowance to ensure the finished width remains uniform, which is crucial for the rolls to slide in easily.
Once the perimeter is sewn, clip the corners diagonally to reduce bulk. This allows the corners to be sharp and square when you turn the piece right side out. Use a turning tool or a blunt pencil to gently push out the fabric at the corners, then give the entire strip a thorough pressing with your steam iron for a crisp finish.
To create the individual pockets for the rolls, you will fold the long strip and mark the sewing lines. In this Fabric Toilet Paper Holder – Tutorial, the placement of these lines determines how many rolls the holder can accommodate. Typically, you will topstitch across the width of the fabric to divide the long tube into two or three distinct sections.
Topstitching is not only functional but also serves as a decorative element. Use a slightly longer stitch length for a professional aesthetic and ensure your thread color complements the fabric. This row of stitching will bear the weight of the paper rolls, so consider backstitching at the start and end of each line for extra durability.
If you wish to add a hanging loop, this is the time to secure it at the top of the holder. You can create a simple loop from a matching strip of fabric or use a piece of sturdy ribbon. Center the loop carefully and reinforce the stitching, as this point will experience the most tension when the holder is hanging.
The final structural step is to close the turning gap using a ladder stitch for an invisible finish or by topstitching close to the edge around the entire perimeter. This final pass of the machine adds a high-end look to your handmade organizer, completing the main assembly of your Fabric Toilet Paper Holder – Tutorial.
4. Personalizing and Finishing Your Design
The final subtitled section of our Fabric Toilet Paper Holder – Tutorial focuses on those special touches that make the project uniquely yours. You can embellish the front of the pockets with embroidery, lace trim, or appliqué designs. These small details transform a utilitarian item into a standout piece of bathroom decor that reflects your personal style.
Consider adding buttons or snaps if you want the pockets to be closable, though most fabric dispensers are designed for easy access with open tops. If you are using this as a gift, adding a small personalized label or a “Handmade with Love” tag adds a wonderful touch of sincerity and value to the finished craft project.
For those who enjoy a more rustic look, using wooden buttons or twine for the hanging mechanism can create a beautiful contrast against soft cotton fabrics. The versatility of this Fabric Toilet Paper Holder – Tutorial allows you to experiment with different textures and finishes until you find the perfect match for your home.
If you have leftover fabric from this project, why not make a matching tissue box cover or a small makeup pouch? Creating a coordinated set of bathroom accessories is a fantastic way to elevate the entire room’s design without spending a fortune on retail sets. It also helps in utilizing every inch of your sewing stash.
Maintenance of your new holder is simple. Because you chose high-quality washable fabric, you can simply toss the holder into the laundry whenever it needs a refresh. This makes the fabric toilet paper holder a much more hygienic and long-lasting option than many cheap plastic or wicker alternatives found in stores.
Congratulations on completing this Fabric Toilet Paper Holder – Tutorial! You have successfully taken raw materials and turned them into a practical, beautiful, and sustainable solution for your home. This project is a testament to the power of handmade creations and the joy of improving your living space through your own skills and creativity.
FAQ – Frequently Asked Questions
What is the best fabric for a toilet paper holder?
The best material for a Fabric Toilet Paper Holder – Tutorial is 100% cotton or a cotton-polyester blend. These fabrics are durable, easy to sew, and can be machine-washed frequently to keep the bathroom environment clean.
How do I make sure the holder is strong enough?
The secret to a sturdy handmade organizer is using fusible interfacing. This adds a layer of stiffness to the fabric, preventing it from drooping under the weight of the toilet paper rolls over time.
Can I make this holder for “Mega” rolls?
Yes! Simply increase the width of your fabric pieces by about 1 to 2 inches and add a little extra length to the pockets. This Fabric Toilet Paper Holder – Tutorial is easily customizable to fit any brand or size of paper roll.
Is this project suitable for a beginner?
Absolutely. This is an excellent project for those learning how to sew. It involves straight lines, basic measurements, and simple assembly techniques, making it a great confidence-builder for novice crafters.
How do I hang the fabric toilet paper holder?
You can use a fabric loop, a wooden dowel, or even large grommets. Most people hang them from the side of the toilet tank, a wall-mounted hook, or the back of a bathroom door for convenient access.
Conclusion
In this Fabric Toilet Paper Holder – Tutorial, we have covered everything from selecting the perfect textiles and interfacing to the final decorative stitches that bring your project to life.
You have learned how to prepare your fabric, sew a reinforced structure, and create functional pockets that keep your bathroom tidy and stylish. By choosing to make your own DIY bathroom accessories, you are embracing a more sustainable and personalized approach to home management.