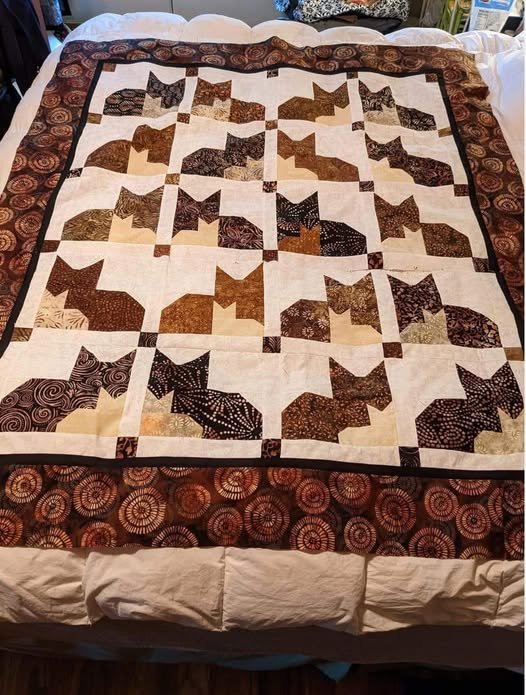
Kitten Quilt – Tutorial is a delightful project that combines the charm of feline-inspired designs with the timeless art of quilting to create a cozy masterpiece. Whether you are an experienced quilter or a beginner looking for a whimsical challenge, crafting a cat-themed quilt allows you to express your creativity through various fabric textures and color palettes. This guide is designed to help you navigate the process of selecting the right quilting materials and mastering the stitching techniques required to bring these adorable kittens to life on your fabric.
The beauty of a Kitten Quilt – Tutorial lies in its versatility, as you can customize every element from the whisker embroidery to the geometric patchwork that forms the kitten’s body. Many crafters find that using cotton quilting fabric provides the best stability for the intricate feline silhouettes and applique details. By focusing on high-quality batting and durable threads, you ensure that your finished project is not only visually stunning but also a durable heirloom that can be cherished for generations.
Starting your Kitten Quilt – Tutorial journey requires a bit of planning and a clear understanding of quilt block construction. In this article, we will break down the essential steps, covering everything from fabric cutting guides to the final binding process. By following these SEO-optimized quilting tips, you will be able to improve your sewing accuracy and create a professional-looking result. Let’s dive into the details of creating your very own handcrafted kitten quilt with this comprehensive walkthrough.
1. Selecting the Perfect Fabrics for Your Kitten Quilt – Tutorial
Choosing the right colors is the first step in making your Kitten Quilt – Tutorial stand out. You should look for high-contrast fabrics that distinguish the kitten shapes from the background, ensuring the patchwork design is clear and crisp. Many quilters prefer pre-cut fabric bundles like fat quarters or jelly rolls to get a coordinated look without the stress of matching individual bolts.
When working on a Kitten Quilt – Tutorial, the texture of the fabric can add a unique dimension to the cat motifs. Consider using a mix of solid cottons and subtle floral prints to give each kitten its own personality. It is also important to pre-wash your fabrics to prevent any color bleeding or shrinkage after the quilt assembly is complete, maintaining the integrity of your sewing project.
The weight of the fabric is another crucial factor in your Kitten Quilt – Tutorial. Stick to 100% quilting weight cotton for the best results, as it is easy to press and holds crisp seams. If you choose fabrics that are too thick, like denim or corduroy, the seam allowances can become bulky, making it difficult to achieve the precise points required for the kitten’s ears and paws.
Don’t forget the backing fabric and binding for your Kitten Quilt – Tutorial. A soft flannel backing can make the quilt extra cuddly, while a bold, striped bias binding adds a professional finish to the edges. Think about the overall quilt aesthetic you want to achieve, whether it’s a modern minimalist kitten design or a traditional scrappy quilt style.
Your thread choice also impacts the Kitten Quilt – Tutorial outcome. A high-quality 50wt cotton thread is ideal for piecing because it is strong yet thin enough to allow for flat seams. Matching your thread color to the background fabric helps the topstitching blend in, while a contrasting thread can be used for decorative quilting patterns or whisker details.
Lastly, keep your fabric scraps from the Kitten Quilt – Tutorial. These small pieces are perfect for fussy cutting tiny details like the kitten’s nose or eyes. Organized fabric management will make the construction phase much smoother and more enjoyable. By preparing your materials thoughtfully, you set the foundation for a successful and beautiful DIY quilting project.
2. Master the Cutting and Piecing Phase of the Kitten Quilt – Tutorial
Precision cutting is the backbone of any successful Kitten Quilt – Tutorial. You will need a rotary cutter, a self-healing cutting mat, and a quilting ruler to ensure every square and triangle is exact. Accuracy at this stage prevents the quilt blocks from becoming distorted during the machine piecing process, which is vital for the kitten’s facial features.
Following the Kitten Quilt – Tutorial cutting instructions carefully will save you from wasting fabric. It is often helpful to label your cut pieces according to the quilt pattern sections, such as “ears,” “cheeks,” and “body.” This organization keeps your workspace tidy and helps you maintain a steady sewing rhythm as you move through the different stages of the patchwork assembly.
When you begin piecing the Kitten Quilt – Tutorial, always use a consistent 1/4 inch seam allowance. This is the standard in professional quilting and ensures that all your pieces fit together like a puzzle. If your seams are inconsistent, the kitten blocks won’t line up correctly, leading to uneven rows and a frustrated quilting experience.
Pressing is just as important as sewing in a Kitten Quilt – Tutorial. Use a hot iron and press your seams to the side or open, depending on the quilt design’s requirements. Proper seam pressing reduces bulk and allows the quilt top to lie flat, which makes the subsequent quilting and layering steps much easier to manage.
As you assemble the kitten’s head in this Kitten Quilt – Tutorial, pay close attention to the diagonal seams. Techniques like the stitch-and-flip method are often used to create the triangular shapes for the ears. Marking your sewing lines with a fabric pen can help you stay on track and achieve those sharp points that give the kittens their alert and cute expression.
Once all the individual feline blocks are finished, it is time to join them into rows. This part of the Kitten Quilt – Tutorial is where you see the “quilt top” come together. Take a moment to step back and check the color distribution of your kittens across the layout to ensure a balanced and visually appealing quilt design before the final rows are joined.
3. Advanced Applique and Embroidery for Your Kitten Quilt – Tutorial
Adding the final touches to your Kitten Quilt – Tutorial often involves applique techniques. You can use raw-edge applique for a fast and modern look, or needle-turn applique for a more traditional, finished appearance. This step allows you to add rounder shapes, like a ball of yarn or a curved tail, that are difficult to achieve with standard piecing.
In this Kitten Quilt – Tutorial, we focus on giving the kittens life through embroidery stitches. Simple stitches like the backstitch or satin stitch are perfect for creating whiskers, mouths, and twinkling eyes. Using embroidery floss in a dark charcoal or soft pink can add a delicate touch that makes each quilt block unique and personalized.
If you are new to applique in a Kitten Quilt – Tutorial, consider using fusible web. This adhesive material allows you to “glue” your fabric shapes onto the quilt background with an iron before sewing around the edges. It prevents the fabric from shifting and ensures your cat appliques are perfectly positioned every time.
Choosing the right decorative stitches on your sewing machine can also enhance the Kitten Quilt – Tutorial. A blanket stitch or a tight zigzag stitch around the applique pieces provides a secure and decorative border. This not only adds to the handmade charm but also prevents the fabric edges from fraying over time during use or washing.
For a more 3D effect in your Kitten Quilt – Tutorial, you can experiment with button eyes or small fabric bows. However, if the quilt is intended for a baby or small child, it is safer to stick with embroidery or fabric-only details to avoid any choking hazards. Safety is always a priority when creating functional textile art.
The Kitten Quilt – Tutorial encourages you to play with different fabric weights for the applique. Using a bit of velvet or minky fabric for the kitten’s ears can provide a sensory experience, making the quilt even more special. This attention to detail is what elevates a simple project into a truly customized quilt creation.
4. Final Assembly, Quilting, and Finishing Your Kitten Quilt – Tutorial
The final stage of the Kitten Quilt – Tutorial is the “quilt sandwich” creation. This involves layering the quilt top, the batting, and the backing fabric. Use curved safety pins or a spray baste to hold the layers together securely. Proper quilt basting prevents the fabric from shifting and puckering while you are sewing the three layers together.
When deciding on a quilting pattern for your Kitten Quilt – Tutorial, you have several options. Straight-line quilting with a walking foot is beginner-friendly and creates a clean, modern look. Alternatively, free-motion quilting allows you to sew swirls, hearts, or even “meow” text across the surface, adding a playful energy to the finished quilt.
If you want the kittens to stand out in the Kitten Quilt – Tutorial, try stitch-in-the-ditch quilting. This technique involves sewing directly into the seams of the patchwork, which makes the kittens “pop” forward from the background. It is a subtle way to add structure without distracting from the feline design you worked so hard to create.
Once the quilting is done, square up the edges of your Kitten Quilt – Tutorial using your rotary cutter and ruler. This step removes the excess batting and backing, leaving you with clean, straight sides. A well-squared quilt is much easier to bind and will hang straight if you decide to use it as a decorative wall hanging.
Applying the quilt binding is the final “frame” for your Kitten Quilt – Tutorial. Double-fold French binding is the most durable method, ensuring the edges can withstand years of wear. You can sew the binding to the front by machine and then hand-stitch the fold to the back for a hidden, professional finish that looks beautiful from both sides.
Congratulations on completing your Kitten Quilt – Tutorial! Take the time to add a quilt label to the back with your name, the date, and the occasion. This small detail turns your craft project into a documented piece of history. Whether it’s for a gift or your own home, your handmade kitten quilt is now ready to be enjoyed.
FAQ – Frequently Asked Questions
Is a Kitten Quilt – Tutorial suitable for absolute beginners?
Yes, while some parts require precision, a Kitten Quilt – Tutorial can be adapted for beginners by using simpler square-based patterns and avoiding complex curves. Starting with larger blocks can also make the piecing process much more manageable for those new to the craft.
What is the best batting to use for a Kitten Quilt – Tutorial?
A cotton-poly blend batting is often recommended for a Kitten Quilt – Tutorial because it offers the breathability of cotton with the durability and “loft” of polyester. This helps the quilted kittens look slightly raised and keeps the quilt warm without being too heavy.
How long does it take to complete a Kitten Quilt – Tutorial?
The timeframe for a Kitten Quilt – Tutorial depends on the size of the quilt and your experience level. A baby-sized quilt might take 10 to 15 hours, while a full-sized bed quilt with intricate kitten applique could take several weeks of dedicated work.
Can I machine wash my finished Kitten Quilt – Tutorial?
Yes, most cotton quilts are machine washable. It is best to use a gentle cycle with cold water and a mild detergent. Using color catchers during the first wash is a great tip for any Kitten Quilt – Tutorial to ensure the dark kitten fabrics don’t bleed into the lighter background.
What are the must-have tools for a Kitten Quilt – Tutorial?
Essential tools include a reliable sewing machine, a 1/4 inch presser foot, sharp fabric shears, and a quality iron. For the specific Kitten Quilt – Tutorial details, you will also benefit from having embroidery needles and a fabric marking pen.
How do I choose the background color for a Kitten Quilt – Tutorial?
For a Kitten Quilt – Tutorial, a neutral background like cream, light gray, or soft blue usually works best. This allows the colors of your patchwork kittens to be the star of the show and prevents the overall quilt layout from looking too busy or cluttered.
Conclusion
In this Kitten Quilt – Tutorial, we have explored every essential step to creating a beautiful, cat-themed masterpiece. From selecting the best quilting fabrics and mastering precise cutting techniques to adding personality with embroidery and applique, you now have the knowledge to complete this project from start to finish.
We covered the importance of consistent seam allowances, the benefits of proper pressing, and the final steps of layering, quilting, and binding to ensure your work lasts for years.